m (→Bonus: linked two necro skills references) |
(→Hard mode: 2-character end-game mission and bonus) |
||
| Line 74: | Line 74: | ||
A single character with Heroes and Henchman can do the mission and also the bonus in separate attempts, with a running skill like [[Enchanted Haste]]. For the mission you can post your party anywhere out of the way and simply run crystals, prioritizing first the NW portal, then the NE portal, and finally the SW portal. You may end up attuning 6 portals. For the bonus you'd post your party between the NW and SW portals while you attune the NW and NE portals (probably NW, NE, then NW again), pick up a crystal and run with your party to the SW portal and attune it, then lead them counter clockwise wide through the area, bypassing the White Mantle and attacking the [[Demagogue]]. You will have time to kill him before the mantle attune all the portals. |
A single character with Heroes and Henchman can do the mission and also the bonus in separate attempts, with a running skill like [[Enchanted Haste]]. For the mission you can post your party anywhere out of the way and simply run crystals, prioritizing first the NW portal, then the NE portal, and finally the SW portal. You may end up attuning 6 portals. For the bonus you'd post your party between the NW and SW portals while you attune the NW and NE portals (probably NW, NE, then NW again), pick up a crystal and run with your party to the SW portal and attune it, then lead them counter clockwise wide through the area, bypassing the White Mantle and attacking the [[Demagogue]]. You will have time to kill him before the mantle attune all the portals. |
||
| + | |||
| + | Two characters can easily do the end-game mission and bonus; a runner with a 25% movement bonus (such as a [[Blue Rock Candy]]) and anybody who can quickly defeat the level 24 warrior Demagogue, such as a Spirit Spammer. The runner should attune the first portal, the killer grabs a crystal and attunes the W portal on his way, counter-clockewise, to kill the Demagogue. The killer keeps right sleeve against the outside wall. The runner just needs to keep running, and avoid the group defending the enemy runner, and make sure the Bonus is acquired before attuning all the portals. There is no real need to fight the mantle in this area. |
||
==Creatures== |
==Creatures== |
||
Revision as of 02:55, 8 July 2010
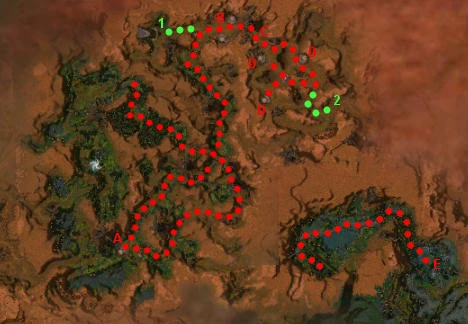
Aurora Glade Mission map
This is a mission entry. For information on the location Aurora Glade, see Aurora Glade (location).

This article has an associated Zaishen Challenge Quest.
Mission Objectives
Gain access to the Henge of Denravi.
- Get to the Henge Portal.
- Attune the Henge Portal before the White Mantle do it.
- ADDED Attune the thorn pedestal to clear the vine gate.
- BONUS Assassinate the Demagogue.
- ADDED Attune both thorn pedestals to clear the vine gate.
- ADDED Kill the Henge Guardian.
Walkthrough
Primary
The Henge Guardian
The mission begins with an easy but long run through the jungle. Attune the first pedestal to clear the vines blocking the path (A on the map). To do so, talk with the druid, take a rune crystal from the thorn pedestal next to him and place it on the other thorn pedestal. Fight on until you get to a spot with two pedestals, one on each side (B on the map). To open the way forward, both pedestals need to be attuned with crystals. Doing this starts the White Mantle running to attune the Henge Portal, so make sure you have your tactics discussed first. Attune the Henge Portal by attuning all three pedestals with crystals before the White Mantle succeed in attuning them all. The crystals are located at point C on the map and the pedestals at the three point Ds on the map. If you control all three capture points simultaneously, you trigger the cut scene and advance to the end portion of the mission. If the White Mantle controls all three simultaneously, you fail the mission.
After the pedestals are attuned, a cinematic plays and you are transported into the henge. There you need to kill the Henge Guardian, a level 20 Behemoth and his two Root Behemoths; this should be an fairly easy fight with the Behemoth tending to deal less damage than the two minions. Afterwards, another cutscene plays and you will find yourself at the Henge of Denravi.
Crystal running
Your group and the White Mantle each get a thorn pedestal that produces crystals. While you can take the crystal from either one, they guard and use the one to the southeast, and leave the one to the northwest alone. When a crystal is placed on one of the thorn pedestals at a capture point (D on the map), that side claims that capture point. Capture points can be claimed by either side, and can change hands many times. The change in ownership of a capture point is pinged on the map. The capture point is marked red if controlled by the White Mantle, blue if controlled by your group, and white if controlled by neither.
A pedestal will respawn a crytal after the one taken is used or dropped. Be aware that switching weapons or using some warping skills will cause you to drop (and hence destroy) your crystal. If in doubt, test them while holding a crystal earlier in the mission.
Perhaps the easiest way to advance past the area is to kill all the White Mantle in the area, so that they can no longer capture any thorn pedestals. Flag your group slightly in front of the northwest capture point, while one player is a runner. If alone with only heroes and henchmen, you're the runner; otherwise, pick one player to be the runner while the rest guard the capture point.
Pick up the crystal at your crystal spawn point and use it to attune the nearby capture point. Go back and pick up another crystal, then go to the northeast capture point and wait. When a group of White Mantle gets near taking the northwest capture point, use your crystal to attune the northeast, and run back to the northwest one. It is important that you wait until the enemy runner gets close to the northwest crystal, or he may use it to attune the northeast capture point instead, eliminating your advantage of not having to run nearly as far as he does.
The rest of the group kills the mobs that escort the enemy runner, but should let the runner pass through unharmed, although applying slow skills is desirable. Killing the runner makes another White Mantle become a new runner--and he's often standing right next to the crystal spawn point, reducing the amount of time you have.
The runner in your group can join the fight for a bit, but shouldn't wait too long before attuning the northwest capture point again. It is imperative that you reclaim it before the White Mantle reclaim the northeast capture point, though this gives you quite a bit of time. Your runner can also join in the fight for a while after attuning the northwest capture point, but must leave to get a crystal and head back to the northeast capture point before the White Mantle runner makes it back to the northwest one.
The enemy runner has to run perhaps 2-3 times as far as you do, so you have a lot of time, but not an infinite amount of time. Run speed skills can help a bit, but aren't necessary.
Henchmen are plenty strong enough to handle all of the fighting on their own, but not quite smart enough. You may have to reflag them to move lightly armored ones out of Searing Heat (as you'd have to do throughout the mission if it's necessary here). You may also need to flag them ahead and call a target to get them to kill White Mantle Abbots that tend to stay back and heal.
White Mantle do not respawn, so after killing several groups, the runner will eventually come alone. When that happens, kill him and you can attune the crystals at your leisure. If you're doing the bonus, the Demagogue will be all alone at this point, and hence an easy kill.
Bonus
Rescue the warrior Less Longbow from the White Mantle attacking him (1 on the map). He will tell you of the Demagogue, a powerful member of the Mantle, whom you should kill.
When you first catch sight of Less Longbow on your radar, pause a moment and observe if he is being attacked by the two White Mantle Knights near him. The Knights' attack script is not triggered until you come too close to Less, which means that if you wait long enough, Less will be able to slaughter the two Knights all by himself and will therefore be in no danger. If, however, you come too close, the two White Mantle Knights will start pummeling Less. He can take some punishment and uses Healing Signet liberally, but if you defeat the nearby boss just before reaching him the knights activate "I Will Avenge You!", which is a problem. In this scenario, you'll have to quickly rush to Less' aid before he dies. If you have a human-controlled monk in your party, send him on ahead to keep Less alive until the rest of the group can get there. A Ranger with Throw Dirt and a running skill can also keep Less alive for a few more crucial seconds. Quite often, Less may spawn in the rear area and the White Mantle Knights will not be able to reach him. In that case, he is in no danger as the Knights don't seem to move.
There is another path just before that area, guarded by two White Mantle, hidden by a house/bush figure. You can climb it and only have to deal with the two White Mantle instead of the groups.
If you do the crystal attuning portion by killing all of the White Mantle as described above, killing the Demagogue before attuning the final thorn pedestal is very easy.
Alternate Route: Another way to do the mission and bonus is to Necrotic Traversal or Consume Corpse over the gate on the corpse of a warthog. Do this before you open the vine gate, and only the Demagogue will spawn. Either bring a build capable of soloing him, or have everyone kill themselves using vamp weapons or saccing skills, and rebirth them through. This allows you to take your time in killing the Demagogue without worry of the mantle attuning the portals. Note: The warthog very seldom spawns in a location that makes this possible
Tip: Another way to do the Bonus is by force-killing the Demagogue. It's the fastest way, but there's no assurance that you can complete the Mission afterwards. Therefore, doing the Bonus this way is meant for players who already did the Mission. As you get the crystal, let the White Mantle attune the left pedestal. Let them go (do not attack) and then attune it yourself. Now, run to the right path, past the middle pedestal, and wait for the White Mantle runner to come back to attune the left pedestal again. As they leave his quarters, rush there (by the right path), ignore the White Mantle there (you can possibly avoid aggroing them) and go straight to the Demagogue. Throw everything you've got at him; hopefully you will kill him and complete the Bonus. Also, you can choose to avoid the crystals altogether and head straight for the Demagogue, again, taking the rightmost path. If you want to take a risk, you can leave 2 or 3 of your party behind with running skills and have them attempt to attune the pedestals while you are killing the Demagogue. However, be sure that they don't attune them before Bonus is complete.
Note: Occasionally the White Mantle will send out a group which does not contain a runner; these will sit around one of the pedestals as if to guard it. Be wary of engaging these longer than necessary, as it is all too easy for a runner to slip in during the combat and claim the pedestal. If you see a large group of more than 4-5 approaching, chances are it is a "guard" group and a runner group combined. If this happens you should retreat, since you will be overwhelmed by numbers should you choose to fight them all at once.
Note: Even if you fail the mission before completing the bonus, it is possible to still get the bonus if you have lowered the Demagogue's health enough and have placed degen skills on him before the failed mission kills your party. You then just sit and wait for the degen to kill the Demagogue, get the bonus, and then return to outpost.
Note: It is possible to steal the enemy crystal from their pedestal while they are distracted. You use it to attune a portal for yourself, or simply keep it from them.
Note: If, for any reason, you kill the Demagogue before speaking to Less Longbow and get the bonus objective, you won't get the reward, even if he is dead.
Hard mode
The normal mode tactics for the crystal attuning area almost work in hard mode. The mobs run faster, so it helps if your runner has a movement speed skill, but it isn't entirely necessary.
The big problem is that there are three White Mantle Abbots, which are now pretty potent healers. Their healing and defensive skills are almost entirely enchantments, so heavy enchantment removal can greatly diminish their healing. Shatter Storm works especially well, even when used by a hero. However, if two or three abbots come up to heal, in addition to a group, it can take quite a while to wear them down. If the next group reaches the party defending the northwest capture point before the previous group is dead, it can be big trouble.
The abbots can often be prevented from coming prematurely if the party will stay way back at the northwest capture point, instead of coming out further to attack. This doesn't always work, but when it does, it makes the mission pretty easy.
More importantly, the crystal runner can buy the group at the northwest capture point more time to kill a group. Rather than waiting until the white mantle gets close to the northwest capture point to claim the northeast one, grab it while they are still far away. The white mantle runner will then take the northeast capture point, and his convoy will see no one there to fight, and head back to the white mantle base, along with their runner. Do this as many times as necessary until the rest of the party can kill the previous group at the northwest capture point, and then revert to the usual tactics to funnel one group to the rest of the party at a time.
A single character with Heroes and Henchman can do the mission and also the bonus in separate attempts, with a running skill like Enchanted Haste. For the mission you can post your party anywhere out of the way and simply run crystals, prioritizing first the NW portal, then the NE portal, and finally the SW portal. You may end up attuning 6 portals. For the bonus you'd post your party between the NW and SW portals while you attune the NW and NE portals (probably NW, NE, then NW again), pick up a crystal and run with your party to the SW portal and attune it, then lead them counter clockwise wide through the area, bypassing the White Mantle and attacking the Demagogue. You will have time to kill him before the mantle attune all the portals.
Two characters can easily do the end-game mission and bonus; a runner with a 25% movement bonus (such as a Blue Rock Candy) and anybody who can quickly defeat the level 24 warrior Demagogue, such as a Spirit Spammer. The runner should attune the first portal, the killer grabs a crystal and attunes the W portal on his way, counter-clockewise, to kill the Demagogue. The killer keeps right sleeve against the outside wall. The runner just needs to keep running, and avoid the group defending the enemy runner, and make sure the Bonus is acquired before attuning all the portals. There is no real need to fight the mantle in this area.
Creatures
NPCs
- Human
 15 Less Longbow
- 20 Markis (cutscene only)
- 20 Saidra (cutscene only)
- 20 Evennia (cutscene only)
- Spirit
- 20 Druid
Animals
- 5 Warthog
Monsters
- Behemoth
- 19 (25)Root Behemoth
- Devourer
- 17 (25)Thorn Devourer
- 17 (25)Fevered Devourer
- Human
- 16 (25) Demagogue
- 16 (25) White Mantle Knight
- 16 (25) White Mantle Seeker
- 18 (25) White Mantle Abbot
- 16 (25)White Mantle Ritualist
- 16 (25) White Mantle Sycophant
- 16 (25) White Mantle Savant
- Plant
- 17 (25) Thorn Stalker
- Rider
- 12 (24) Wind Rider
- Scarab
- 12 (24) Moss Scarab
- Spider
- 16 (25)Maguuma Spider
- Troll
- /18 (25)Jungle Troll
Bosses (skill captures)
- Behemoth
- 20 (25)Henge Guardian
- Plant
- 18 (28) Tree of Vitality
- Human
- 20 (29) Holt the Iron Boot Heel
- 20 (29) Cuthbert the Chaste - Dryder's Defenses (unavailable before Marhan's Grotto)
- 20 (29)Garr the Merciful - Convert Hexes (unavailable before Camp Rankor)
- Divine Intervention (unavailable before Copperhammer Mines)
- 20 (29) Kenric the Believer - Order of Pain (unavailable before Port Sledge)
- Well of the Profane (unavailable before The Misplaced Sword at Heroes' Audience))
- 20 (29) Lars the Obeisant - Guilt (unavailable before The Misplaced Sword at Heroes' Audience)
- 20 (29) Manton the Indulgent - Glyph of Elemental Power (unavailable before Port Sledge)
- Searing Heat (unavailable before Copperhammer Mines)
- Rider
- 18 (28)Chott Stormsinger
- 18 (28) Wydd Kindlerun
- Spider
- Troll
- /20 Grook Plugalug
Dialogues
Briefing from Elder Gretchen.
Inside the mission
Less Longbow: You'll not take me alive, you cultist creeps!...I am grateful for your aid. You have my eternal gratitude. You must know, the White Mantle are led by a wicked evil man. He's their champion. They call him the Demagogue. He drives the Mantle forward. They will do anything he asks. Until he has been brought down, the Mantle will always have strength.
Ending cutscene
<party leader>: Thank you.
Evennia: Now we have a safe place from which to strike back at the White Mantle. Today the tides have been turned. Come on. The old druid temple should be just over the waterfall. It's time to take a look at our new home.
Voice of Glint: A new chapter now lies open for Tyria. The page has been turned, and the conflict begins in earnest. All is as I have foreseen.Follow-up
- The players will be in the Henge of Denravi at the completion of this mission.
- To continue the storyline, take on the following Primary Quest: Passage Through The Dark River from Shadow.
Notes
- Complete exploration of the mission area will add approximately 1.0% to the Tyrian Cartographer title. The first 0.7% can be explored before the cutscene that teleports you to the last bit of the mission, leaving 0.3% to be explored before you kill the Henge Guardian.
