m (Upgraded Youtube tag) |
|||
| (6 intermediate revisions by 5 users not shown) | |||
| Line 7: | Line 7: | ||
* Protect the [[Baby Dragon]] at all costs. |
* Protect the [[Baby Dragon]] at all costs. |
||
** Survive as many waves of attackers as possible. |
** Survive as many waves of attackers as possible. |
||
| − | ** Destroy enemy waves quickly to earn points; the faster you kill the more points you earn; |
+ | ** Destroy enemy waves quickly to earn points; the faster you kill the more points you earn; |
**Earn bonus points for each Dwarf defender who survives the assault. |
**Earn bonus points for each Dwarf defender who survives the assault. |
||
| Line 16: | Line 16: | ||
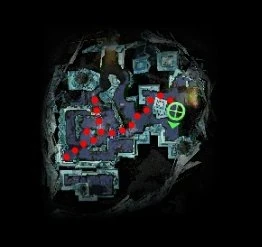
The main mission area contains three entrances to a room with the baby dragon. The rear entrance connects to an elevated loop that encircles the arena. There are two side gates which lead to pathways and monster spawn points. In the center, the baby dragon rests on an elevated platform. |
The main mission area contains three entrances to a room with the baby dragon. The rear entrance connects to an elevated loop that encircles the arena. There are two side gates which lead to pathways and monster spawn points. In the center, the baby dragon rests on an elevated platform. |
||
===Primary=== |
===Primary=== |
||
| − | * The first wave consists of a constant swarm of weak level 15 and 10 [[Destroyer of Souls|Destroyers of Souls]] and [[Destroyer of Hordes|Destroyers of Hordes]], along with some level 20 [[Destroyer of Thoughts|Destroyers of Thoughts]] for about 3 minutes. |
+ | * The first wave consists of a constant swarm of weak level 15 and 10 [[Destroyer of Souls|Destroyers of Souls]] and [[Destroyer of Hordes|Destroyers of Hordes]], along with some level 20 [[Destroyer of Thoughts|Destroyers of Thoughts]] for about 3 minutes. Splitting into two groups along the two paths and killing the monsters at their spawn points is effective. |
| − | * The second wave consists of [[Destroyer of Compassion|Destroyers of Compassion]] and [[Destroyer of Deeds|Destroyers of Deeds]]. The Destroyers of Deeds [[block]] most attacks with [[Lightning Reflexes]], making this the hardest wave for groups consisting mainly of [[physical damage]]rs. |
+ | * The second wave consists of [[Destroyer of Compassion|Destroyers of Compassion]] and [[Destroyer of Deeds|Destroyers of Deeds]]. The Destroyers of Deeds [[block]] most attacks with [[Lightning Reflexes]], making this the hardest wave for groups consisting mainly of [[physical damage]]rs. They also use [[Debilitating Shot]], [[Broad Head Arrow]] and [[Savage Shot]], which can incapacitate your casters. Meanwhile, the Destroyers of Compassion will try to wreck your [[backline]]. |
* In the third wave, [[Destroyer of Hope|Destroyers of Hope]] and Destroyers of Thoughts dig out of the ground throughout the main area. Due to the lack of offensive firepower they possess on their own, this wave is more of a matter of persevering and making sure that the baby dragon is not targeted. |
* In the third wave, [[Destroyer of Hope|Destroyers of Hope]] and Destroyers of Thoughts dig out of the ground throughout the main area. Due to the lack of offensive firepower they possess on their own, this wave is more of a matter of persevering and making sure that the baby dragon is not targeted. |
||
* The fourth wave consists of Destroyers of Compassion, [[Destroyer of Flesh|Destroyers of Flesh]], [[Destroyer of Sinew|Destroyers of Sinew]], [[Destroyer of Bones|Destroyers of Bones]], and a few Destroyers of Souls coming down the side and rear exits. |
* The fourth wave consists of Destroyers of Compassion, [[Destroyer of Flesh|Destroyers of Flesh]], [[Destroyer of Sinew|Destroyers of Sinew]], [[Destroyer of Bones|Destroyers of Bones]], and a few Destroyers of Souls coming down the side and rear exits. |
||
| Line 24: | Line 24: | ||
===Tips=== |
===Tips=== |
||
| − | * A group with 2 Necromancer [[Minion Master]]s works well due to the large number of bodies, but be |
+ | * A group with 2 Necromancer [[Minion Master]]s works well due to the large number of bodies, but be careful as the [[Destroyer of Compassion|Destroyers of Compassion]] have [[Banishing Strike]]. |
* Barragers and [[Area of Effect]] damage is very effective. |
* Barragers and [[Area of Effect]] damage is very effective. |
||
* Hex and condition based [[Debuff]]s are effective, particularly [[weakness]], as is large amounts of blocking, as most of the significant damage comes from attacks. |
* Hex and condition based [[Debuff]]s are effective, particularly [[weakness]], as is large amounts of blocking, as most of the significant damage comes from attacks. |
||
| Line 54: | Line 54: | ||
===Bosses=== |
===Bosses=== |
||
*[[Destroyer]]s |
*[[Destroyer]]s |
||
| − | **{{w}}28 [[Hand of Destruction]] |
+ | **{{w}}28 [[Hand of Destruction]] ([[Flourish]]), ([[Devastating Hammer]]) |
**{{w}}28 [[Heart of Destruction]] ([[Skull Crack]]) |
**{{w}}28 [[Heart of Destruction]] ([[Skull Crack]]) |
||
**{{n}}28 [[Flesh of Destruction]] ([[Soul Leech]]) |
**{{n}}28 [[Flesh of Destruction]] ([[Soul Leech]]) |
||
**{{me}}28 [[Mind of Destruction]] ([[Hex Eater Vortex]]) |
**{{me}}28 [[Mind of Destruction]] ([[Hex Eater Vortex]]) |
||
| + | ==Videos== |
||
| + | |||
| + | * Excellent Guide on how to do the Mission<br />[[File:Guild Wars - Glint's Challenge AFK-Mode HD|640]] |
||
==Notes== |
==Notes== |
||
Latest revision as of 20:35, 17 June 2013
Mission map
Overview
Obtained from Consular Brand Oakencask in the Central Transfer Chamber
Objectives
- Protect the Baby Dragon at all costs.
- Survive as many waves of attackers as possible.
- Destroy enemy waves quickly to earn points; the faster you kill the more points you earn;
- Earn bonus points for each Dwarf defender who survives the assault.
Rewards
After defeating the final wave, a Chest of the Brotherhood spawns, containing a Cloth of the Brotherhood and a Destroyer Core for each member of the party.
Walkthrough
The main mission area contains three entrances to a room with the baby dragon. The rear entrance connects to an elevated loop that encircles the arena. There are two side gates which lead to pathways and monster spawn points. In the center, the baby dragon rests on an elevated platform.
Primary
- The first wave consists of a constant swarm of weak level 15 and 10 Destroyers of Souls and Destroyers of Hordes, along with some level 20 Destroyers of Thoughts for about 3 minutes. Splitting into two groups along the two paths and killing the monsters at their spawn points is effective.
- The second wave consists of Destroyers of Compassion and Destroyers of Deeds. The Destroyers of Deeds block most attacks with Lightning Reflexes, making this the hardest wave for groups consisting mainly of physical damagers. They also use Debilitating Shot, Broad Head Arrow and Savage Shot, which can incapacitate your casters. Meanwhile, the Destroyers of Compassion will try to wreck your backline.
- In the third wave, Destroyers of Hope and Destroyers of Thoughts dig out of the ground throughout the main area. Due to the lack of offensive firepower they possess on their own, this wave is more of a matter of persevering and making sure that the baby dragon is not targeted.
- The fourth wave consists of Destroyers of Compassion, Destroyers of Flesh, Destroyers of Sinew, Destroyers of Bones, and a few Destroyers of Souls coming down the side and rear exits.
- The fifth wave consists of Destroyers of Hope and Destroyers of Thoughts coming through all three exits, while Destroyers of Lives pop up within range of the Baby Dragon. Interrupt the Destroyers of Lives and dispatch them quickly.
- The sixth and final wave consists of four bosses: the Hand of Destruction, the Mind of Destruction, the Heart of Destruction, and the Flesh of Destruction.
Tips
- A group with 2 Necromancer Minion Masters works well due to the large number of bodies, but be careful as the Destroyers of Compassion have Banishing Strike.
- Barragers and Area of Effect damage is very effective.
- Hex and condition based Debuffs are effective, particularly weakness, as is large amounts of blocking, as most of the significant damage comes from attacks.
- Bringing PvE skills such as Pain Inverter, "You Move Like a Dwarf!", Alkar's Alchemical Acid, and "Finish Him!" will help you get out of tight spots like when the destroyers pop-up behind you.
- Bringing 3 healers is suggested, this way you shouldn't have to bring a resurrection. The Healer Henchmen along with a healer of your own will work just fine.
Creatures
NPCs
- Dwarf
 24 Dwarven Scout
 24 Dwarven Soldier
- Dragon
- 22 Baby Dragon
Monsters
- Destroyers
- 15, 28 Destroyer of Souls
- 10, 28 Destroyer of Hordes
- 20, 28 Destroyer of Thoughts
- 28 Destroyer of Compassion
- 28 Destroyer of Deeds
- 28 Destroyer of Flesh
- 28 Destroyer of Sinew
- 28 Destroyer of Bones
- 28 Destroyer of Hope
- 28 Destroyer of Lives
Bosses
Videos
- Excellent Guide on how to do the Mission
640
Notes
- The world map (using 'M') shows the location of the challenge to be directly beneath the Dragon's Lair in the Crystal Desert. The architecture and ambient music in the mission are also extremely similar to those of Glint's abode, even though it is accessed from the Central Transfer Chamber in the Far Shiverpeaks. This may be because of the Asura Gate transporting you back to the Crystal Desert.