(→General tips: Expanding the "ninja mode" description a little.) |
m (subst:historical, remove outdated info, unlink updates) |
||
| (11 intermediate revisions by 9 users not shown) | |||
| Line 55: | Line 55: | ||
; Grab some popcorn and enjoy the show |
; Grab some popcorn and enjoy the show |
||
| − | : Because |
+ | : Because cutscenes are rendered in-game, everywhere your character appears during one will count as if you had traveled there normally. For the most part, cutscenes take place in areas that you ''can'' explore normally, so watching them will simply save you some travel time, but there are a couple notable exceptions: |
:* [[Sanctum Cay (mission)|Sanctum Cay]]: The final cutscene takes place on a boat some distance from the shore. All party members will appear on the boat. |
:* [[Sanctum Cay (mission)|Sanctum Cay]]: The final cutscene takes place on a boat some distance from the shore. All party members will appear on the boat. |
||
:* [[Pogahn Passage (mission)|Pogahn Passage]]: The final cutscene again takes place on a boat, but only the party leader will appear. |
:* [[Pogahn Passage (mission)|Pogahn Passage]]: The final cutscene again takes place on a boat, but only the party leader will appear. |
||
| Line 75: | Line 75: | ||
; Ninja mode (Shadow step technique) |
; Ninja mode (Shadow step technique) |
||
| − | : Similar to the teleport technique, you can also use [[shadow step]] skills, particularly |
+ | : Similar to the teleport technique, you can also use [[shadow step]] skills, particularly {{skill icon|Heart of Shadow}} and {{skill icon|Viper's Defense}}, to jump across many [[area boundary|portals]] without actually triggering a [[zone]] transition. In some cases this provides access to areas that are otherwise inaccessible, while in other cases it provides access to areas without the usual enemy spawns. The details on how to use this in specific areas are given in the next section, but the general technique is as follows: |
| + | :# Determine the actual edge of the portal by flagging a hero progressively closer to it. Once the hero reaches the portal, it will teleport back to you. |
||
| + | :# Position your character at the edge of the portal and flag the hero away from you, directly opposite from the direction you want to shadow step. |
||
| + | :# Target the hero, activate Heart of Shadow/Viper's Defense, and you should be on the other side of the portal. |
||
| + | :* The technique usually works best at the edges of the portal, especially if you can shadow step at an angle such that you move even further from the center of the portal. |
||
| + | :* Most of the places where this technique works actually have little benefit for cartographers, so the specific areas that ''are'' beneficial are listed below. |
||
| + | :* Ongoing research on where this technique can be used, as well as more detailed information on the technique and video demonstrations of it, can be found at [[Area boundary/Portal jumping project]]. |
||
; Visit low level competitive arenas |
; Visit low level competitive arenas |
||
| Line 96: | Line 102: | ||
; [[Flame Temple Corridor]] and [[Dragon's Gullet]] |
; [[Flame Temple Corridor]] and [[Dragon's Gullet]] |
||
| + | : The shadow step technique can be used to jump the portal between these areas in either direction, allowing enemy-free exploration of both areas. |
||
| − | : Though you will gain no extra cartography points, it is possible to jump across either portal between these two zones using Heart of Shadow or Viper's Defense without triggering the normal rezone. This permits exploration of both zones without the mobs normally present. Once you have explored one zone with this technique, cross the portal normally to trigger the rezone and then jump across again to explore the other zone without mobs. |
||
; [[The Frost Gate (mission)]] |
; [[The Frost Gate (mission)]] |
||
| Line 108: | Line 114: | ||
; [[Nebo Terrace]] and [[Cursed Lands]] |
; [[Nebo Terrace]] and [[Cursed Lands]] |
||
| + | : The shadow step technique can be used to jump the portal between these areas in either direction, allowing enemy-free exploration of both areas. |
||
| − | : As with Flame Temple Corridor and Dragon's Gullet, it is possible to shadow step through the portals between these zones without triggering them. This works with either portal. The only cartography benefit is being able to explore each zone without the mobs present; this will net no extra points. |
||
; [[Aurora Glade (mission)]] |
; [[Aurora Glade (mission)]] |
||
| Line 122: | Line 128: | ||
: There is a spot along the eastern edge where you can seemingly climb up the wall into a hidden area. |
: There is a spot along the eastern edge where you can seemingly climb up the wall into a hidden area. |
||
| − | ; [[Spearhead Peak]] |
+ | ; [[Granite Citadel]] and [[Spearhead Peak]] |
| − | : |
+ | : The shadow step technique can be used to jump the portal from [[Tasca's Demise]] into the Granite Citadel, after which you can simply walk into Spearhead Peak to explore the area with no enemies. |
; [[Thunderhead Keep (mission)]] |
; [[Thunderhead Keep (mission)]] |
||
: After defeating [[Confessor Dorian]], the mission will not end until you speak to [[King Jalis Ironhammer]]. This gives you freedom to explore the area around the keep at your leisure. |
: After defeating [[Confessor Dorian]], the mission will not end until you speak to [[King Jalis Ironhammer]]. This gives you freedom to explore the area around the keep at your leisure. |
||
| + | |||
| + | ; [[Anvil Rock]] |
||
| + | :There is a small area that can be cleared if you take a right out of [[Ice Tooth Cave]]. It leads into the mountains. |
||
=== Cantha === |
=== Cantha === |
||
| Line 139: | Line 148: | ||
; Exclusive areas in Kurzick and Luxon outposts |
; Exclusive areas in Kurzick and Luxon outposts |
||
| − | : Outposts in [[Echovald Forest]] and the [[Jade Sea]] have an exclusive area that can only be accessed by members of the [[alliance]] that controls the outpost. Generally these can be mapped from the surrounding area without actually entering them, although there are a |
+ | : Outposts in [[Echovald Forest]] and the [[Jade Sea]] have an exclusive area that can only be accessed by members of the [[alliance]] that controls the outpost. Generally these can be mapped from the surrounding area without actually entering them, although there are a few exceptions. |
; [[Monastery Overlook]] |
; [[Monastery Overlook]] |
||
: This area is only accessible to newly-created Factions characters, and it cannot be re-accessed once you enter [[Shing Jea Monastery]]. In order to access the entire area, you must take the quest [[Mantid Hatchlings]] from [[Instructor Ng]]. The [[Shing Jea Boardwalk]] occupies the same place on the map, and can be accessed by all characters during many [[special event]]s. |
: This area is only accessible to newly-created Factions characters, and it cannot be re-accessed once you enter [[Shing Jea Monastery]]. In order to access the entire area, you must take the quest [[Mantid Hatchlings]] from [[Instructor Ng]]. The [[Shing Jea Boardwalk]] occupies the same place on the map, and can be accessed by all characters during many [[special event]]s. |
||
| − | : |
+ | : Alternatively, the shadow step technique can be used to jump the portal from [[Linnok Courtyard]] into the Monastery (or even from [[Saoshang Trail]] into the Courtyard). The gate to the Overlook will appear closed, but you can walk through it. |
; [[Vizunah Square (Foreign Quarter)]] and [[Vizunah Square (Local Quarter)]] |
; [[Vizunah Square (Foreign Quarter)]] and [[Vizunah Square (Local Quarter)]] |
||
| Line 161: | Line 170: | ||
[[image:Eredon_Bug_Map.jpg|thumb|The exclusive area in Eredon Terrace]] |
[[image:Eredon_Bug_Map.jpg|thumb|The exclusive area in Eredon Terrace]] |
||
; [[Eredon Terrace]] |
; [[Eredon Terrace]] |
||
| − | : The exclusive area in this outpost is fairly large due to a terrain glitch and cannot be mapped without entering it. |
+ | : The exclusive area in this outpost is fairly large due to a terrain glitch and cannot be mapped without entering it. The shadow step technique can be used to jump the portal from [[Maishang Hills]] into the outpost, after which you can walk through the closed gate into the exclusive area. |
; [[Saint Anjeka's Shrine]] |
; [[Saint Anjeka's Shrine]] |
||
| Line 171: | Line 180: | ||
; [[Unwaking Waters (mission)]] vs. [[Unwaking Waters (explorable)]] |
; [[Unwaking Waters (mission)]] vs. [[Unwaking Waters (explorable)]] |
||
: The mission and explorable area actually occupy the two arms of a double spiral, requiring both areas to be explored individually. |
: The mission and explorable area actually occupy the two arms of a double spiral, requiring both areas to be explored individually. |
||
| + | |||
| + | ; [[Raisu Palace (explorable)]] |
||
| + | : The shadow step technique can be used to jump the portal from [[Raisu Pavilion]] into [[Raisu Palace (location)]]. You will want to shadow step diagonally across the wall corner immediately behind the portal, after which you should still hug the wall until you are well clear of the portal; the [[Canthan Guard]] near the portal is in an ideal position for this. After jumping into the outpost, you can walk into the explorable area, which you can explore with no enemies. |
||
| + | |||
| + | ; [[Divine Path]] |
||
| + | : The shadow step technique can be used to jump the portal from the Raisu Palace explorable into [[Imperial Sanctum (location)]]. (Alternatively, you use the Raisu Palace jump above, run the length of the explorable, and simply walk into Imperial Sanctum.) In the southeast corner of the outpost, where the Xunlai Agent normally stands, is a closed door to the south that you can pass through to access the Divine Path. In this room, there is another door to the east that you can pass through, leading to a small area that is normally inaccessible. |
||
; [[Imperial Sanctum (mission)]] |
; [[Imperial Sanctum (mission)]] |
||
: Be sure to explore the area that Shiro sends characters to with [[Echoing Banishment]]. To make sure you get banished, enter the mission with one other player (Shiro will not banish you if you are the only player in the party), and if you bring AI characters, only use heroes, not henchmen (Shiro will banish henchmen but not heroes). Have the other player stay back when you initially engage Shiro, and you should get banished. |
: Be sure to explore the area that Shiro sends characters to with [[Echoing Banishment]]. To make sure you get banished, enter the mission with one other player (Shiro will not banish you if you are the only player in the party), and if you bring AI characters, only use heroes, not henchmen (Shiro will banish henchmen but not heroes). Have the other player stay back when you initially engage Shiro, and you should get banished. |
||
| − | : A normally inaccessible area of the mission can be reached by jumping across either the portal between [[Raisu Palace (explorable)]] and [[Imperial Sanctum (location)]] or the portal between [[Raisu Pavilion]] to [[Raisu Palace (location)]] without triggering the normal rezone. Both are fairly difficult jumps, requiring using Heart of Shadow or Viper's Defense to shadow step diagonally through the walls immediately beside either portal. Note that in Raisu Pavilion, the [[Canthan Guard]] standing near the portal is in an ideal position to serve as a target for the relevant shadow stepping skills, making this the easier jump. In both cases, stay near the walls after a successful jump until you are well clear of the portal. The inaccessible area is reached by passing through the closed doors in the south of the Raisu Palace explorable area; the explorable area can also be explored without mobs with this technique. |
||
=== Elona === |
=== Elona === |
||
| Line 190: | Line 204: | ||
; [[Beknur Harbor]] |
; [[Beknur Harbor]] |
||
| + | : The shadow step technique can be used to jump the portal from either [[Cliffs of Dohjok]] or [[Issnur Isles]], allowing exploration of the normally inaccessible corridor between the outpost and the Cliffs. |
||
| − | : |
||
| − | :*From [[Issnur Isles]], it is possible to shadow step through the wall using Heart of Shadow or Viper's Defense around Beknur Harbor past the portal to explore a normally inaccessible area. |
||
| − | :*From [[Cliffs of Dohjok]], shadow stepping around the portal allows exploration of the normally inaccessible between Cliffs of Dohjok and Beknur Harbor. |
||
; [[Consulate Docks (mission)]] vs. [[Pogahn Passage (mission)]] vs. [[Gandara, the Moon Fortress]] |
; [[Consulate Docks (mission)]] vs. [[Pogahn Passage (mission)]] vs. [[Gandara, the Moon Fortress]] |
||
| − | : These three instances take place on the same map, although |
+ | : These three instances take place on the same map, although the Pogahn Passage mission is the only one that allows access to the entire area (portions of the area will be closed off in the other two instances). It also allows you free exploration without any enemies: nothing spawns in the area north of the fortress, and all the Kournans in the fortress will be neutral until you free Kormir and Shahai. |
| − | ; [[Arkjok Ward |
+ | ; [[Arkjok Ward]] |
| − | : |
+ | : The shadow step technique can be used to jump the portal to Marga Coast, allowing exploration of the normally inaccessible corridor between the two areas. |
| − | ; [[Marga Coast |
+ | ; [[Marga Coast]] |
| + | : The shadow step technique can be used to jump the portal to [[Sunspear Sanctuary]], but with a slight variation, as this portal does not trigger the usual teleportation of heroes. You will need a shadow step that moves you to an ally, such as [[Recall]]. Flag the hero past the portal, then activate your shadow step to explore the normally inaccessible area behind this portal. |
||
| − | : It is possible to flag a hero or henchman on the other side of the portal from Marga Coast to Sunspear Sanctuary. If the hero or henchman is flagged around the corner but not too far from your location, you can shadow step to the hero or henchmen, allowing exploration of a portion of the map that is not otherwise accessible. |
||
| − | ; [[Turai's Procession |
+ | ; [[Turai's Procession]] |
| − | : |
+ | : The shadow step technique can be used to jump the portal to the [[Command Post]] for exploration of this small, inaccessible area. |
; [[Chantry of Secrets]] |
; [[Chantry of Secrets]] |
||
| Line 210: | Line 222: | ||
; [[Tihark Orchard (mission)]] vs. [[Garden of Seborhin]] |
; [[Tihark Orchard (mission)]] vs. [[Garden of Seborhin]] |
||
| − | : During the mission, all the exits from the garden are blocked off by [[Vabbian Guard]]s. However |
+ | : During the mission, all the exits from the garden are blocked off by [[Vabbian Guard]]s. However, by using a skill that shadow steps to an ally, shadow stepping to one of the Vabbian Guards can place you on the opposite side, allowing enemy-free exploration of the rest of the area. Alternatively, if you wait for the Skree to attack, you can make them move by pulling some of the Skree to within their aggro range. |
| − | ; [[Resplendent Makuun |
+ | ; [[Resplendent Makuun]] |
| − | : |
+ | : The shadow step technique can be used to jump the portal to the [[Wilderness of Bahdza]], allowing exploration of the normally inaccessible corridor between the two areas. |
; [[Dynastic Tombs]] ([[Remains of Sahlahja (mission)]]) |
; [[Dynastic Tombs]] ([[Remains of Sahlahja (mission)]]) |
||
| Line 223: | Line 235: | ||
*[http://www.youtube.com/watch?v=94UKgd4nHvo TexMod and Cartography Made Easy guide] |
*[http://www.youtube.com/watch?v=94UKgd4nHvo TexMod and Cartography Made Easy guide] |
||
| − | |||
| − | == Notes == |
||
| − | {{Historical|At one time, [[The Undercity]] counted for the Canthan Cartographer title.}} |
||
==See also== |
==See also== |
||
Latest revision as of 17:37, 4 April 2011
Overview
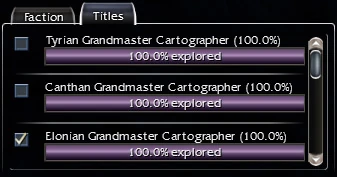
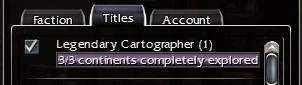
The Cartographer titles are gained per character by exploring the primary map of each continent. Any area viewable when viewing the world map counts towards the title. This includes the following:
- Explorable areas
- Mission zones (cooperative, challenge and competitive)
- Arenas not on the Battle Isles
- Towns and Outposts including exclusive areas for Canthan outposts
It does not include any area which is not shown on the world map of any continent. This includes the following:
- In Tyria:
- Pre-Searing Ascalon (this area has its own explorable map)
- The Dragon's Lair mission location
- The Dragon's Lair mission area
- Sorrow's Furnace
- In Cantha:
- In Elona:
- Core areas: Any area that appears on The Battle Isles or shows the Battle Isles map, this includes:
- The Battle Isles themselves
- The Fissure of Woe
- The Underworld
A fully explored area equal to the size of the radar around a player equals roughly 0.1% of Cantha. The percentage is less for Tyria (about 0.07%) as it is a larger continent.
To gain the Grandmaster Cartographer title, a character does not need to explore every single point on the map. Some margin of error is allowed. As a result, even though some characters may never be able to access some portions of the map, they may still earn 100% explored. Unreachable zones would most likely be arenas that have been rendered inaccessible due to a game update (such as Fort Koga) or due to level limits (such as the Shing Jea Arena). Again, these zones do count towards the titles for those who revealed them, but they do not make it impossible for those who cannot to obtain the grandmaster title.
General tips
A video guide covering basic cartography techniques can be seen here.
- Scrape
- In order to get every bit of map around the perimeter of an area, you will need to walk your character along the very edge of the accessible terrain. When doing this, keep your character turned slightly towards the edge, so that your character is literally "scraping" along it. Also, do not use the mouse when scraping, especially the click-to-move feature, as it is nearly impossible to click precisely along the edge or exactly at the inner point of every nook and cranny. (On the other hand, there are some hard-to-access spots that are easier to find using click-to-move, but these will be noted in detail in the next section.)
- There and back again
- After you've scraped an edge in one direction, turn around and scrape in the other direction. It is common to "discover" additional nooks when going backwards that you missed the first time, and you will often reveal additional slivers of the map this way.
- Slow down
- You may be tempted to use running skills to make the mapping process quicker. There's nothing wrong with using them to reach the edge of an area, but do not use them while scraping. Doing so increases the server-client discrepancy due to lag, meaning that the server may not recognize every single step your character took on your screen. For the same reason, you may find that you have to stand still in a specifc corner for a few seconds in order to map certain spots.
- Behind you!
- Whenever you pass through a portal into an area, your character will spawn some distance away from the portal. Be sure to turn around and scrape the walls on either side of the portal. Sometimes walking into the portal will reveal additional bits of the map, so you should try passing both ways through a portal if there is a nearby spot that you can't get otherwise.
- Grab some popcorn and enjoy the show
- Because cutscenes are rendered in-game, everywhere your character appears during one will count as if you had traveled there normally. For the most part, cutscenes take place in areas that you can explore normally, so watching them will simply save you some travel time, but there are a couple notable exceptions:
- Sanctum Cay: The final cutscene takes place on a boat some distance from the shore. All party members will appear on the boat.
- Pogahn Passage: The final cutscene again takes place on a boat, but only the party leader will appear.
- Moddok Crevice, Greed and Regret, Calling the Order: Portions of the cutscenes for these missions/quests take place in an inaccessible spot on the southern edge of Forum Highlands. Even though the player characters do not appear at this location, it will still be mapped.
- Sunspears in Kryta / Sunspears in Cantha: When foreign-born characters travel to Elona for the first time through these quests, a cutscene will play that partly takes place in the Island of Shehkah, an area otherwise only accessible to newly-created Elonian characters.
- Synergize your titles
- After vanquishing an area is a perfect time to scrape it, since you will have already explored most of it in addition to clearing all the enemies.
- Don't fail to communicate
- If you are in a party with other players, make sure to let them know that you are working on your cartographer titles. Otherwise, they may inadvertently trigger events (like ending a mission) that take you out of the location you are trying to map. They may also push ahead and leave you behind while you are scraping.
- Beam me up! (Teleport technique)
- Teleportation skills can be quite useful to access parts of an area that a) normally wouldn't be accessible until after a specific event, or b) normally aren't accessible at all. The details on how to use this in specific areas are given in the next section, but the general technique is as follows:
- Create a corpse in the inaccessible area.
- Use
 Consume Corpse or
  Necrotic Traversal to teleport at least one player character to the corpse.
 - If there are not enough corpses for all player characters to teleport, they will need to kill themselves with sacrifice skills or a vampiric weapon, then the first player can use Rebirth to teleport them across.
- Flag heroes and henchmen at the crossover point, then move away until they are off your compass (names are grayed out in the party window). When you unflag them, they will "magically" cross the obstacle to move to your position.
- Ninja mode (Shadow step technique)
- Similar to the teleport technique, you can also use shadow step skills, particularly Heart of Shadow and Viper's Defense, to jump across many portals without actually triggering a zone transition. In some cases this provides access to areas that are otherwise inaccessible, while in other cases it provides access to areas without the usual enemy spawns. The details on how to use this in specific areas are given in the next section, but the general technique is as follows:
- Determine the actual edge of the portal by flagging a hero progressively closer to it. Once the hero reaches the portal, it will teleport back to you.
- Position your character at the edge of the portal and flag the hero away from you, directly opposite from the direction you want to shadow step.
- Target the hero, activate Heart of Shadow/Viper's Defense, and you should be on the other side of the portal.
- The technique usually works best at the edges of the portal, especially if you can shadow step at an angle such that you move even further from the center of the portal.
- Most of the places where this technique works actually have little benefit for cartographers, so the specific areas that are beneficial are listed below.
- Ongoing research on where this technique can be used, as well as more detailed information on the technique and video demonstrations of it, can be found at Area boundary/Portal jumping project.
- Visit low level competitive arenas
- These are: Ascalon Arena, Shiverpeak Arena, Shing Jea Arena, and Sunspear Arena. It is best to get there when you are still a low enough level to enter the battle area and get the most out of it. But even above the allowed levels, the outpost itself will still add to your exploration. All you have to do is speak to a local guard to enter and scrape away!
Specific tips
Many areas, especially missions, have mappable areas that are seemingly impossible to access. This section provides details on these areas, in addition to other area-specific tips.
Tyria
The Great Northern Wall mission exploration

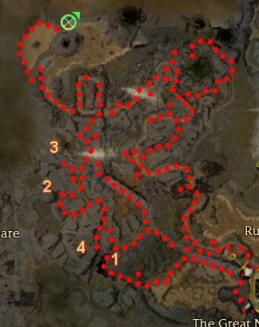
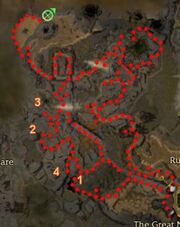
Inaccessible path in the Frost Gate mission

The glitched area in Talus Chute
- Cooperative missions
- Cooperative Missions in Tyria take place in exclusive areas that cannot be accessed outside of the mission. Thus, exploration of the mission area must be performed within the constraints of the mission. Strictly following the path for the mission and bonus objectives will usually leave significant portions of the area unexplored. Luckily, most Tyrian missions do not have time limits, so you can explore at your leisure. Missions that require additional strategies to explore are noted below.
- The Great Northern Wall (mission)
-
- After the cutscene where the Charr break through the blocked gate, you can access the area beyond it to the north. Beware that the timer will still be running, so using a skill or consumable to increase your movement speed may be necessary to map the whole area before time runs out. Otherwise, you'll have to run through the mission again.
- When running back to the wall after that cutscene, the area that you pass through extends quite a ways to the west, filling in most of the area up to Piken Square. Again, speed boosts are a big help in mapping this area. Alternatively, it is possible (although very rare) to find a Moa Bird wandering in this area that you can kill before the cutscene, allowing you to use the teleport technique described above to access this area without the timer.
- Flame Temple Corridor and Dragon's Gullet
- The shadow step technique can be used to jump the portal between these areas in either direction, allowing enemy-free exploration of both areas.
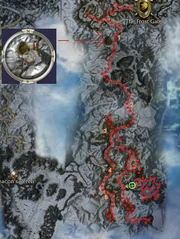
- The Frost Gate (mission)
- The path that Prince Rurik travels in this mission can be accessed using the teleport technique.
- At point 1 on the map at right, you can lure the groups with Ice Golems back north onto the bridge so that they kill Prince Rurik's guards. If you find it difficult to wrangle the golems properly, you can also bring a minion master hero with Bone Fiends, then force him to suicide with sacrifice skills while standing on the edge close to Rurik.
- At the southern end of this path is a single Summit Axe Wielder. Killing it will cause more of them to spawn in increasing numbers (these are the foes that Rurik fights at the end of the mission), so it is usually best to ignore it.
- It is possible to return to the normal mission path at point 3 by killing one of the Stone Summit Engineers.
- Lion's Gate
- Speak to Lionguard Bedo in Lion's Arch to access this commonly-missed area.
- Nebo Terrace and Cursed Lands
- The shadow step technique can be used to jump the portal between these areas in either direction, allowing enemy-free exploration of both areas.
- Aurora Glade (mission)
- Be sure to explore the entire area around the Henge Portal before attuning all three pedestals. This is easily done by killing off all the White Mantle (so you don't have to worry about them attuning the pedestals). Alternatively, it is possible (although rare) to find a warthog just inside the gate to the Henge Portal area, allowing you to use the teleport technique to access the area without spawning any White Mantle (except the Demagogue).
- Sanctum Cay (mission)
- At the end of the mission, there are two beaches that can be explored freely as long as you stay away from the dock where Vizier Khilbron appears. The southern beach can be reached easily, but to reach the eastern beach, you must scrape the cliff to the north when moving past the dock.
- Dunes of Despair (mission)
- A very large area can be explored outside the fort where you defend the Ghostly Hero from a siege. Although you can try exploring this area during the siege, it is much easier to use the teleport technique (see the mission article for details). The drawbridges on the eastern and western forts will appear to be drawn up, but you can still walk across them to enter the forts.
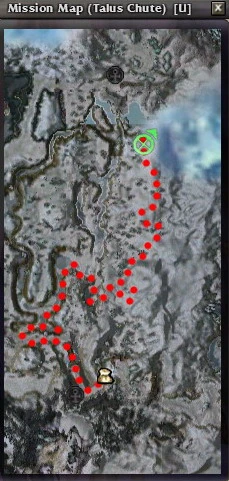
- Talus Chute
- There is a spot along the eastern edge where you can seemingly climb up the wall into a hidden area.
- Granite Citadel and Spearhead Peak
- The shadow step technique can be used to jump the portal from Tasca's Demise into the Granite Citadel, after which you can simply walk into Spearhead Peak to explore the area with no enemies.
- Thunderhead Keep (mission)
- After defeating Confessor Dorian, the mission will not end until you speak to King Jalis Ironhammer. This gives you freedom to explore the area around the keep at your leisure.
- Anvil Rock
- There is a small area that can be cleared if you take a right out of Ice Tooth Cave. It leads into the mountains.
Cantha
- Cooperative missions
- Most Cooperative Missions in Cantha share their location with an explorable area, although in some cases the areas that are actually accessible do not overlap (these are noted below). As a general rule, it is easier to explore the area when you are not in the mission so that you are not subject to mission constraints, including having portions of the area sealed off. However, many missions will have fewer enemies than the explorable area does, in which case it may be preferable to explore as much as possible during the mission.
- Challenge missions
- Most Challenge Missions in Cantha do count for cartography, with the only exception being Dragon's Throat. They can be explored with relative ease within the default time limits.
- Competitive missions
- Both of the Competitive Missions also count for cartography. Be aware that you will be randomly placed on a team alongside other players in these missions, and they may respond negatively when they find out that you are only there for cartography.
- Exclusive areas in Kurzick and Luxon outposts
- Outposts in Echovald Forest and the Jade Sea have an exclusive area that can only be accessed by members of the alliance that controls the outpost. Generally these can be mapped from the surrounding area without actually entering them, although there are a few exceptions.
- Monastery Overlook
- This area is only accessible to newly-created Factions characters, and it cannot be re-accessed once you enter Shing Jea Monastery. In order to access the entire area, you must take the quest Mantid Hatchlings from Instructor Ng. The Shing Jea Boardwalk occupies the same place on the map, and can be accessed by all characters during many special events.
- Alternatively, the shadow step technique can be used to jump the portal from Linnok Courtyard into the Monastery (or even from Saoshang Trail into the Courtyard). The gate to the Overlook will appear closed, but you can walk through it.
- Vizunah Square (Foreign Quarter) and Vizunah Square (Local Quarter)
- Normally, a character will only be able to access one of these outposts based on his/her native campaign (Canthan-born characters get the Local Quarter while all others get the Foreign Quarter). However, it is possible to gain access to both outposts:
- Canthan-born characters can accompany a foreign character who is performing the quest Welcome to Cantha to access the Foreign Quarter.
- Foreign-born characters must first complete Zen Daijun (mission), then they can accompany a Canthan character who is performing the quest Mayhem in the Market to access the Local Quarter.
- Vizunah Square (mission)
- The area of this mission cannot be accessed as an explorable area. There are a number of places in the mission where Mhenlo and Togo will stop and wait for the party to catch up; take advantage of these spots to scrape the areas you've already passed through.
- Nahpui Quarter (mission) vs. Nahpui Quarter (explorable)
- The mission and explorable area occupy opposite halves of the overall zone with a closed gate between them, requiring both areas to be explored individually.
- Boreas Seabed (mission) vs. Boreas Seabed (explorable)
- Both instances have access to the main "sea" portion of the area, while the convocation area to the west is only accessible during the mission, and the 1,000 Daggers Guild Hall in the northeast is only accessible in the explorable area. While in the mission, the section of sea west and south of Zhu Hanuku will be free of enemies.
The exclusive area in Eredon Terrace
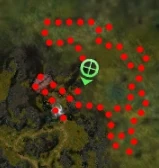
- Eredon Terrace
- The exclusive area in this outpost is fairly large due to a terrain glitch and cannot be mapped without entering it. The shadow step technique can be used to jump the portal from Maishang Hills into the outpost, after which you can walk through the closed gate into the exclusive area.
- Saint Anjeka's Shrine
- The exclusive area here likewise cannot be mapped from outside, although it is much smaller.
- The Eternal Grove (mission) vs. The Eternal Grove (explorable)
- It is possible to explore the entire area with no enemies, except for the besieging Luxons, during the mission. Fight through the Luxon assault as normal, but avoid triggering the cutscene by sparing one or two of the rangers in the final western group.
- Unwaking Waters (mission) vs. Unwaking Waters (explorable)
- The mission and explorable area actually occupy the two arms of a double spiral, requiring both areas to be explored individually.
- Raisu Palace (explorable)
- The shadow step technique can be used to jump the portal from Raisu Pavilion into Raisu Palace (location). You will want to shadow step diagonally across the wall corner immediately behind the portal, after which you should still hug the wall until you are well clear of the portal; the Canthan Guard near the portal is in an ideal position for this. After jumping into the outpost, you can walk into the explorable area, which you can explore with no enemies.
- Divine Path
- The shadow step technique can be used to jump the portal from the Raisu Palace explorable into Imperial Sanctum (location). (Alternatively, you use the Raisu Palace jump above, run the length of the explorable, and simply walk into Imperial Sanctum.) In the southeast corner of the outpost, where the Xunlai Agent normally stands, is a closed door to the south that you can pass through to access the Divine Path. In this room, there is another door to the east that you can pass through, leading to a small area that is normally inaccessible.
- Imperial Sanctum (mission)
- Be sure to explore the area that Shiro sends characters to with Echoing Banishment. To make sure you get banished, enter the mission with one other player (Shiro will not banish you if you are the only player in the party), and if you bring AI characters, only use heroes, not henchmen (Shiro will banish henchmen but not heroes). Have the other player stay back when you initially engage Shiro, and you should get banished.
Elona
- Cooperative missions
- Most Cooperative Missions in Elona share their location with an explorable area. As a general rule, it is easier to explore the area when you are not in the mission so that you are not subject to mission constraints, including having portions of the area sealed off. However, many missions will have fewer enemies than the explorable area does, in which case it may be preferable to explore as much as possible during the mission.
- Challenge missions
- Most Challenge Missions in Elona do not count for cartography, with the only exception being Remains of Sahlahja, listed below.
- Island of Shehkah
- This area is only accessible to newly-created Elonian characters, and it cannot re-accessed once you enter Chahbek Village (location). In order to access the entire area, you must take the quest Rally the Recruits (Tutorial) from Kormir.
- Chahbek Village (mission) vs. Churrhir Fields
- The western part of the area will be closed off during the mission. However, during the mission, you can use the teleport technique to access the boats on either side of the area.
- Beknur Harbor
- The shadow step technique can be used to jump the portal from either Cliffs of Dohjok or Issnur Isles, allowing exploration of the normally inaccessible corridor between the outpost and the Cliffs.
- Consulate Docks (mission) vs. Pogahn Passage (mission) vs. Gandara, the Moon Fortress
- These three instances take place on the same map, although the Pogahn Passage mission is the only one that allows access to the entire area (portions of the area will be closed off in the other two instances). It also allows you free exploration without any enemies: nothing spawns in the area north of the fortress, and all the Kournans in the fortress will be neutral until you free Kormir and Shahai.
- Arkjok Ward
- The shadow step technique can be used to jump the portal to Marga Coast, allowing exploration of the normally inaccessible corridor between the two areas.
- Marga Coast
- The shadow step technique can be used to jump the portal to Sunspear Sanctuary, but with a slight variation, as this portal does not trigger the usual teleportation of heroes. You will need a shadow step that moves you to an ally, such as Recall. Flag the hero past the portal, then activate your shadow step to explore the normally inaccessible area behind this portal.
- Turai's Procession
- The shadow step technique can be used to jump the portal to the Command Post for exploration of this small, inaccessible area.
- Chantry of Secrets
- There is an exclusive area in this outpost that can only be accessed by speaking to the Guardian of Whispers after defeating Abaddon.
- Tihark Orchard (mission) vs. Garden of Seborhin
- During the mission, all the exits from the garden are blocked off by Vabbian Guards. However, by using a skill that shadow steps to an ally, shadow stepping to one of the Vabbian Guards can place you on the opposite side, allowing enemy-free exploration of the rest of the area. Alternatively, if you wait for the Skree to attack, you can make them move by pulling some of the Skree to within their aggro range.
- Resplendent Makuun
- The shadow step technique can be used to jump the portal to the Wilderness of Bahdza, allowing exploration of the normally inaccessible corridor between the two areas.
- Dynastic Tombs (Remains of Sahlahja (mission))
- To explore this area, you must gain enough points in the central area to open the doors to each of the other four sections. You do not have to explore all four sections at the same time; in fact, it is usually easier to restart the mission after exploring one area, as one additional Maddened Spirit will spawn for each area you have unlocked, making it increasingly difficult not only to map but also to gain points towards unlocking the other sections.
Cartography Made Easy
DISCLAIMER: This article describes software written by a third party. GuildWars Wikia (a fan fiction wiki) does not endorse, explicitly or otherwise, the use of any third party tools. As with all third party software, the user should investigate the tool themselves and take precautions prior to installation in order to protect their privacy and security.
By far the easiest way to complete your cartographer titles is to use a user-created TexMod (download) package called Cartography Made Easy (CME). The following video demonstrates how to use this package.