m (→Notes: self-cast Pious Haste >>> henchmen (failing to) use Charge!) |
mNo edit summary |
||
| (27 intermediate revisions by 18 users not shown) | |||
| Line 1: | Line 1: | ||
| ⚫ | |||
[[Image:IceCavesofSorrow.jpg|320px|thumb|right|Ice Caves of Sorrow mission map.]] |
[[Image:IceCavesofSorrow.jpg|320px|thumb|right|Ice Caves of Sorrow mission map.]] |
||
| ⚫ | |||
| + | {{Zaishen Quest}} |
||
| + | |||
==Objectives== |
==Objectives== |
||
Rescue [[Evennia]] |
Rescue [[Evennia]] |
||
| Line 10: | Line 12: | ||
==Walkthrough== |
==Walkthrough== |
||
The truth about the [[White Mantle]] has been revealed. They are a cult worshipping strange beings known as the [[Mursaat]]. Having achieved [[Ascension]], you are now (supposedly) ready to return to save the [[Shining Blade]] and stop the White Mantle. While you were away, the White Mantle have cornered the Shining Blade into the [[Shiverpeak Mountains]] and have captured both [[Evennia]] and [[Saidra]], and now plan to sacrifice them on the Shiverpeak [[Bloodstone]]. |
The truth about the [[White Mantle]] has been revealed. They are a cult worshipping strange beings known as the [[Mursaat]]. Having achieved [[Ascension]], you are now (supposedly) ready to return to save the [[Shining Blade]] and stop the White Mantle. While you were away, the White Mantle have cornered the Shining Blade into the [[Shiverpeak Mountains]] and have captured both [[Evennia]] and [[Saidra]], and now plan to sacrifice them on the Shiverpeak [[Bloodstone]]. |
||
| + | |||
| + | ===[[Spectral Agony]]=== |
||
| + | This is the first mission in which your character will encounter [[Spectral Agony]], a [[monster skill]] wielded by [[Mursaat]] and their [[Jade (species)|Jade]] automatons. This absurdly powerful skill can drain 600 [[health]] within five seconds; consequently, treat these enemies with grave caution. The best defense against Spectral Agony is [[Infusion|infused]] armor, which reduces [[Health degeneration|degeneration]] to 15 [[health]]/second. Unfortunately, the next mission is the first opportunity to infuse player or [[henchmen]] armor. For this mission, you can take [[Pet]]s and [[Hero]]es (whose armor is innately infused). You can also summon [[Minion]]s or [[Spirit]]s to divert the enemy. (You can find additional tips below.) |
||
===Primary=== |
===Primary=== |
||
| + | It is not necessary to kill any Mursaat to complete the mission. While there are a number of groups of them, you can take alternate routes to avoid them, or else wait for them to get out of your way. |
||
| − | You begin the mission facing a group of [[Pinesoul]]s and [[Ice Imp]]s. Beware, because near them there will be a group of Mursaat. They are the floating beings with golden outfits and black wings coming out of their backs. Avoid them at all cost. All Mursaat (this includes spell casters as well as [[Jade Armor]]s and [[Jade Bow (monster)|Jade Bow]]s) have a powerful skill called [[Spectral Agony]]. For now, this power will wipe out your entire party in a matter of seconds. It will massively drain away your health. (Though it may be possible to survive limited, brief encounters if you have a couple of healers and use the Heroes that were introduced in the Nightfall campaign.) |
||
| − | + | To start the mission, sneak around the Mursaat and head left. You will come across an area being pounded by siege weapons and several groups of [[Stone Summit]]. Kill them and pass the siege area. You will see a bridge and a way down onto an icy path (where the Stone Summit have set up their siege weapons). Go onto the ice and destroy the group protecting the first siege weapon and then the second. Fire the second weapon (point A) and you will see a cutscene where a herd of [[Dolyak|Yak]]s rampages through the White Mantle encampment and helps destroy the siege weapons and forces for you. |
|
Now, go back up and cross the bridge into the White Mantle camp. Immediately up the hill will be a gate guarded by Jade Armors. Avoid them. If you continue to the left of that gate, you will find a path around to another door guarded by the less imposing White Mantle. Kill the patrols, grab a keg from the nearby [[Dwarven Powder Keg Station|powder station]] (point B) and blow the door away. |
Now, go back up and cross the bridge into the White Mantle camp. Immediately up the hill will be a gate guarded by Jade Armors. Avoid them. If you continue to the left of that gate, you will find a path around to another door guarded by the less imposing White Mantle. Kill the patrols, grab a keg from the nearby [[Dwarven Powder Keg Station|powder station]] (point B) and blow the door away. |
||
| Line 20: | Line 25: | ||
You will enter an ice cave. If you keep to the left side of the cave, you will be able to go around all the Mursaat groups (facing a few White Mantle groups) and out into an area that has a circular path with a pit in the middle. Evennia and Saidra are opposite to you on this circle (point C). You can go either left or right around the pit, but there is one patrol of Mursaat to avoid, which is easier if you go left. Then there is a patrol of [[White Mantle Savant]]s and [[White Mantle Sycophant|Sycophants]], which you can take out. There you will find a cave that will take you around the left side of the circle to very near the cell. There is another patrol of Mursaat to dodge here. Get a keg from the nearby powder station (point D) and blow the cell door. |
You will enter an ice cave. If you keep to the left side of the cave, you will be able to go around all the Mursaat groups (facing a few White Mantle groups) and out into an area that has a circular path with a pit in the middle. Evennia and Saidra are opposite to you on this circle (point C). You can go either left or right around the pit, but there is one patrol of Mursaat to avoid, which is easier if you go left. Then there is a patrol of [[White Mantle Savant]]s and [[White Mantle Sycophant|Sycophants]], which you can take out. There you will find a cave that will take you around the left side of the circle to very near the cell. There is another patrol of Mursaat to dodge here. Get a keg from the nearby powder station (point D) and blow the cell door. |
||
| − | A cutscene will show you that Saidra sacrificed herself for you. Now you will need to blow a gate, then run Evennia to the ship. |
+ | A cutscene will show you that Saidra sacrificed herself for you. Now you will need to blow a gate, then run Evennia to the ship. Alternatively, you can destroy the other gate before triggering the cut scene, to avoid the danger to Evennia. Despite her assertion that you should stop for nothing, Evennia will stop and engage any enemy that crosses her path. If you wish to run, keep an eye on her; if she attacks a group of enemies, you will have to attack too because otherwise she will die and you will fail the mission. |
| + | You can either run ahead of the gang of twelve [[Mursaat Elementalist]]s that slowly follows and clear the way to the exit yourself, or else get onto the their path to start their movement, then run back west to get out of the way. If you do the latter and then follow the Mursaat, they will mostly clear the path for you, and then get themselves killed by catapults. |
||
| − | '''Notes:''' Despite her assertion that you should stop for nothing, Evennia will stop and engage any enemy that crosses her path. If you wish to run, keep an eye on her; if she attacks a group of enemies, you will have to attack too because otherwise she will die and you will fail the mission. |
||
| + | |||
| + | Be warned that occasionally the twelve Mursaat do not all get killed by catapults. If they do not, they will stop on the path shortly beyond the target of the second catapult. If only a couple survive, your group can probably finish them off, even if not infused. |
||
When you're near the ship (point E) there will be some Stone Summit (with a boss) engaging the dwarves that run the ship. They usually wipe out the crew if you move too slowly, so as soon as you can, engage and destroy them. |
When you're near the ship (point E) there will be some Stone Summit (with a boss) engaging the dwarves that run the ship. They usually wipe out the crew if you move too slowly, so as soon as you can, engage and destroy them. |
||
| − | |||
| − | The Mursaat following you (a large host that will emerge after you come out of a small cave past Evennia's cell) are very slow. You do not need to panic: engaging every Stone Summit group on the way does little to worsen your chances of making it. The Mursaat will be wiped out by catapult fire near the end of the path to the boat. |
||
| − | |||
| − | ''Tip 1:'' You can fetch Evennia and then let the Mursaat get ahead of you. They'll slice through the Stone Summit and then get themselves killed by siege weapon fire. Follow them at a distance, and once they've done your work for you and gotten killed, proceed as described above. Note: It has happened that the Mursaat have got stuck on the northernmost part of the path, before reaching the area where they are killed. If this happens, try sending a party member to try to lure them ahead or use heroes/pets to engage them (if your party can quickly take them down -- see tip 3 below). |
||
| − | |||
| − | Please bear in mind this doesn't always work, they can sometimes make it through and stop around the boss. If your party includes Heroes, you can attempt to clear a few Mursaat (per Tip 2, below). If you have only characters and henchmen (without infused armor), you will almost certainly not be able to continue the mission. |
||
| − | |||
| − | ''Tip 2:'' The Heroes introduced with the Nightfall campaign give you added tools to take on one or two Mursaat and live to tell the tale. Hero armor is infused from when you first gain them, giving Heroes increased survivability that your character lacks if your armor is not yet infused. The Mursaat will generally use their Spectral Agony skill early in any fight, and it takes a long time to recharge. If Heroes and/or pets first aggro the Mursaat, they will likely expend their first Spectral Agony blast on those survivable or expendible targets. While you should still try to avoid them, don't panic if your party accidentally aggros one or two Mursaat: If your character and enough of the party survives the first onslaught, a reasonably balanced, competent party should be able to take a couple of Mursaat down quickly before they can use Spectral Agony on your vulnerable character(s) or henchmen. This also means that if you choose to let the large party of Mursaat go first (Tip 2, above), a party with Heroes has a good chance of being able to clear the path of any individual Mursaat who get "stuck" along the the way. (You still haven't got a chance against a large party, but you can pick off stuck individuals who are left behind -- especially if their Spectral Agony skill hasn't yet recharged after they used it on another enemy.) |
||
===Bonus=== |
===Bonus=== |
||
| ⚫ | |||
| − | The bonus in this mission is rather straightforward, but requires that you fight at least two groups of Mursaat. However at this point, you probably do not have [[infusion|infused]] armor (this happens next mission normally) and as such you cannot stand up to the Mursaat and their [[Spectral Agony]] skill. It is possible, although time consuming, to infuse your armor before this mission by travelling all the way up to [[Mineral Springs]] to find the seer who can perform an infusion. ''(Alternatively, you can travel to the [[Iron Mines of Moladune]] and do that mission first (out of sequence) as most consider this to be the easiest method of infusion.)'' |
||
| − | |||
| − | Bring two powder kegs into the cave. |
||
| − | |||
| ⚫ | |||
# The prisoner, [[Rornak Stonesledge]], is located in a cell that is inside the ice cave you took to get to the circular path. Before exiting the cave, you will see a path in the cave to the right (green path on map). This path is guarded by Jade Armors. Fight them, and then fight the Mursaat spell-casters after them. You will then get to a locked door (point 2); blow it open with a powder keg (powder stations at point B and point D). This door leads to a snowy path guarded by White Mantle; at the end you will find a small cell with Rornak inside. You will need another powder keg to blow open the cell door. |
# The prisoner, [[Rornak Stonesledge]], is located in a cell that is inside the ice cave you took to get to the circular path. Before exiting the cave, you will see a path in the cave to the right (green path on map). This path is guarded by Jade Armors. Fight them, and then fight the Mursaat spell-casters after them. You will then get to a locked door (point 2); blow it open with a powder keg (powder stations at point B and point D). This door leads to a snowy path guarded by White Mantle; at the end you will find a small cell with Rornak inside. You will need another powder keg to blow open the cell door. |
||
| Line 48: | Line 43: | ||
* Speak to Hamdor; he'll ask you to look for Rornak. Go back and free Rornak and he'll thank you and you'll get the bonus. |
* Speak to Hamdor; he'll ask you to look for Rornak. Go back and free Rornak and he'll thank you and you'll get the bonus. |
||
| + | In order to reach Rornak, you will have to clear a group of three [[Jade Armor]]s and a group of three [[Mursaat Elementalist]]s. If you have no defensive measures against their Spectral Agony beyond those that henchmen bring, you can probably clear them by the naive approach of charging in and attacking, but expect to take a few deaths in each battle. Your death toll can be reduced from this by means detailed in the section on Spectral Agony above. You may wish to leave the eastward facing [[Stone Summit Engineer]] to the south of point A alone earlier in the mission, so that you can recharge the [[Resurrection Signet]]s that will be expended in fighting Mursaat. |
||
| − | Either way, you will notice that when you come out of the cave to speak to Hamdor, the large host of Mursaat will appear and will be ahead of you on your way to the boat. This is not as bleak as it seems. You can just follow them slowly, and the catapults of the Summit will take them out before they get to the boat. If you don't want to follow the Mursaat, but want to talk to Hamdor, you might let them lead your group until they get to point 4, where they will engage some Stone Summit. You can quickly take the other route (the green one) to get ahead of them. |
||
| − | |||
| − | ''Note'': Either way you do the bonus you need 2 Dwarven Kegs to blast through the doors. If you are in a group of people, make sure two people take them. If you are with henchmen, because the mission is easily done with them, be warned, there is a lot a to-and-froing so for bonus you may be better off taking at least a couple of human players. |
||
'''Warning''': It's possible the White Mantle Zealots who patrol near Rornak's cell get too close to him. He will sometimes leave the cell (even though the door is closed) and start firing his bow at the enemies. This allows them to possibly kill him, thereby failing the bonus. Try to take out the Mantle close to the locked door to avoid this bug. |
'''Warning''': It's possible the White Mantle Zealots who patrol near Rornak's cell get too close to him. He will sometimes leave the cell (even though the door is closed) and start firing his bow at the enemies. This allows them to possibly kill him, thereby failing the bonus. Try to take out the Mantle close to the locked door to avoid this bug. |
||
| + | |||
| + | ===Hard mode=== |
||
| + | Once you get past the branch off to go do the bonus, avoid fighting the [[White Mantle Savant]]s and [[White Mantle Sycophant|Sycophants]]. The groups along the normal route wander clockwise in circles, and will get out of your way if you wait for them. Two groups with identical routes usually patrol on top of each other by the powder keg station, and fighting both at once can be very dangerous. |
||
| + | |||
| + | At the end, the [[Mursaat Elementalist]]s move faster, and thus usually don't all get killed by the catapults before they reach the end of their route. If you attack them before they reach the end of their route, they come in linked groups of six, which can be rough even if your entire party is infused, as [[Evennia]] isn't. Once they reach the end of their scripted route, they wander randomly. If you wait long enough, they will wander into range of the final catapult and die, but this can take quite a long time. You can also wait until enough die for you to be able to handle the rest. They are hostile to most [[Stone Summit]] along their route, but not the boss group at the end of their scripted route. |
||
==Creatures== |
==Creatures== |
||
| Line 94: | Line 92: | ||
**{{r}}24 [[Pinesoul]] |
**{{r}}24 [[Pinesoul]] |
||
| − | ===Bosses |
+ | ===Bosses - elite skill captures=== |
*[[Dwarf]] |
*[[Dwarf]] |
||
| − | **{{w}}28 [[Arlak Stoneleaf]] |
+ | **{{w}}28 [[Arlak Stoneleaf]] - [[Cleave]] |
| − | **{{w}}28 [[Virag Bladestone]] |
+ | **{{w}}28 [[Virag Bladestone]] - [[Cleave]] |
| − | **{{n}}28 [[Hormak Ironcurse]] |
+ | **{{n}}28 [[Hormak Ironcurse]] - [[Offering of Blood]] |
| − | **{{mo}}28 [[Darda Goldenchief]] |
+ | **{{mo}}28 [[Darda Goldenchief]] - [[Mark of Protection]] |
| − | **{{me}}28 [[Jonar Stonebender]] |
+ | **{{me}}28 [[Jonar Stonebender]] - [[Crippling Anguish]] |
*[[Golem]] |
*[[Golem]] |
||
| − | **{{e}}28 [[Berg Frozenfist]] |
+ | **{{e}}28 [[Berg Frozenfist]] - [[Water Trident]] |
==Dialogues== |
==Dialogues== |
||
Briefing from [[Blade Scout Shelby]]. |
Briefing from [[Blade Scout Shelby]]. |
||
| + | ===Inside the mission=== |
||
| + | <div class="dialogue"> |
||
| ⚫ | |||
| ⚫ | |||
| − | {| border="0" width="100%" cellspacing="1" cellpadding="1" |
||
| − | |- style="background:whitesmoke;" |
||
| ⚫ | |||
| − | |- |
||
| − | |valign="top" width="16%" | '''Rornak Stonesledge:''' |
||
| ⚫ | |||
| − | |- style="background:whitesmoke;" |
||
| ⚫ | |||
| − | |- |
||
| − | |valign="top" | '''Hamdor Grandaxe:''' |
||
| ⚫ | |||
| − | |} |
||
| − | {{clear}} |
||
| − | ===Cutscene 2=== |
||
| − | {| border="0" width="100%" cellspacing="1" cellpadding="1" |
||
| − | |- |
||
| − | |valign="top" width="16%" | '''Evennia:''' |
||
| ⚫ | |||
| − | |- |
||
| − | | || |
||
| − | |- |
||
| − | |valign="top" | '''Saidra:''' |
||
| ⚫ | |||
| − | |- |
||
| − | |valign="top" | '''Evennia:''' |
||
| ⚫ | |||
| − | |- |
||
| − | | || |
||
| − | |- |
||
| − | |valign="top" | '''Evennia:''' |
||
| ⚫ | |||
| − | |} |
||
| − | {{clear}} |
||
| − | ===Cutscene 3=== |
||
| − | {| border="0" width="100%" cellspacing="1" cellpadding="1" |
||
| − | |- |
||
| − | |valign="top" width="16%" | '''Evennia:''' |
||
| ⚫ | |||
| − | |} |
||
| − | {{clear}} |
||
| ⚫ | |||
| ⚫ | |||
| ⚫ | |||
| ⚫ | |||
| ⚫ | |||
| − | *Since Evennia follows the first person to talk to her until that person talks to her again, it is possible for someone to essentially hold her hostage. By staying away from the boat at the end, the person Evennia follows can demand money to let the group finish the mission, or even just lead her back into the siege fire to be spiteful. |
||
| ⚫ | |||
| − | [[Image:Saidra Rescue.jpg|right|thumb|Saidra rescued!]] |
||
| + | </div> |
||
| − | *It is possible to save [[Saidra]] at the cut scene. Just stay close enough to her and [[Evennia]] will use [[Heal Area]] and [[Heal Other]] to bring Saidra back to full health. Then run in and kill the [[Mursaat Elementalist]]s and [[Jade Armor]] in the group. Saidra will then run ahead of you into the tunnel that Evennia urges you to enter, but stop half way through and stand there forever -- probably because her [[Artificial intelligence|AI]] is not designed to handle this case. Evennia still laments Saidra's untimely death in the ending cut scene, though. |
||
| + | ===Second intermediate cutscene=== |
||
| ⚫ | *Near where Saidra and Evennia are being held, is what appears to be, the Shiverpeak [[Bloodstone]]. While standing on it however, you are not under the effects of [[Curse of the Bloodstone]]. [[Glint]] informs you at the end of the [[Dragon's Lair]] Mission, that the White Mantle are planning to sacrifice Saidra and Evennia on the Shiverpeak Bloodstone, and they are being held nearby. The Rock in question does bear a resemblance to the Bloodstone in Maguuma and Hell's Precipice and looks as though the Red Spikes (Blood Batteries) around the edge of the rock are covered in snow and ice. |
||
| + | <div class="dialogue"> |
||
| ⚫ | |||
| ⚫ | |||
| ⚫ | |||
| ⚫ | [[Saidra]]: ''We're caught. Take Evennia to the east. The Deldrimor Dwarves use the frozen lakes and rivers there for transport. If you're lucky you'll find one of their ice ships. I'll hold off the Mursaat as long as I can. Take my bow. I won't be needing it where I'm going. To the end of us all!'' |
||
| − | ==Glitches== |
||
| + | |||
| ⚫ | |||
| ⚫ | |||
| ⚫ | |||
| + | |||
| + | |||
| + | |||
| ⚫ | |||
| + | </div> |
||
| + | |||
| + | ===Ending cutscene=== |
||
| + | <div class="dialogue"> |
||
| ⚫ | Evennia: ''I can't believe Saidra is gone. If the old gods still exist, then hear me now. Saidra should not have died. It wasn't her time. But she gave her life so that the rest of us could live on. Now I put you on warning, you gods who abandoned [[Tyria (continent)|Tyria]] so long ago. When my time comes, and I arrive in the [[The Mists|Mists]], I'd best not find that she's been mistreated. Or as [[Balthazar]] as my witness (sic), I will make all of you pay. To the end of us all. Now we settle our account with the Mursaat. For every drop of our blood they have spilled, we will take two from them.'' |
||
| + | </div> |
||
| + | |||
| ⚫ | |||
| ⚫ | |||
| ⚫ | |||
| + | |||
| ⚫ | |||
| ⚫ | *Near where Saidra and Evennia are being held, is what appears to be, the Shiverpeak [[Bloodstone]]. While standing on it however, you are not under the effects of [[Curse of the Bloodstone]]. [[Glint]] informs you at the end of the [[Dragon's Lair]] Mission, that the White Mantle are planning to sacrifice Saidra and Evennia on the Shiverpeak Bloodstone, and they are being held nearby. The Rock in question does bear a resemblance to the Bloodstone in Maguuma and Hell's Precipice and looks as though the Red Spikes (Blood Batteries) around the edge of the rock are covered in snow and ice. |
||
| + | *At the start of the mission, you walk down onto what appears to be a frozen lake to disable the Siege Weapons and where you encounter some small mobs of [[Stone Summit]]. This frozen lake does not have the [[Icy Ground]] [[Environment Effect]]. |
||
| ⚫ | |||
| ⚫ | |||
*After the first cutscene, if you have any [[henchmen]], [[hero]]es, or [[pet]]s in your party, don't go near the area where the yaks were formerly corralled. There are invisible walls around it (presumably to control the yak stampede) that can badly confuse their pathfinding AI. |
*After the first cutscene, if you have any [[henchmen]], [[hero]]es, or [[pet]]s in your party, don't go near the area where the yaks were formerly corralled. There are invisible walls around it (presumably to control the yak stampede) that can badly confuse their pathfinding AI. |
||
| − | *Sometimes |
+ | *Sometimes, [[chest]]s will spawn on the ice-ships the Stone Summit Engineers are on near the end of the mission. There is no way to get to these chests. |
| ⚫ | |||
| − | *Sometimes, [[chest]]s will spawn on the ice-ships the Stone Summit Engineers are one near the end of the mission. There is no way to get to these chests. |
||
| + | {{Bug|Sometimes the Mursaat Elementalists will not take damage from the catapults.}} |
||
| + | {{Bug|Even though it may be possible to save Saidra from the Mursaat, she will disappear shortly afterwards.}} |
||
| ⚫ | |||
| + | {{Bug|Sometimes the door in the first cave along the bonus path (the second time you need to use a keg) will not blow up, so you cannot get to Rornak Stonesledge.}} |
||
{{C1MissionNavBox}} |
{{C1MissionNavBox}} |
||
Latest revision as of 14:42, 30 May 2010
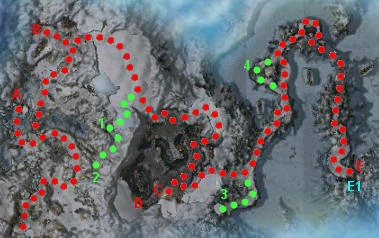
Ice Caves of Sorrow mission map.
This is a mission entry. For information on the location Ice Caves of Sorrow, see Ice Caves of Sorrow (location).

This article has an associated Zaishen Challenge Quest.
Objectives
Rescue Evennia
- Find a way into the holding area.
- Break Evennia out of her cell.
- Escape with Evennia to the awaiting ice ship.
- BONUS Return news of Rornak Stonesledge to Hamdor Grandaxe.
Walkthrough
The truth about the White Mantle has been revealed. They are a cult worshipping strange beings known as the Mursaat. Having achieved Ascension, you are now (supposedly) ready to return to save the Shining Blade and stop the White Mantle. While you were away, the White Mantle have cornered the Shining Blade into the Shiverpeak Mountains and have captured both Evennia and Saidra, and now plan to sacrifice them on the Shiverpeak Bloodstone.
Spectral Agony
This is the first mission in which your character will encounter Spectral Agony, a monster skill wielded by Mursaat and their Jade automatons. This absurdly powerful skill can drain 600 health within five seconds; consequently, treat these enemies with grave caution. The best defense against Spectral Agony is infused armor, which reduces degeneration to 15 health/second. Unfortunately, the next mission is the first opportunity to infuse player or henchmen armor. For this mission, you can take Pets and Heroes (whose armor is innately infused). You can also summon Minions or Spirits to divert the enemy. (You can find additional tips below.)
Primary
It is not necessary to kill any Mursaat to complete the mission. While there are a number of groups of them, you can take alternate routes to avoid them, or else wait for them to get out of your way.
To start the mission, sneak around the Mursaat and head left. You will come across an area being pounded by siege weapons and several groups of Stone Summit. Kill them and pass the siege area. You will see a bridge and a way down onto an icy path (where the Stone Summit have set up their siege weapons). Go onto the ice and destroy the group protecting the first siege weapon and then the second. Fire the second weapon (point A) and you will see a cutscene where a herd of Yaks rampages through the White Mantle encampment and helps destroy the siege weapons and forces for you.
Now, go back up and cross the bridge into the White Mantle camp. Immediately up the hill will be a gate guarded by Jade Armors. Avoid them. If you continue to the left of that gate, you will find a path around to another door guarded by the less imposing White Mantle. Kill the patrols, grab a keg from the nearby powder station (point B) and blow the door away.
You will enter an ice cave. If you keep to the left side of the cave, you will be able to go around all the Mursaat groups (facing a few White Mantle groups) and out into an area that has a circular path with a pit in the middle. Evennia and Saidra are opposite to you on this circle (point C). You can go either left or right around the pit, but there is one patrol of Mursaat to avoid, which is easier if you go left. Then there is a patrol of White Mantle Savants and Sycophants, which you can take out. There you will find a cave that will take you around the left side of the circle to very near the cell. There is another patrol of Mursaat to dodge here. Get a keg from the nearby powder station (point D) and blow the cell door.
A cutscene will show you that Saidra sacrificed herself for you. Now you will need to blow a gate, then run Evennia to the ship. Alternatively, you can destroy the other gate before triggering the cut scene, to avoid the danger to Evennia. Despite her assertion that you should stop for nothing, Evennia will stop and engage any enemy that crosses her path. If you wish to run, keep an eye on her; if she attacks a group of enemies, you will have to attack too because otherwise she will die and you will fail the mission.
You can either run ahead of the gang of twelve Mursaat Elementalists that slowly follows and clear the way to the exit yourself, or else get onto the their path to start their movement, then run back west to get out of the way. If you do the latter and then follow the Mursaat, they will mostly clear the path for you, and then get themselves killed by catapults.
Be warned that occasionally the twelve Mursaat do not all get killed by catapults. If they do not, they will stop on the path shortly beyond the target of the second catapult. If only a couple survive, your group can probably finish them off, even if not infused.
When you're near the ship (point E) there will be some Stone Summit (with a boss) engaging the dwarves that run the ship. They usually wipe out the crew if you move too slowly, so as soon as you can, engage and destroy them.
Bonus
The bonus is to rescue an imprisoned dwarf. There are two parts to this:
- The prisoner, Rornak Stonesledge, is located in a cell that is inside the ice cave you took to get to the circular path. Before exiting the cave, you will see a path in the cave to the right (green path on map). This path is guarded by Jade Armors. Fight them, and then fight the Mursaat spell-casters after them. You will then get to a locked door (point 2); blow it open with a powder keg (powder stations at point B and point D). This door leads to a snowy path guarded by White Mantle; at the end you will find a small cell with Rornak inside. You will need another powder keg to blow open the cell door.
- There is a second dwarf, Hamdor Grandaxe, who is looking for the prisoner. He can be found after rescuing Evennia. After you blow the gate to flee, you will enter a short ice cave. After you come out, you will see a path and a large number of Mursaat coming from your right. Evennia will ask you to run; ignore her advice and wait at the exit from the caves. The group of Mursaat will pass from the right to the left. Now go where they came from and you should see Hamdor there (point 3).
Now you can actually go about doing this bonus in either order:
- Free Rornak and he'll ask you to speak to Hamdor.
- Speak to Hamdor; he'll ask you to look for Rornak. Go back and free Rornak and he'll thank you and you'll get the bonus.
In order to reach Rornak, you will have to clear a group of three Jade Armors and a group of three Mursaat Elementalists. If you have no defensive measures against their Spectral Agony beyond those that henchmen bring, you can probably clear them by the naive approach of charging in and attacking, but expect to take a few deaths in each battle. Your death toll can be reduced from this by means detailed in the section on Spectral Agony above. You may wish to leave the eastward facing Stone Summit Engineer to the south of point A alone earlier in the mission, so that you can recharge the Resurrection Signets that will be expended in fighting Mursaat.
Warning: It's possible the White Mantle Zealots who patrol near Rornak's cell get too close to him. He will sometimes leave the cell (even though the door is closed) and start firing his bow at the enemies. This allows them to possibly kill him, thereby failing the bonus. Try to take out the Mantle close to the locked door to avoid this bug.
Hard mode
Once you get past the branch off to go do the bonus, avoid fighting the White Mantle Savants and Sycophants. The groups along the normal route wander clockwise in circles, and will get out of your way if you wait for them. Two groups with identical routes usually patrol on top of each other by the powder keg station, and fighting both at once can be very dangerous.
At the end, the Mursaat Elementalists move faster, and thus usually don't all get killed by the catapults before they reach the end of their route. If you attack them before they reach the end of their route, they come in linked groups of six, which can be rough even if your entire party is infused, as Evennia isn't. Once they reach the end of their scripted route, they wander randomly. If you wait long enough, they will wander into range of the final catapult and die, but this can take quite a long time. You can also wait until enough die for you to be able to handle the rest. They are hostile to most Stone Summit along their route, but not the boss group at the end of their scripted route.
Creatures
NPCs
Monsters
Bosses - elite skill captures
Dialogues
Briefing from Blade Scout Shelby.
Inside the mission
Bonus objective:
Rornak Stonesledge: I've managed to get myself captured again. I was looking for a secret passage, a way to sneak up on these demons, but it didn't work. Hamdor Grandaxe should be leading a party to rescue me. Let him know where I am, and he'll take care of the rest.
Finishing the bonus:
Hamdor Grandaxe: Thank the Great Dwarf you've found him! As soon as things calm down, we'll sneak in and get him out.
Second intermediate cutscene
Evennia: Help! Help! We're over here!
Saidra: We're caught. Take Evennia to the east. The Deldrimor Dwarves use the frozen lakes and rivers there for transport. If you're lucky you'll find one of their ice ships. I'll hold off the Mursaat as long as I can. Take my bow. I won't be needing it where I'm going. To the end of us all!
Evennia: Let's go. Quickly. Don't let Saidra's sacrifice be wasted!
Evennia: Hurry! They are right behind us. Don't stop whatever you do!
Ending cutscene
Evennia: I can't believe Saidra is gone. If the old gods still exist, then hear me now. Saidra should not have died. It wasn't her time. But she gave her life so that the rest of us could live on. Now I put you on warning, you gods who abandoned Tyria so long ago. When my time comes, and I arrive in the Mists, I'd best not find that she's been mistreated. Or as Balthazar as my witness (sic), I will make all of you pay. To the end of us all. Now we settle our account with the Mursaat. For every drop of our blood they have spilled, we will take two from them.
Follow-up
- Upon completion of the mission players will find themselves in: Iron Mines of Moladune.
- To continue the story line players must complete: Iron Mines of Moladune: Mission
Notes
- Near where Saidra and Evennia are being held, is what appears to be, the Shiverpeak Bloodstone. While standing on it however, you are not under the effects of Curse of the Bloodstone. Glint informs you at the end of the Dragon's Lair Mission, that the White Mantle are planning to sacrifice Saidra and Evennia on the Shiverpeak Bloodstone, and they are being held nearby. The Rock in question does bear a resemblance to the Bloodstone in Maguuma and Hell's Precipice and looks as though the Red Spikes (Blood Batteries) around the edge of the rock are covered in snow and ice.
- At the start of the mission, you walk down onto what appears to be a frozen lake to disable the Siege Weapons and where you encounter some small mobs of Stone Summit. This frozen lake does not have the Icy Ground Environment Effect.
- All the bosses in this mission have fixed spawn points (unusual for Tyrian Bosses) and thus it may be a good idea to capture elite skills from them here.
- Doing the bonus involves quite a bit of running around with Powder Kegs, so you may want to carry a speed boost skill, such as Pious Haste.
- After the first cutscene, if you have any henchmen, heroes, or pets in your party, don't go near the area where the yaks were formerly corralled. There are invisible walls around it (presumably to control the yak stampede) that can badly confuse their pathfinding AI.
- Sometimes, chests will spawn on the ice-ships the Stone Summit Engineers are on near the end of the mission. There is no way to get to these chests.
