(writting mistake corrected) |
mNo edit summary |
||
| (23 intermediate revisions by 15 users not shown) | |||
| Line 1: | Line 1: | ||
| ⚫ | |||
| − | {{TOCright}} |
||
| + | {{Location Explorable info|title = Raisu Palace}} |
||
| ⚫ | |||
| + | {{Zaishen Quest}} |
||
| − | |||
| − | ''This is a [[mission]] entry. For information on the [[location]] Raisu Palace, see [[Raisu Palace (Location)]]. For information on the [[explorable area]] Raisu Palace, see [[Raisu Palace (Explorable)]].'' |
||
==Objectives== |
==Objectives== |
||
| Line 19: | Line 18: | ||
|HMMaster = < 26 min}} |
|HMMaster = < 26 min}} |
||
| ⚫ | |||
| − | ''Tip:''While beginning the mission you will be in a room where you can choose two allies to join you in battle; bring [[Danika]] and either [[Talon Silverwing]] or [[Cynn]], as the fights they allow you to skip are the longest in the entire Palace. |
||
| + | ===Allies=== |
||
| − | |||
| ⚫ | Before the fight begins, the party members should speak to [[Kuunavang]], who will offer each player in the party a very powerful [[Kuunavang#Celestial Skills|celestial skill]] to help them in this fight. This skill recharges only upon killing a boss, so use it wisely, and don't be afraid to use it if you still have it when fighting a boss. |
||
| − | Also, if you have taken Danika she will open a door in the end and give you a shortcut to a long hallway, full of monsters, where you have to kill the Ritualist boss in the end. |
||
| − | It will save a lot of time to simply run through that hallway and only go for the ritualist boss at the end. After he dies, you can run through the door that opens, which triggers a cutscene that will resurrect any dead party members. |
||
| − | |||
| ⚫ | |||
| − | This mission is a race against time to get to the Emperor's throne and save him before he is bound or destroyed by [[Shiro Tagachi]]. The mission features fights against large numbers of ''Shiro'ken'' enemies, the [[bound spirit]]s created by Shiro. The sheer numbers of these can sometimes be overwhelming. To counter this, the mission offers players some extraordinary skills. The tactical part of the mission is to know when to use these skills as well as when to fight and when to simply run. |
||
| − | |||
| ⚫ | Before the fight begins, the party members should speak to [[Kuunavang]], who will offer each player in the party a very powerful [[Kuunavang#Celestial Skills|celestial skill]] to help them in this fight. This skill recharges |
||
| + | Henchmen get a celestial skill automatically, while heroes do not. As such, it is not guaranteed that heroes will be more effective than henchmen here. In particular, [[Lukas]], [[Devona]], and [[Kai Ying]] get [[Storm of Swords]] or [[Celestial Storm]], extremely powerful skills that can quickly destroy a group of mobs. Note that your party will also be accompanied by [[Brother Mhenlo]] and [[Master Togo]]. |
||
| − | {{bug|Heroes do not get the Celestial skill although henchmen do.}} |
||
| − | After equipping the new skills, the party leader will be asked to choose two |
+ | After equipping the new skills, the party leader will be asked to choose two allies to fight alongside the party. The choice is not simply a choice of henchmen but rather which parts of the mission you wish to skip. Each of the six available allies will (at one point in the mission or another) enable your party to skip a portion of the fight against the [[Shiro'ken]]. Sorted in order of the portion that they allow you to skip: |
*[[Argo]]: Lets the party skip the very first fight and head straight to the Warrior boss. |
*[[Argo]]: Lets the party skip the very first fight and head straight to the Warrior boss. |
||
| ⚫ | |||
| ⚫ | |||
*[[Cynn]]: Lets the party skip the fighting before the bridges after the Elementalist boss. |
*[[Cynn]]: Lets the party skip the fighting before the bridges after the Elementalist boss. |
||
*[[Danika]]: Will close a gate on a large room full of Shiro'ken, allowing the party a faster trip to the corridor with the Ritualist boss. |
*[[Danika]]: Will close a gate on a large room full of Shiro'ken, allowing the party a faster trip to the corridor with the Ritualist boss. |
||
| ⚫ | |||
*[[Panaku]]: Disables the [[Acid Trap]]s in the corridor that leads to the Ritualist boss. |
*[[Panaku]]: Disables the [[Acid Trap]]s in the corridor that leads to the Ritualist boss. |
||
| + | For each ally, there is a brief cinematic of his sacrifice, and the party moves on without him. Note that each chosen ally will fight alongside your party until you reach the portion that he allows you to skip, and then leave. If a chosen ally dies before his part, he will not be able to skip monsters for you. |
||
| ⚫ | |||
| − | For each hero, there is a brief cinematic of their sacrifice, and the party moves on without them. |
||
| ⚫ | It is recommended that you choose Danika and Cynn as your two allies, though some players prefer Talon rather than Cynn. As soon as the party leader chooses the two allies, the timer will begin and an indicator in the top left part of the screen will show Emperor Kisu's resistance warning which determines how much time the party has left. |
||
| − | ''Note: Knowing when to run (and avoiding unnecessary fights) is one of the most important component of this mission. Use control flags so your [[henchmen]] run for the destination. Without the flag, Henchmen have pathing problems and do not break from a fight easily. In addition, they exhaust all their celestial skills at the first fight after the skills recharge.'' |
||
| ⚫ | |||
| ⚫ | |||
| + | There is a group on the north path and another group on the south path. You can clear either one and ignore the other. Most of the groups in this room will have a few [[Shiro'ken Elementalist]]s, which have dangerously high damage outputs from [[Sliver Armor]] and [[Star Burst]]. As such, target these elementalists first in their groups. This is the arguably the hardest portion of the mission, but conveniently right at the start, where failure is inconsequential. |
||
| + | Where the paths rejoin is another similar group that can be dispatched in the same way. Up the ramp is a group with a boss, [[Sword Ancient Kai]], and behind it another group wanders. You can take them all on at once, or wait for the group behind the boss to get out of the way and let the boss group be pulled separately. |
||
| − | It is important to know where to go and also important to observe patrol movements and not [[aggro]] more than the party can handle. With the powerful skills the party has, the number of foes they can take on is obviously increased, but aggroing the wrong type of foes at the wrong time can be dangerous. The [[Shiro'ken Elementalist]]s with their powerful [[Star Burst]] can wipe out a few members of the party if the monks are not prepared. Further, they use [[Sliver Armor]] which can take down your melee fighters quite fast. |
||
| + | If you brought Talon, as soon as you enter the next room, there will be a cutscene of Talon sealing off the portals to the north and south. If not, mobs will slowly stream in from two portals, in addition to a group that comes down the ramp to attack you. Keep your party back near the entrance to the room, only coming far enough into the room to pull the mobs that congregate at the center, and some of the mobs that come out of each portal will be content to stay at their portals. Once all of the mobs that come into the center of the room are cleared, you can move on to attack the boss and its few accompanying mobs. The boss itself, [[Doomed Ancient Kkraz]], will be accompanied by only a few mobs, and is not much of a challenge, even without celestial skills. |
||
| − | At the end of each section in the palace will be a Shiro'ken boss. This would be a good point to gather large aggro and invoke the powerful skills of the party because slaying a boss will recharge these skills (nothing else will). The elementalist skill [[Celestial Storm]] is extremely effective at clearing out large groups of enemies and weakening the major bosses. |
||
| + | Up ramp in the next room is another boss, [[Famished Ancient Brrne]], accompanied by several warriors and rangers. Flag your party near the boss to crowd around and unleash your celestial skills which were just recharged to quickly destroy this group and recharge the skills again. |
||
| − | Follow the path on the map (adjacent). Try to proceed as fast as possible. Try not to aggro more than necessary. |
||
| + | Beyond this, you must go around the center of the room either to the north or to the south. There are four small groups of 3-4 mobs, mostly [[Shiro'ken Ranger]]s, that wander around the room. Ideally, you can clear all four groups before taking on the boss, most easily by following both paths. If you have cleared three groups and the fourth is far to the other side of the room, you can sometimes sneak in, kill the boss, and move on. |
||
| − | Note that after the area with the bridges (Where Cynn will collapse a bridge if you've selected her as one of the heroes who accompany you) there is more than one gate that can lead you to the corridor (with acid traps that Panaku can disable), the gate that opens for your party will not always be the same gate. |
||
| + | The boss of this room, [[Star Ancient Koosun]], is the most dangerous boss in the mission. As soon as he aggros (whether you were ready for him or not), your whole party needs to drop whatever they were doing and throw everything they have at him. Fortunately, this boss is not linked to any other mobs, so you can fight him alone. |
||
| − | When the party gets to the final bosses, there will be three of them in the area in front of the throne (a monk, a mesmer and an assassin). Upon slaying them, the mission will be completed. Use [[Celestial Storm]] when fighting each of the bosses. It recharges at the death of each boss! |
||
| + | If you chose Cynn as an ally, as soon as you enter the next room, a cut scene will play, and you will skip the room. If not, an endless stream of mobs will attack you, and you must run through the room to stop them from coming. Don't stop until Danika's cut scene plays. |
||
| ⚫ | |||
| − | Please note that this walkthrough presumes throughout that you are using [[Talon Silverwing|Talon]] and [[Danika]] as your assisting heroes. These are thought to be the best choices for making it through this mission as quickly and easily as possible. However, you should not be closed-minded about doing the mission in other ways should you encounter someone who believes they may have an effective strategy. Just be aware that you may encounter additional battles or even rooms not covered in this walkthrough. |
||
| + | Unfortunately, if you try to run through as soon as you get to the room, sometimes Togo or Mhenlo will get stuck on some mobs and not come with you, and then die before the cut scene, causing mission failure. One way to avoid this is to pull the three mobs near the door and clear them before you enter the room. The extra mobs do not begin spawning until someone enters the room. Another solution is to flag your party by Mhenlo and Togo while you run through yourself to trigger the cut scene. |
||
| − | === Selecting Your Party === |
||
| + | After Danika's cut scene, if you also had Cynn, the next room is pretty easy. Clear the rangers and necromancers and move on. If you did not have Cynn, and thus had to run across the bridge, then a flood of mobs will keep chasing you after the cut scene, though they take a bit of time to catch up to you. Clear mobs that aggro on you at the cut scene, but be careful not to pull anything else. Once the flood of mobs behind you catches up, clear them before moving on. This battle can be hard, so don't be afraid to use celestial skills. |
||
| − | What you absolutely must have is a couple of warriors to tank the [[Shiro'ken Elementalist]]s. Although the mission can and has been done using only the healing from [[Mhenlo]], [[Master Togo]], and [[Danika]], bringing two more healers (or a healer and a protector) is a very good idea. It is best to have a Minion Master in your party. While the high level of the monsters prevents a [[General minion mastery guide|minion master]] [[necromancer]] from being a significant source of damage; the celestial skill compensates here. The real benefit is that a minion master provides ample quantities of undead cannon fodder to distract the monsters and their spells, giving protection to your party, and minions chew up the lesser enemy. Note: a warrior's celestial skill [[Storm of Swords]] also applies to the minions, making them a very potent damage source. The last 3 bosses can be cleared in a matter of seconds with enough minions up and [[Storm of Swords]]. So far that's 2 warriors, 2 healers, a minion master. For the last 3 party spots options abound. Heavy-duty area-of-effect damage is very useful for clearing the huge mobs, and is necessary if you want to beat the masters’ time limit. That means [[Fire Magic]] [[elementalist]]s, [[Spiteful Spirit]] [[necromancer]]s, [[barrage]] [[ranger]]s, and other AoE damage dealers, are all particularly useful. Another useful addition is an [[interrupt]]er to shut down the [[Shiro'ken Elementalist]]s' [[Sliver Armor]], the [[Shiro'ken Warrior]]s' [[Healing Signet]], the [[Shiro'ken Ranger]]s' [[Troll Unguent]], and anything else they can hit. |
||
| + | The next room has four small groups of three mobs, mostly [[Shiro'ken Mesmer]]s. Don't stand in the [[Acid Trap]]s while fighting, and use flags as necessary to ensure that henchmen and heroes attack mobs, not walls. At the end of the room comes another boss, [[Defiant Ancient Sseer]], which is unlinked to any other mobs. |
||
| − | Although somewhat difficult, the mission is able to be done only with henchmen. It doesn't help that the game's best henchmen are unavailable here, (as you can select only two inside the mission). For the most part, how you proceed through the mission is the same regardless the henchmen you are using. Differences will be noted explicitly. |
||
| ⚫ | |||
| − | === Room 0: Kuunavang === |
||
| + | The final room has three bosses, and a handful of other mobs. Charge in and use celestial skills to kill whatever comes quickly, usually taking down [[Silent Ancient Onata]] first. This recharges your celestial skills, so use them again to kill the other bosses, [[Arcane Ancient Phi]] and [[Untouched Ancient Ky]]. |
||
| − | For almost any character build you might have, the [[Kuunavang#Celestial Skills|celestial skill]] offered by [[Kuunavang]] is probably an improvement over one of the skills in your bar. Talk to Kuunavang to get your celestial skill. Once everyone who wants it has their celestial skill, the group leader should talk to Talon and Danika and select them as assisting heroes, after which the gate will open. Time spent in this room does not count against [[Emperor Kisu]]’s resistance timer. It’s unknown whether time spent in this room counts against the experts’ and masters’ timers, so it’s probably best not to linger here. Additionally, skills such as [[Charm Animal]] are excellent to select for replacement, because once in the mission the pet will stay regardless. |
||
| + | ===Master's reward=== |
||
| − | === Room 1: Sword Ancient Kai === |
||
| + | Twenty minutes for master's reward is meaningful time pressure, though master's reward is quite doable for any class, even with only henchmen (not heroes). Note that the time you spend at the start getting celestial skills and choosing allies counts toward the cap for master's reward. Choose what you're going to do before entering the mission, so as not to waste time here. |
||
| + | A lot of time is saved by quickly dispatching mobs via [[Storm of Swords]] or [[Celestial Storm]], so be sure to bring the henchmen that have those even at the expense of heroes, unless you have several players and thus no room for them. Mobs also group up quite a bit, leaving them vulnerable to other area attacks, which can save a lot of time. |
||
| − | As you come down the ramp, use the control key (on your keyboard) to scan the monsters on the north and south platforms. If one side has more Shiro'ken Elementalists than the other, pick the other. The monsters on the platform are consisted of two mobs. If you are confident in your party's abilities to deal with large mobs, pull both at once from the bottom of the stairs. If you are using henchmen or are unsure of your party’s abilities, pull them one at a time from the bottom of the stairs. Pulling these mobs will accomplish 2 things: (1) it will get the slightly-faster-moving Shiro'ken Elementalists out in front where they are easy to target, and (2) it will enable your warriors to body block the stairs and protect the rest of the team. Target the Shiro'ken Elementalists first. Interrupt and kill them as quickly as possible. If they activate [[Sliver Armor]], your warriors will suffer great amounts of damage. The longer they live, the more damage they inflict. |
||
| + | If running short on time in the hallway with the ritualist boss, you can simply rush past the mobs and focus fire on the boss. (If playing with heroes/henchmen, flag them manually.) As soon as he dies, move into the next room to trigger the cutscene and move the party to safety. |
||
| − | The monsters on the east side of the canal vary in their spawns. There will usually be two mobs in more or less the same spot – one consisting of a Shiro'ken Monk and Ritualist and the other consisting of up to three Shiro'ken Elementalists plus some additional Shiro'ken Warriors and Assassins. If you get a spawn like this, pull one group from as far away as possible, kill it, then pull the other and kill it. Make sure to take out the Shiro'ken Elementalists first when you take on their mob. Occasionally, there will only be one mob. Pull it and kill it. On rare occasions, there will be no monsters here at all. However, do not immediately head up the stairs towards the boss. |
||
| + | ===Hard mode=== |
||
| − | On the landing at the top of the first flight of stairs sits [[Sword Ancient Kai]] and a small mob of Shiro'ken Warriors and Assassins, plus one Monk. Patrolling the north and south second flights of stairs is a huge mob that usually contains several Shiro'ken Elementalists. Both mobs have extended aggro radii and will pull quite easily. The difficult part is pulling just one mob. Pull whichever mob you can get down to the bottom of the stairs (and perhaps a bit further) and kill it. If you got the Elementalists, kill them first. In any event, now is a good time to use your celestial skills. If you’re facing the boss, they'll recharge as soon as he dies; if you're facing the Elementalists, they can cause you far worse problems than the boss, so now is as good a time as ever. |
||
| + | Danika and Cynn are definitely the allies to choose. Mobs hit a lot harder in hard mode, but don't take much more damage to kill, as they only gain two levels. Your four allies (everything beyond Cynn's cut scene is quite easy) are far more durable in hard mode, however, making the mission scarcely harder than before. While the mission doesn't really take any longer, you do get an extra six minutes allowed for master's reward. |
||
| + | About the same tactics as above still work nicely, though you may take a couple deaths here and there when fighting elementalists. Death penalty gets worked off fast, so it isn't likely to be a problem unless you take enough to run out of rez signets. The first room is by far the hardest, and is conveniently right at the start. |
||
| − | Sword Ancient Kai himself is not a big threat so long as he is kept away from your casters. He can, however, take an annoyingly long time to kill if your party is skewed towards physical damage and is unable to interrupt his healing signet. |
||
| + | With Danika and Mhenlo as quite powerful allied healers, a party needs no more than two additional healers. A protection monk with [[Shield of Absorption]] or [[Shielding Hands]] works well against the elementalists, and [[Extinguish]] can quickly clear the [[disease]] spread by the necromancers' [[Rotting Flesh]]. |
||
| − | If you are extremely confident in your party's ability to deal damage quickly, you can aggro both groups at once and have your warriors block the bottom of the stairs. Just bear in mind that your warriors are probably goners if the Elementalists live long enough to activate Sliver Armor. |
||
| − | |||
| − | Continue up the stairs and through the door to the east. |
||
| − | |||
| − | === Room 2: Doomed Ancient Kkraz === |
||
| − | |||
| − | As soon as you enter this room, there will be a cutscene of Talon sealing off the portals to the north and south. It doesn't matter one bit whether you watch this cutscene or not. |
||
| − | |||
| − | With the endless supply of monsters from the portals shut off, this room is a breeze. Advance to the bottom of the stairs to the east and dispatch the mob that comes down the stairs to greet you. Continue up the stairs towards the boss, killing anything that gets in your way. It's best to kill the Ritualist that is with the boss first to prevent its spirits from healing. [[Doomed Ancient Kkraz]] himself is a total pushover. Use your celestial skills on either the Ritualist or the boss, since they will recharge once the boss dies. |
||
| − | |||
| − | Head through the door to the east. |
||
| − | |||
| − | |||
| − | === Room 3: Two Bosses === |
||
| − | |||
| − | Up the stairs immediately in front of you is a landing with [[Famished Ancient Brrne]], a sizable pack of Shiro'ken Rangers, a single Ritualist, and three or four Warriors that will run down to attack you as soon as you set foot on the stairs. Because they are backed up by the Ritualist's spirits, these Warriors are more resilient than most of those that came before. If your party has adequate damage output to kill them in spite of this, kill them first. Otherwise, you will have to go for the Ritualist while the Warriors pound on you. Next comes the Ritualist, then Famished Ancient Brrne and his Rangers. Area-of-effect attacks work particularly well here, since neither Famished Ancient Brrne, nor his Rangers, nor the Ritualist will move out of them. Use your celestial skills here, since they will be recharged when Famished Ancient Brrne dies. |
||
| − | |||
| − | It matters very little whether you use the north platform or the south platform here. Both contain two weak mobs and you usually can't see far enough to note the location of the next two major mobs from the point where you must choose north or south. |
||
| − | |||
| − | Heading back into the center, you will find two large mobs of Rangers half-patrolling, half-loitering near the base of the north, south, or east stairs. Depending on your spawn, you will have to deal with them in different ways: sometimes one or both mobs will be close enough to pull from your platform. In which case pull them (one at a time if you can reach both) from the platform and kill them at the bottom of the stairs to the platform. Sometimes one or both mobs will be far enough away that you can go up the east stairs without aggroing them. In which case, don't aggro them. Most often, they will be just past the east stairs, but just close enough you can’t make it up the stairs without aggroing them. In which case you will have to pull them over to the base of the stairs you just came down (north or south) and kill them. Be very careful and stay as far away from the base of the east stairs as possible. The boss has a huge aggro radius and will attack if you get anywhere near them. Once you've cleared as many Rangers as necessary so that you can go up the east stairs, go near the stairs and the boss will aggro and come down to you. Go to both sides to clear the enemies just before koosun. |
||
| − | |||
| − | [[Star Ancient Koosun]] is by far the most dangerous boss in this mission. As soon as he aggros (whether you were ready for him or not), your whole party needs to drop whatever they were doing and throw everything they have at him. If he lives long enough to activate Sliver Armor, at least one fatality is almost guaranteed. If he lives much longer, several more are likely. Fortunately though, while he deals a tremendous amount of damage, Star Ancient Koosun is not very durable, and a concerted effort should bring him down very quickly. If there was ever a time to use your celestial skills, this is it. |
||
| − | |||
| − | As you continue up the stairs, scan the small mobs at the northeast and southeast doorways. Usually they are identical, but you might be able to avoid an Elementalist by scanning. If you want to fight the mob in your path, make sure to pull it into Room 3 without setting foot in Room 4. As soon as any member of your party enters Room 4, everyone needs to run! |
||
| − | |||
| − | === Room 4: The Bridge === |
||
| − | |||
| − | Run. Run like hell. Run to the bridge in the center (north-south-wise). Run east across the bridge. Run east across either of the two second bridges. Keep running east until the cutscene starts. Do not stop to fight anything. Run. |
||
| − | |||
| − | If your other party members don't run too, leave them. Leave them even if it means they die. Togo, Mhenlo, and Danika can't look after themselves so be sure they are close with you. The cutscene will revive everyone else. Having 15% DP, even on 7 party members, is a much smaller problem than you will have if you don't trigger the cutscene as fast as possible. |
||
| − | |||
| − | As soon as someone in your party entered this section, monsters started spawning at the north and south portals – monsters that will chase you no matter what, even past a cutscene. The portals will only stop spawning more and more of these pursuers when the entire party is past them. By running straight to the cutscene you can limit the portals to one batch of three monsters each. |
||
| − | |||
| − | If you stay to fight the spawning monsters from both portals you could end up killing time and maybe 50 more monsters! Choose your strategy carefully. The wise run through this room, saving lots of time and the emperor's life too. |
||
| − | |||
| − | === Room 5: The Room After the Bridge === |
||
| − | |||
| − | This room begins with Danika's cutscene. The first thing you will notice about the cutscene is that at least one Shiro'ken Ranger will probably be shooting at least one of your party members. This should incline you to skip the scene immediately. However, there are two things to be gained by watching the scene (or at least most of it) anyway: (1) You may be able to get rid of Danika, who will become a liability if she remains with you after the scene – which she definitely will if you skip immediately. (2) The large mob at the top of the stairs to the north often moves away from you during the scene and becomes less likely to aggro immediately than if you had skipped. Ultimately, you need to look at which party member is getting hit (the warrior? the monk? Togo?) and how many Rangers are hitting them and decide if it's worth having that person take some hits to get these advantages. |
||
| − | |||
| − | Your situation at the close of the cutscene is as follows: Your entire party is facing west with their backs to a closed door. Immediately to the south is a staircase that leads to a closed door with two Shiro'ken Rangers on it. They are already aggroed. Immediately to the north is the staircase leads to the next room with another two Shiro'ken Rangers on it. They are already aggroed. In these close quarters, the Rangers are a big problem, since your casters, particularly your monks, have no place to go to escape their [[energy]]-draining [[Debilitating Shot]]s. At the top of the stairs to the north is a large mob of Rangers and Necromancers which may or may not be aggroed. If it's not, keep it that way. Approaching rapidly from the west is every monster that spawned from the portals in Room 4. If you ran like you were supposed to in Room 4, there will be six, including one Elementalist. If you did not, there may be many, many more. Finally, Danika may have remained with you, especially if you skipped the cutscene immediately. However, she is now neutral and will heal whatever needs it most, including the monsters. Initially, ''you'' will need it most, so this won't be a problem. But as the battle progresses you may come to regret not having ditched her. |
||
| − | |||
| − | The first order of business is to attack the Rangers on the south stairs. Try to kill one or both of them before the mob from the west arrives. This way your casters can huddle in the southeast corner in relative safety and get away from those debilitating shots before their energy is completely drained. As soon as the mob from the west arrives, kill the Elementalist immediately. Now, finish off the Rangers on the south stairs also if you didn't get them both killed before the Elementalist arrived. Next, take out the rest of the mob that came from the west, clearing an expanding safe patch from the southeast corner. Move on to the north stairs Rangers, and then finally to the large mob at the top of the north stairs. Although this room is very difficult, try to refrain from using your celestial skills unless absolutely necessary; you are still a long way from the next boss, and they will come in very handy there. |
||
| − | |||
| − | If Danika is still with you, just when you get down to a managable number of monsters and start to think you have the upper hand, the monsters may suddenly become more resilient. That's because Danika is healing them (because you have the upper hand... at least for a moment). If your party's damage output is high enough, you'll be able to kill the monsters despite her healing (in fact, it's quite possible you might not even notice her healing them). If it's not, you have 3 options, none of which is particularly pleasant: (1) You can continue to pound on the weakest monster till Danika runs out of energy, wasting a lot of precious time; (2) You can go aggro and damage more monsters at the top of the north stairs to spread her healing out to the point that she fails; or (3) you can stop healing your party (possibly in conjunction with aggroing more) so that you need healing more than the monsters do and Danika will heal you instead. |
||
| − | |||
| − | Once this battle is done, head all the way north, cross the little bridge east. |
||
| − | |||
| − | === Room 6: Skipped === |
||
| − | |||
| − | Thanks to Danika, you skipped this room entirely. Trust me, it was worth it. There are a lot of Shiro'ken Necromancers here who are very good at cutting down the number of exploitable corpses if your party has a minion master. |
||
| − | |||
| − | === Room 7: Defiant Ancient Sseer === |
||
| − | |||
| − | You must go east through this straight hallway. Run down the right (South) side. Do not run down the left (north) side. The Left side has two mobs patrolling, plus another two mobs that duck into and out of small rooms to the north. At the end of the hallway is the Ritualist boss, [[Defiant Ancient Sseer]], and behind him is a closed door that opens when he dies. Throughout the hall are acid traps which do 20 damage per second if you stay in them. (Just run past these.) |
||
| − | |||
| − | Before entering the hall, line up yourself on the RIGHT side. Start running, simultaneously plant the party flag at the end of the hall, forcing your henchmen to run to the boss. Do not stop, do not fight. If blocked, side step and keep moving forward. Ignore the mobs, kill the boss quickly, and run out the door to trigger the next cutscene before the mobs catch up to you. Having a minion master along helps distract the mobs as the minions stop to attack. Defiant Ancient Sseer himself is actually quite weak and easy to take down, especially if you take down all his spirits first. In fact, a single warrior or elementalist with a charged celestial skill can almost kill him single-handedly. |
||
| − | |||
| − | If your party cannot be counted on to come with you, you will have to pull and fight some or possibly all four of the mobs in this room first. Since every mob has a Monk in addition to the protection of Defiant Ancient Sseer’s spirits, they can prove difficult and time-consuming to kill. If you must fight these mobs, go ahead and use your celestial skills here, since the boss himself does little damage and can be killed without them more easily than these mobs can. |
||
| − | |||
| − | If you do not flag your party, you get mixed results. The henchmen's record for running straight to the boss in this room is mixed. Sometimes all 7 of them follow you directly to the boss and attack him immediately. Sometimes they get distracted by the first or second mob. This leaves you facing the boss alone with two or even three mobs attacking you from behind. |
||
| − | |||
| − | As soon as the boss is dead, head east through the now-open door to trigger the final cutscene. It does not matter whether or not you skip. (With the exception of the very rare event that some monsters from this room followed you into the scene, in which case you should skip.) Do not fight the former mobs, just move into the new room and target/fight the new bosses. |
||
| − | |||
| ⚫ | |||
| − | |||
| − | === Room 8: Three Bosses === |
||
| − | |||
| − | For a room with three bosses in it, this room is remarkably easy. |
||
| − | |||
| − | Head down the stairs to your right and straight for the small bridge that leads to the bosses. As soon as you near the bridge [[Silent Ancient Onata]] and a handful of Shiro'ken will charge you. Stop where you are and let them come. Then whack Onata with all those celestial skills that the last boss’s death just recharged. If you need to, follow up with a few more attacks to kill Silent Ancient Onata. All of the accompanying Shiro'ken should either be dead or close to being dead from all the splash damage. Quickly finish off any stragglers. |
||
| − | |||
| − | Go as far across the bridge as necessary to get [[Arcane Ancient Phi]] in range (all the way if you're a melee character). Hit Arcane Ancient Phi with all the celestial skills Silent Ancient Onata's death recharged. Then immediately fire off every area-of-effect spell you can squeeze in before he dies. The point is not to hit Arcane Ancient Phi, who is already quite doomed, but rather to hit the mostly-untargetable [[Untouched Ancient Ky]] with splash damage. |
||
| − | |||
| − | Finishing [[Untouched Ancient Ky]] is mostly a job for the warriors, since Untouched Ancient Ky hides behind [[Spell Breaker]] most of the time. Luckily, all offensive celestial skills are typed as Skills, not Spells, so Spell Breaker can't block them. After using their celestial skills, any offensive casters in your party should keep testing with cheap spammable spells till Spell Breaker goes down, then fire off their best stuff before Spell Breaker goes back up. |
||
| − | |||
| − | Once all three bosses in this room are dead, the mission is complete. |
||
| − | |||
| − | ==Additional notes and tips== |
||
| − | *If your two chosen heroes at the beginning of the mission die before they can help you, they will not be able to skip monsters for you. |
||
| − | *The [[Shiro'ken Elementalist]] carry the skill [[Sliver Armor]], and should be stripped or it can easily slay your tank. |
||
| − | *Tanks are advised to carry heavy duty defenses. W/E using [[Armor of Earth]] and/or [[Stoneflesh Aura]] will eliminate the threat of [[Sliver Armor]] entirely. |
||
| − | *Protection Monks are advised to bring [[Shielding Hands]] or [[Shield of Absorption]] to aid the tank against [[Sliver Armor]] |
||
| − | *A protection monk with [[Protective Spirit]] is recommended to counter the high damage spells. The protection henchman at Raisu Palace does not spam this skill. |
||
| ⚫ | |||
| − | *For bosses, especially the Elementalist boss, use [[Pain Inverter]], returning the full dmg of [[Sliver Armor]] to him. Other bosses are vulnerable too. |
||
| − | *When going for Master's, it is useful to keep track of the time throughout the mission. Watch Kisu's health bar, it will give a fair indication of how long you've taken. At around 15 minutes, depending on where your party is, it may be a good idea to run past the remaining monsters and head straight for the boss. This applies to both the hallway before the ritualist boss and the groups of enemies before the second cutscene. |
||
| − | *You may also type /age and it will tell you how long you've been in this map. Take note this time may be off by 1 minute depending on player loading times. |
||
| ⚫ | |||
| − | * Doing this mission in Hard Mode is entirely possible with a full henchman team if you are an E/Me, just use [[Echo]] or [[Arcane Echo]] to copy [[Celestial Storm]]. It makes the mission a whole lot easier. Otherwise, set up one necro hero with [[Spiteful Spirit]] and [[Barbs]] and set up the your other necro hero as a Minion Master with [[Order of Undeath]] and [[Heal Area]]. Healing may be a problem for the MM sometimes, so be ready for it. |
||
| − | *A Minion Master is an excellent damage source, when there is a warrior or more in the party, since their celestial skill [[Storm of Swords]] also affects minions. If Storm of Swords is timed between warriors, getting Masters will be easy. |
||
| − | *An alternate way using heroes and henchman is to have a [[Light of Deliverance]] monk, a E/Me nuker, and a Minion Master. With this you can kill everything quickly, and interrupt as well. |
||
| ⚫ | {{bug|There is a very rare glitch where you can get more than 2 allies, though the extras do not give their bonuses during the mission. This can occur if the party leader loads slower than the second party member: the second player speaks to an ally and clicks "Accept" for that ally, then speaks to a second ally. When the party leader loads, he/she can speak to and "Accept" a third ally, then second player can still click "Accept" for the second ally.}} |
||
| ⚫ | |||
==Creatures== |
==Creatures== |
||
| Line 176: | Line 79: | ||
*{{x}}30 [[Kuunavang]] |
*{{x}}30 [[Kuunavang]] |
||
| − | + | ===Allies=== |
|
*{{w}}20 [[Talon Silverwing]] |
*{{w}}20 [[Talon Silverwing]] |
||
*{{mo}}20 [[Brother Mhenlo]] |
*{{mo}}20 [[Brother Mhenlo]] |
||
| Line 196: | Line 99: | ||
*{{rt}}28 [[Shiro'ken Ritualist]] |
*{{rt}}28 [[Shiro'ken Ritualist]] |
||
| − | + | ===Bosses - elite skill captures=== |
|
| − | *{{w}}28 [[Sword Ancient Kai]] |
+ | *{{w}}28 [[Sword Ancient Kai]] - [[Auspicious Parry]] |
| − | *{{r}}28 [[Famished Ancient Brrne]] |
+ | *{{r}}28 [[Famished Ancient Brrne]] - [[Famine]] |
| − | *{{mo}}28 [[Untouched Ancient Ky]] |
+ | *{{mo}}28 [[Untouched Ancient Ky]] - [[Spell Breaker]] |
| − | *{{n}}28 [[Doomed Ancient Kkraz]] |
+ | *{{n}}28 [[Doomed Ancient Kkraz]] - [[Wail of Doom]] |
| − | *{{me}}28 [[Arcane Ancient Phi]] |
+ | *{{me}}28 [[Arcane Ancient Phi]] - [[Arcane Languor]] |
| − | *{{e}}28 [[Star Ancient Koosun]] |
+ | *{{e}}28 [[Star Ancient Koosun]] - [[Star Burst]] |
| − | *{{a}}28 [[Silent Ancient Onata]] |
+ | *{{a}}28 [[Silent Ancient Onata]] - [[Shroud of Silence]] |
| − | *{{rt}}28 [[Defiant Ancient Sseer]] |
+ | *{{rt}}28 [[Defiant Ancient Sseer]] - [[Defiant Was Xinrae]] |
| + | |||
| + | ==Dialogues== |
||
| + | {{section-stub}} |
||
==Follow-up== |
==Follow-up== |
||
| − | * Upon completion of the mission players will find themselves in: [[Imperial Sanctum ( |
+ | * Upon completion of the mission players will find themselves in: [[Imperial Sanctum (location)]] |
| + | |||
| + | ==Notes== |
||
| ⚫ | |||
| ⚫ | |||
| ⚫ | {{bug|There is a very rare glitch where you can get more than 2 allies, though the extras do not give their bonuses during the mission. This can occur if the party leader loads slower than the second party member: the second player speaks to an ally and clicks "Accept" for that ally, then speaks to a second ally. When the party leader loads, he/she can speak to and "Accept" a third ally, then second player can still click "Accept" for the second ally.}} |
||
| ⚫ | |||
{{C2MissionNavBox}} |
{{C2MissionNavBox}} |
||
Latest revision as of 14:22, 30 May 2010
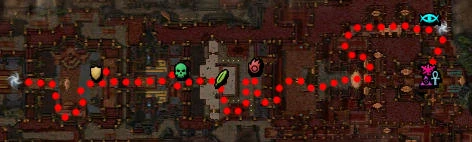
Mission map
This is a mission entry. For information on the location Raisu Palace, see Raisu Palace (location). For information on the explorable area Raisu Palace, see Raisu Palace (explorable).

This article has an associated Zaishen Challenge Quest.
Objectives
Get to the emperor before Shiro kills him!
- <Player name>, you must choose two allies from these heroes to accompany the party.
- Master Togo must survive.
- Mhenlo must survive.
Rewards
Reward Mission completion time XP Gold Skill Points Standard > 25 minutes 1,000 100 1 Expert's 20-25 minutes 1,500 150 1 Master's < 20 minutes 2,000 200 1 Hard mode Standard > 28 min 1,000 200 1 Expert's 26-28 min 2,000 300 1 Master's < 26 min 3,000 500 1
Walkthrough
Allies
Before the fight begins, the party members should speak to Kuunavang, who will offer each player in the party a very powerful celestial skill to help them in this fight. This skill recharges only upon killing a boss, so use it wisely, and don't be afraid to use it if you still have it when fighting a boss.
Henchmen get a celestial skill automatically, while heroes do not. As such, it is not guaranteed that heroes will be more effective than henchmen here. In particular, Lukas, Devona, and Kai Ying get Storm of Swords or Celestial Storm, extremely powerful skills that can quickly destroy a group of mobs. Note that your party will also be accompanied by Brother Mhenlo and Master Togo.
After equipping the new skills, the party leader will be asked to choose two allies to fight alongside the party. The choice is not simply a choice of henchmen but rather which parts of the mission you wish to skip. Each of the six available allies will (at one point in the mission or another) enable your party to skip a portion of the fight against the Shiro'ken. Sorted in order of the portion that they allow you to skip:
- Argo: Lets the party skip the very first fight and head straight to the Warrior boss.
- Talon Silverwing: Lets the party skip the fight after the Warrior boss and head straight to the Necromancer boss.
- Nika: Lets party skip the Ranger boss.
- Cynn: Lets the party skip the fighting before the bridges after the Elementalist boss.
- Danika: Will close a gate on a large room full of Shiro'ken, allowing the party a faster trip to the corridor with the Ritualist boss.
- Panaku: Disables the Acid Traps in the corridor that leads to the Ritualist boss.
For each ally, there is a brief cinematic of his sacrifice, and the party moves on without him. Note that each chosen ally will fight alongside your party until you reach the portion that he allows you to skip, and then leave. If a chosen ally dies before his part, he will not be able to skip monsters for you.
It is recommended that you choose Danika and Cynn as your two allies, though some players prefer Talon rather than Cynn. As soon as the party leader chooses the two allies, the timer will begin and an indicator in the top left part of the screen will show Emperor Kisu's resistance warning which determines how much time the party has left.
Primary
There is a group on the north path and another group on the south path. You can clear either one and ignore the other. Most of the groups in this room will have a few Shiro'ken Elementalists, which have dangerously high damage outputs from Sliver Armor and Star Burst. As such, target these elementalists first in their groups. This is the arguably the hardest portion of the mission, but conveniently right at the start, where failure is inconsequential.
Where the paths rejoin is another similar group that can be dispatched in the same way. Up the ramp is a group with a boss, Sword Ancient Kai, and behind it another group wanders. You can take them all on at once, or wait for the group behind the boss to get out of the way and let the boss group be pulled separately.
If you brought Talon, as soon as you enter the next room, there will be a cutscene of Talon sealing off the portals to the north and south. If not, mobs will slowly stream in from two portals, in addition to a group that comes down the ramp to attack you. Keep your party back near the entrance to the room, only coming far enough into the room to pull the mobs that congregate at the center, and some of the mobs that come out of each portal will be content to stay at their portals. Once all of the mobs that come into the center of the room are cleared, you can move on to attack the boss and its few accompanying mobs. The boss itself, Doomed Ancient Kkraz, will be accompanied by only a few mobs, and is not much of a challenge, even without celestial skills.
Up ramp in the next room is another boss, Famished Ancient Brrne, accompanied by several warriors and rangers. Flag your party near the boss to crowd around and unleash your celestial skills which were just recharged to quickly destroy this group and recharge the skills again.
Beyond this, you must go around the center of the room either to the north or to the south. There are four small groups of 3-4 mobs, mostly Shiro'ken Rangers, that wander around the room. Ideally, you can clear all four groups before taking on the boss, most easily by following both paths. If you have cleared three groups and the fourth is far to the other side of the room, you can sometimes sneak in, kill the boss, and move on.
The boss of this room, Star Ancient Koosun, is the most dangerous boss in the mission. As soon as he aggros (whether you were ready for him or not), your whole party needs to drop whatever they were doing and throw everything they have at him. Fortunately, this boss is not linked to any other mobs, so you can fight him alone.
If you chose Cynn as an ally, as soon as you enter the next room, a cut scene will play, and you will skip the room. If not, an endless stream of mobs will attack you, and you must run through the room to stop them from coming. Don't stop until Danika's cut scene plays.
Unfortunately, if you try to run through as soon as you get to the room, sometimes Togo or Mhenlo will get stuck on some mobs and not come with you, and then die before the cut scene, causing mission failure. One way to avoid this is to pull the three mobs near the door and clear them before you enter the room. The extra mobs do not begin spawning until someone enters the room. Another solution is to flag your party by Mhenlo and Togo while you run through yourself to trigger the cut scene.
After Danika's cut scene, if you also had Cynn, the next room is pretty easy. Clear the rangers and necromancers and move on. If you did not have Cynn, and thus had to run across the bridge, then a flood of mobs will keep chasing you after the cut scene, though they take a bit of time to catch up to you. Clear mobs that aggro on you at the cut scene, but be careful not to pull anything else. Once the flood of mobs behind you catches up, clear them before moving on. This battle can be hard, so don't be afraid to use celestial skills.
The next room has four small groups of three mobs, mostly Shiro'ken Mesmers. Don't stand in the Acid Traps while fighting, and use flags as necessary to ensure that henchmen and heroes attack mobs, not walls. At the end of the room comes another boss, Defiant Ancient Sseer, which is unlinked to any other mobs.
If you want to disable all the acid traps, and have the self-healing to do it, go to the last room on the left closest to the boss and spin the vase inside. The acid traps will be disabled, but the funny looking rain will still be there even though it will do nothing.
The final room has three bosses, and a handful of other mobs. Charge in and use celestial skills to kill whatever comes quickly, usually taking down Silent Ancient Onata first. This recharges your celestial skills, so use them again to kill the other bosses, Arcane Ancient Phi and Untouched Ancient Ky.
Master's reward
Twenty minutes for master's reward is meaningful time pressure, though master's reward is quite doable for any class, even with only henchmen (not heroes). Note that the time you spend at the start getting celestial skills and choosing allies counts toward the cap for master's reward. Choose what you're going to do before entering the mission, so as not to waste time here.
A lot of time is saved by quickly dispatching mobs via Storm of Swords or Celestial Storm, so be sure to bring the henchmen that have those even at the expense of heroes, unless you have several players and thus no room for them. Mobs also group up quite a bit, leaving them vulnerable to other area attacks, which can save a lot of time.
If running short on time in the hallway with the ritualist boss, you can simply rush past the mobs and focus fire on the boss. (If playing with heroes/henchmen, flag them manually.) As soon as he dies, move into the next room to trigger the cutscene and move the party to safety.
Hard mode
Danika and Cynn are definitely the allies to choose. Mobs hit a lot harder in hard mode, but don't take much more damage to kill, as they only gain two levels. Your four allies (everything beyond Cynn's cut scene is quite easy) are far more durable in hard mode, however, making the mission scarcely harder than before. While the mission doesn't really take any longer, you do get an extra six minutes allowed for master's reward.
About the same tactics as above still work nicely, though you may take a couple deaths here and there when fighting elementalists. Death penalty gets worked off fast, so it isn't likely to be a problem unless you take enough to run out of rez signets. The first room is by far the hardest, and is conveniently right at the start.
With Danika and Mhenlo as quite powerful allied healers, a party needs no more than two additional healers. A protection monk with Shield of Absorption or Shielding Hands works well against the elementalists, and Extinguish can quickly clear the disease spread by the necromancers' Rotting Flesh.
Creatures
NPCs
 30 Kuunavang
Allies
 20 Talon Silverwing
- 20 Brother Mhenlo
- 20 Danika
- 20 Argo
- 20 Cynn
- 20 Nika
- 20 Panaku
- 20 Master Togo
Monsters
- 28 Shiro'ken Warrior
- 28 Shiro'ken Ranger
- 28 Shiro'ken Monk
- 28 Shiro'ken Necromancer
- 28 Shiro'ken Mesmer
- 28 Shiro'ken Elementalist
- 28 Shiro'ken Assassin
- 28 Shiro'ken Ritualist
Bosses - elite skill captures
- 28 Sword Ancient Kai - Auspicious Parry
- 28 Famished Ancient Brrne - Famine
- 28 Untouched Ancient Ky - Spell Breaker
- 28 Doomed Ancient Kkraz - Wail of Doom
- 28 Arcane Ancient Phi - Arcane Languor
- 28 Star Ancient Koosun - Star Burst
- 28 Silent Ancient Onata - Shroud of Silence
- 28 Defiant Ancient Sseer - Defiant Was Xinrae
Dialogues
Follow-up
- Upon completion of the mission players will find themselves in: Imperial Sanctum (location)
Notes
- You MUST kill every boss in the mission to win. If you skip any of them, you must return and kill them before the mission will end.
- The skills available for capture from this mission are the same as the skills used in Tahnnakai Temple, so it is not advisable to do this mission with the sole intent to capture.
