(→Notes) |
(→Foes) |
||
| Line 30: | Line 30: | ||
===Foes=== |
===Foes=== |
||
| − | *[[Charr]] |
+ | *'''[[Charr]]s''' |
**{{w}}{{e}}20 [[Charr Axemaster]] |
**{{w}}{{e}}20 [[Charr Axemaster]] |
||
**{{w}}{{e}}20 [[Charr Blademaster]] |
**{{w}}{{e}}20 [[Charr Blademaster]] |
||
| Line 44: | Line 44: | ||
**{{rt}}20 [[Charr Avenger]] |
**{{rt}}20 [[Charr Avenger]] |
||
| − | *[[Jelly]] |
+ | *'''[[Jelly|Jellies]]''' |
**{{w}}20 [[Aggressive Ooze]] |
**{{w}}20 [[Aggressive Ooze]] |
||
**{{me}}20 [[Shimmering Ooze]] |
**{{me}}20 [[Shimmering Ooze]] |
||
**{{e}}20 [[Earthbound Ooze]] |
**{{e}}20 [[Earthbound Ooze]] |
||
| − | *[[Fleshreaver]] |
+ | *'''[[Fleshreaver]]''' |
**{{rt}}20 [[Fleshreaver Harrower]] |
**{{rt}}20 [[Fleshreaver Harrower]] |
||
**{{mo}}20 [[Fleshreaver Hound]] |
**{{mo}}20 [[Fleshreaver Hound]] |
||
Revision as of 19:17, 22 September 2007
| Rragar's Menagerie | ||||||
|---|---|---|---|---|---|---|
| ||||||
| Basic Info | ||||||
| ||||||
| Neighbor(s) | ||||||
| Sacnoth Valley | ||||||
| Map | ||||||
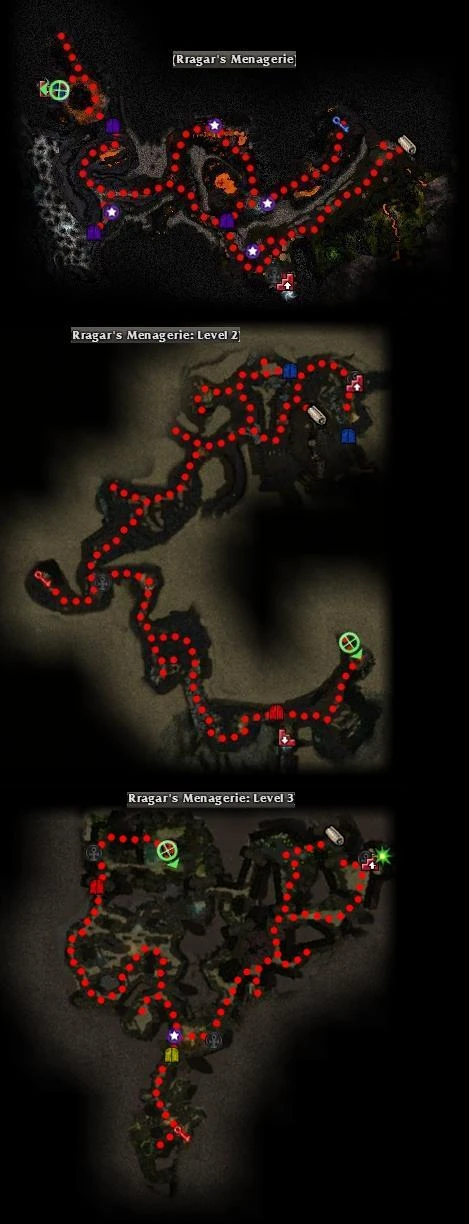 (click to enlarge) | ||||||
General Description
Region: Depths of Tyria
Rragar's Menagerie is a three-level dungeon full of Charr.
To fully explore this dungeon you need the Veiled Threat quest from Gron Fierceclaw.
Getting There
Go south from Doomlore Shrine through Dalada Uplands into Sacnoth Valley. The entrance to the Menagerie is in the southwest corner.
Quests
Creatures
Allies
Collectors
Foes
- Charrs
 20 Charr Axemaster
- 20 Charr Blademaster
- 20 Charr Bladestorm
- 20 Charr Shadowblade
- 20 Charr Seeker
- 20 Charr Prophet
- 20 Charr Mender
- 20 Charr Hexreaper
- 20 Charr Dominator
- 20 Charr Wardkeeper
- 20 Charr Flameshielder
- 20 Charr Avenger
Boss like creatures
- Level 1
- 24 Charr Warden
- Levels 2 & 3
Bosses
- Level 1
- 29 Rragar Maneater (will make a "tactical retreat" when too damaged)
- Level 2
- 24 Beastmaster Korg (Scavenger's Focus)
- 29 Rragar Maneater (will make a "tactical retreat" when too damaged)
- Level 3
Rewards
- 300 Ebon Vanguard reputation points
Unique Items obtainable from the Hidesplitter's Chest:
Notes
- Be cautious of ooze popups in the western cave on the first floor. The large char groups coupled with the AoE of the Earthbound Ooze and sheer numbers due to Ooze Division can easily overwhelm. Sweeping and pulling is key.
- On the first floor there is a hidden Dwarven Ghost on the path from the start to the area map and another one in the middle of the charr group that holds the dungeon key. Use Light of Deldrimor to reveal them. There is an unmarked cracked wall just near the second Dwarven Powder Keg Station, to the North of it. It leads to a secret passage with another Dwarven Ghost at the end of it. Taking the passage behind the cracked wall on the Westernmost part of the map is not recommended due to numerous Ooze popups. It does not contain any treasures.
- On second floor there a hidden treasures near most of the Elder Nephilims, and one just next to the boss lock.
- On third floor there is a Secret Switch just South of the entrance. It reveals a passage with 3 Hidden Treasures and a Dwarven Ghost.
- On third floor there are two powerful necromancer bosses, Flesheaters, in the south cave. They use potent death magic AoE spells, hexes, and corpse consuming spells and surrounding enemies also do AoE damage. It's recommended to concentrate on a single target at a time.
- At the last two bosses it is recommended to stay behind the rock in south to block their spear attacks. Don't follow the bosses since they come back by themselves. Concentrate first on Rragar Maneater, or he will resurrect Hidesplitter.
- Rragar Maneater has no inherent health regeneration.
- Be prepared for a long session. Due to sheer size of this dungeon, as well as the constant 'need' to stop, sweep and pull, completion time could exceed two hours.
- Players should display the Ebon Vanguard title Rebel Yell, to protect against the Charr.