| (42 intermediate revisions by 17 users not shown) | |||
| Line 1: | Line 1: | ||
[[Image:Eternal_Grove_Mission_Map.jpg|thumb|200|right|Eternal Grove Mission map]] |
[[Image:Eternal_Grove_Mission_Map.jpg|thumb|200|right|Eternal Grove Mission map]] |
||
| + | {{Zaishen Quest}} |
||
| − | |||
| + | {{Location Explorable info| title = The Eternal Grove}} |
||
| − | ''This is a [[mission]] entry. For information on the [[location]] The Eternal Grove, see [[The Eternal Grove (Location)]]. For information on the [[explorable area]] The Eternal Grove, see [[The Eternal Grove (Explorable)]].'' |
||
==Objectives== |
==Objectives== |
||
| Line 9: | Line 9: | ||
==Rewards== |
==Rewards== |
||
| − | {{Mission rewards |
+ | {{Mission rewards |
| + | | Objective = [[Tree Singer]]s remaining |
||
| − | |Standard = 1..5 |
||
| − | + | | Standard = 1..5 |
|
| + | | Expert = 6..11 |
||
| − | + | | Master = 12 |
|
| + | | Title = [[Faction (Kurzick)|Kurzick faction]]<sup>1</sup> |
||
| + | | NMTitlePoints = 1000 |
||
| + | | HMTitlePoints = 1000 |
||
| + | }} |
||
| + | :<sup>1</sup> You can only earn the faction reward the first time you complete the mission at a certain level in either mode, you will not earn faction for completing it in the other mode. |
||
==Walkthrough== |
==Walkthrough== |
||
| + | ===Primary=== |
||
| − | + | There is an additional health display on the top left corner of your screen, which shows the health status of the three Forever Trees. The trees are located at the points 1, 2, and 3 on the map. There are four [[Tree Singer]]s grouped around each of these trees, each of which accounts for one quarter of the tree's hit points. When the singers are damaged, the health bar of their tree will degrade, and if a tree singer dies his tree's health bar will not regenerate back up to 100%. When all four singers of one tree are dead, so is the tree. Note that this does not result in a failure of this mission! Success only requires one tree singer (out of 12) to survive. While in the area near the trees, you will get the [[Aura of the Grove]] environmental effect, which boosts your running speed. |
|
| − | Each tree has an associated [[Juggernaut]] in the mission. Each juggernaut will continuously resurrect as long as its forever tree stays alive. In addition to providing the [[Aura of the Juggernaut]], the juggernauts make great tanks and do good damage as well. |
+ | Each tree has an associated [[Juggernaut]] in the mission. Each juggernaut will continuously resurrect near the north tree as long as its forever tree stays alive. In addition to providing the [[Aura of the Juggernaut]], which boosts your energy regeneration, the juggernauts make great tanks and do good damage as well. You can talk to a juggernaut to make it follow you, and talk to it again to make it stop. |
| + | ====Luxon attack==== |
||
| − | '''Tip:''' You can get a Juggernaut to follow you by talking to it, unless it is already following someone else. This is a good way to bring the Aura of the Juggernaut with you if you need to leave the Grove. |
||
| + | There are two types of Luxon groups. One consists of pairs of [[Luxon Warrior]]s, [[Luxon Elementalist|Elementalist]]s, and [[Luxon Ranger|Ranger]]s. These will rush into the grove to attack tree singers. They must go through one of the two gates, so it helps to guard both gates and intercept them there. |
||
| + | The other type of Luxon group consists of a [[Siege Turtle]] and two or three rangers. These will go to a hill (marked X on the map) overlooking the grove and stay there. The siege turtle will bombard the corresponding tree, and kill tree singers if ignored. Siege turtles may attack your group instead if you get close. The rangers that accompany the siege turtles will not attack the grove, but will only attack you if you come near. |
||
| − | The mission takes place in a very small area. Usually you will rarely venture very far from the hill with the trees, which is also the starting area. There are two gates leading up to the hill. With a well coordinated and balanced team it is possible to block both gates so that no attacker can enter and be a threat to the Tree Singers. Unfortunately, you will also have to leave the area to dispatch long range attackers. You should only do so when necessary, so that you can benefit from both the [[Aura of the Juggernaut]] (which boosts your [[energy]] regeneration) as well as the [[Aura of the Grove]] (which boosts your movement speed) as much as possible. If you are doing the mission with henchmen, you will of course have to run back and forth between the gates. In this case it will often be advantageous to attack approaching enemies as soon as they come into view and not wait for them all to converge on you. |
||
| + | The siege turtle groups come, in order, from the west, south, north, south, north, and west. The other pairs of Luxons come from all three directions, and sometimes take circuitous routes on their way to the grove. |
||
| − | Both [[Mhenlo]] and [[Danika]] will always be there as mission NPCs. Unfortunately you will have no control over them whatsoever. It does not matter if one or even both of them die, you will not fail the mission. |
||
| + | It helps to go far west of the grove to kill a siege turtle and several Luxons at the very start of the mission. After this, hang back in the grove and kill any Luxon raiders that come, leaving only to kill siege turtles. If you can split your party (e.g., with heroes), it can help to have a couple characters guard one gate while the rest of the party leaves to kill a siege turtle in the other direction. The rest of the party can readily intercept any Luxons heading for the other gate before they get there. |
||
| ⚫ | |||
| + | Once all siege turtles that come from the west and their accompanying Luxons are dead, there will be a cut scene. It is not necessary to kill the rangers that accompany the siege turtles that come from the north or south. Indeed, most such rangers that are left alive will become your allies at the cut scene, so it can be beneficial to leave them. |
||
| − | The Luxons will attack from all sides, coming down the paths from the north, west and south. The first wave will be the strongest and come from the west. It can be advantageous to intercept this group early, before it reaches the Grove, and splits up. After this, attacking groups will consist of pairs of [[Luxon Warrior]]s, [[Luxon Elementalist|Elementalist]]s, and [[Luxon Ranger|Ranger]]s only. Dispatch the smaller groups quickly, making sure not to let any Warriors or Elementalists get past you to the Tree Singers, as they can take down a Singer in a matter of seconds. Do not go after the [[Siege Turtle]]s as long as there are any Warriors or Elementalists around. The Rangers can be mostly ignored, as they don't deal much damage and will be taken care of by the Juggernauts. The Siege Turtles will come down the paths from all three sides and start firing once they arrive on the small hills, marked with an X on the map. Each Turtle has an escort of three Rangers, which again can simply be ignored, as they will not attack the Tree Singers. |
||
| + | ====Afflicted attack==== |
||
| − | After several waves a second wave of Siege Turtles and Luxon Rangers appears, one for each tree. Defeat the final 3 Siege Turtle groups starting with either the South or North and keeping an eye out for attacking groups spawning on the other side. Killing the final wave triggers the cutscene, which will explain the second part of the mission. |
||
| + | After the cut scene, your defenses will be reinforced by two Luxon warriors and two pet crabs at each gate. [[Mhenlo]] will go to the north gate to heal. [[Danika]] will stay back initially, but often step up to heal. Most Luxon rangers left alive at the cut scene will become allies, and will run back and forth between the hill they were at and the gate on that side. If not all such rangers become allies, those that do will usually kill those that don't. |
||
| + | Twelve groups of afflicted will assault the grove, split into five distinguishable waves. Unlike the Luxons, the afflicted have no means of bombardment, so you can guard the two gates and wait for them to reach you there. The waves are timed, and one wave can come before all mobs in the previous wave are dead. Indeed, the second wave will usually arrive before the first is completely cleared. |
||
| − | '''Note:''' The cutscene is triggered once the Siege Turtle group (turtle plus rangers) attacking the Western tree is completely killed. If any Luxon Rangers remain after killing the Northern and Southern Siege Turtles they will become your allies after the cutscene. Therefore it is advised to only kill the Siege Turtles and always leave the Luxon Rangers (except in the western group). This is simple as the Rangers will remain on the hill. |
||
| + | The first wave has mobs that attack both gates, but more attack the southern gate. The second wave is similar, and includes the warrior boss [[The Afflicted Maaka]] at the south gate. The third wave balances the mobs more evenly between the two gates. In the last two waves, most of the mobs attack the north gate, with only two or three attacking the south gate. The last wave also brings two bosses to attack the north gate, [[The Afflicted Senku]] and [[The Afflicted Xenxo]]. When all afflicted are dead, the mission is completed. |
||
| − | ===Second part=== |
||
| + | The second part of the mission is harder than the first. As it is a point defense mission, standard area defense tactics such as [[trap]]s or a [[minion master]] can be useful. Spirit range is long enough that a spirit dropped in the middle of the grove can have its effect throughout the grove, affecting combat at both gates simultaneously. Ritualist spirits such as [[Recuperation]] and [[Life]] will not merely heal party members at both gates at once, but your Luxon allies, Juggernauts, Mhenlo, and Danika, as well. |
||
| − | This part is mostly the same as the last, however the opponents are both more difficult and more plentiful. The handful of newly-acquired allies you have will not make up for this. One of the best approaches for holding off the Afflicted is to block the gates with one or two [[tank]]s and have the rest of the party use ranged attacks and skills, so that not too many are hit by the [[Afflicted Soul Explosion]]s, which occur whenever an Afflicted dies. The Afflicted do not have any siege weapons, so it is safe to wait for them inside the Grove. Several of the attacking groups will also have a boss with them. If a boss is attacking a Tree Singer directly, it can be very helpful to place [[Protective Spirit]] on all tree singers around that tree, as a single boss [[Afflicted Soul Explosion]] can easily hit the Singers for 3/4 of their total health. |
||
| + | Note that if you only care about mission completion and not master's reward, you only have to keep one tree singer alive. If having trouble with the mission, you could camp out in one spot and fight mobs there. The north tree is probably the most easily defensible, as it contains Mhenlo and the juggernaut respawn point. |
||
| − | The Juggernauts make great tanks during this part of the mission, as long as the forever trees stay alive. They absorb damage well and if killed resurrect almost immediately, very close to the fighting. |
||
| + | {{bug|It is possible that during this attack, the Luxon Rangers will die, leaving their Reef Lurkers behind and invulnerable for a brief period of time.}} |
||
| − | '''Note on Success or Getting Masters Reward:''' |
||
| + | ===Master's reward=== |
||
| − | Having two Minion Masters, one on each side, can really tip the battle in your favor, just don't forget to have [[Soul Feast]] or some other way of healing yourself after you use [[Blood of the Master]]. Another very helpful tactic is to deploy trappers on each gate. |
||
| + | To get master's reward if grouped with only henchmen here is unusually difficult. You can try flagging henchmen off to one area while you guard another, and using juggernauts to accompany you, providing a more even group split. It is possible to do either portion of the mission without losing any tree singers even with only henchmen, but you'll most likely need either heroes or other players in order to effectively split your group and get master's reward. Getting master's reward with heroes and henchmen is much more doable, so the remainder of this section will assume the presence of heroes or players who can move independently of the rest of the group. |
||
| + | For the group setup, it helps to have a ritualist with [[Recuperation]], [[Life]], and some other healing spells. It also helps to have a minion master who can keep some minions up even with corpses only intermittently available. Spells such as [[Animate Flesh Golem]], [[Animate Bone Minions]], [[Animate Shambling Horror]], and [[Jagged Bones]] can effectively provide multiple minions off of one corpse making them more effective than other minion spells. The minions are going to have to take some hits and die, so it is better to bring [[Death Nova]] for a minion bomber build than to try to heal them. The other six party members should comprise a reasonably well-balanced group of six. |
||
| − | Skipping the cutscene towards the second part of the mission will delay the Afflicted for a few seconds. Useful for any preparations that you might need to make (such as moving the Juggernauts). |
||
| + | The entire party should initially head west of the grove to kill the first siege turtle and the various Luxons near it. After that, come back to the grove and leave two party members (one of which is a healer) standing in the north gate to kill any Luxons that attack from that side. The rest of the party can guard the south gate, then head out to kill the south siege turtle when it comes. After that, switch the two party members at the north gate to the south gate while the rest of the party heads to the north gate. Kill the north siege turtle when it comes. Repeat this shuffling to kill the next two siege turtles, and then the six party members at the north gate can head over to kill the siege turtle party coming from the west, triggering the cut scene. |
||
| − | The last wave of Afflicted will attack from the North, but be aware that two Warriors will flank through the Southern stairs and eventually kill a tree singer if you haven't been paying attention and all your forces were deployed to the North. |
||
| + | After the cut scene, send all three juggernauts and the minion master to the north gate, the ritualist to the center of the grove, and the rest of the party to the south gate. If a juggernaut dies, then move it back to the north gate between waves. The ritualist should cast recuperation and life as often as possible to heal, and various other healing spells to heal party members or allies on either side as appropriate. |
||
| − | Self healing and high damage can essentially allow you to assassinate each Siege Turtle and the Luxon Rangers along with it while you leave your party/heroes/henchmen behind to defend the hill. However, do keep in mind that if you die, it will become difficult to revive you. |
||
| + | The ritualist should not set up any attacking spirits in the center of the grove. Mobs prefer to attack things that are attacking them, so this can make them run to the center of the grove to kill a spirit. Mobs also prefer nearby targets over distant ones, so after killing an attacking spirit, they sometimes move on to attack tree singers. A hero ritualist should not bring any attacking spirits for this reason. A player ritualist can set up attacking spirits by the gates, but not in the center. A player ritualist can even set up the same attacking spirit by each gate and have two copies of it up and fighting at the same time. |
||
| − | '''Note on Henchmen:''' |
||
| − | The second part is quite difficult to do with henchmen. Stick to guarding either the Northern or Southern tree. Stand close to the tree, and do not go down the stairs. It may not be possible to keep all the Tree Singers alive, but you will complete the mission. Spellcasters will have an easier time. |
||
| + | Depending on the course of the fighting, a character from the south gate may need to go help at the north gate once the south gate is reasonably secure. Once the mobs to the south are cleared in the second and third waves, all characters defending the south gate should help clear the north gate. This setup should get you through the first three waves. When you get a message saying that 3 groups remain, it's time to change tactics. |
||
| − | You could also try letting all your Henchman defend 1 side, and you and all the Juggernauts the other. Then when your Henchmen team has defended their side, they could go and help you. |
||
| − | + | After that, send two or three characters (including a healer) to the south gate while the rest of the party defends the north gate. The characters at the south gate should clear the couple of afflicted that come, and then head over to help at the north gate. Once the fourth wave is clear, the two or three characters can return to the south gate to kill the couple of afflicted that come there in the fifth wave, before again returning to the north gate to fight. |
|
| ⚫ | |||
| − | After the cutscene put all your heroes and henchmen on the south gate. Pull the Juggernauts with you to the north. Mhenlo will have to be your healer so don't stray from him too far. Using a trapper build makes things easier, since the snares will slow the Afflicted down so the Juggernauts can get in to melee range of them. Keep track of Juggernaut deaths and run back up to the north tree to get them down to the fight faster. |
||
| + | To complete this mission with only henchmen and heroes is unusually difficult. As such, let us assume that your party consists entirely of players and heroes. Two players and six heroes is sufficient. |
||
| − | |||
| − | When the final wave comes, both bosses come to the north gate so watch for when the south gate is clear. Release your heroes and henchmen to help you out, but make absolutely sure there are no more foes at the south gate - a single loose enemy will still make short work of the Tree Singers. |
||
| + | As usual in hard mode, not only are enemies greatly strengthened, but so are your NPC allies, which is vital, as you have a lot of them. AI prefers to attack weaker targets over stronger targets, so mobs will usually prefer to attack members of your party rather than your NPC allies. In particular, the [[Afflicted]] will usually leave [[Tree Singer]]s alone until all other party members and most allies nearby are dead. This helps greatly in getting master's reward, to the degree that if you can finish the mission at all, you probably won't lose any tree singers after the cut scene. |
||
| − | '''Master's Strategy with Heroes and Henchmen:''' |
||
| − | The whole idea for Masters is to never loose a [[Tree Singer]]. If a single one dies, Masters is forfeit. |
||
| + | The party should include a ritualist with [[Recuperation]] and [[Life]]. The ritualist can be flagged in the middle of the grove when fighting afflicted and these spirits will heal both your party members and all NPC allies on both sides at once. |
||
| − | What works well, if you have two Necromancer [[Heroes]] (Like [[Master of Whispers]] and [[Livia]]), is to set them both up a Minion Masters with [[Blood of the Master]] and [[Soul Feast]] (both very important). For your third hero take an excellent healer ([[Dunkoro]], [[Ogden Stonehealer]]). For henchmen take [[Redemptor Karl]] (protection), [[Jamei]] (healer), [[Cynn]] (fire elem), [[Lukas]] (tank). For yourself, set yourself up for lots of physical damage (for GWEN players [[Ursan Blessing]] (elite) is excellent). |
||
| + | The party should also include at least one minion master, and possibly two. Use a minion bomber build, as trying to keep minions alive is pretty futile. Instead, raise minions, [[Death Nova]] them, and let them die. Skills such as [[Animate Flesh Golem]], [[Animate Shambling Horror]], and [[Animate Bone Minions]] that can effectively raise multiple minions from a single corpse work especially well. Avoid [[Blood of the Master]], as the health sacrifice from that is likely to get your minion master killed. Heroes are probably better than players at this, as players have difficulty finding minions to death nova them amid the mayhem. |
||
| − | Strategy for both waves: Set flags for one necro and the healer on the left gate (the first gate to be attacked is the left gate. The one [[Mhenlo]] stands by is the right gate). Set the flag for the other necro at the right gate. [[Mhenlo]] will heal the right gate necro. |
||
| + | Assume that virtually all resurrecting will be done in combat--and that you will have to do some resurrecting in combat. [[Rebirth]] is useless, and skills that revive a character with little health may not be terribly useful. |
||
| − | Make sure to leave those flags planted for the entire time. It is best not to flag the rest of the henchmen at all, but if you have to do it VERY carefully so that the heroes stay put. |
||
| + | The mobs that come do so at set times, and do not wait until the previous mobs are dead. This can be particularly deadly if the third or fourth wave of afflicted comes before the previous is cleared. Afflicted tend to group up a lot, and as such, skills that damage several mobs at once without making mobs scatter out of the way are highly useful. Area [[hex]]es, [[condition]]s, and [[ward]]s that dampen mob damage are also quite useful. |
||
| − | When the [[Luxon]] battle commences and the [[Juggernaut]] appear, click on one [[Juggernaut]] and have him follow you to the Left gate as you engage in battle there. Take the time to click on the [[Juggernaut]] again to plant him at the gate. Once the first group is taken care of rush to the next two [[Juggernaut]] and get them to follow you to the right gate. As you fight at the right gate, make sure to click on the [[Juggernaut]] so that they stay planted at the right gate (two of them). |
||
| + | At the start, the whole party should head west to kill the 10 or so Luxons that come. Speed matters here, as if they aren't killed fast enough, mobs can slip into the grove while you're away and kill undefended tree singers. In particular, delays in loading the mission may force a restart. |
||
| − | Main strategy for fighting: Work your way between the two gates by running in front of the middle tree (it does not matter if its on the grass or on the little road up to the tree). When foes arrive at the gates, run close to the middle tree before targeting a group so that your support (you and the unflagged henchmen) is covering the closest foes to the middle tree. You will spend time switching from gate to gate as foes try to enter. While standing close to the middle tree, use "slash space" on your keyboard to target the closest foe. Never let a foe free inside the gates. Always target foes inside the gates before targeting foes outside. Period. |
||
| + | After that, split your party into two reasonably balanced groups of four, and send one to each gate. Each group should kill any Luxons that come to that gate. If the gate is not under attack and a [[Siege Turtle]] comes on a group's side, the group can go out and kill the siege turtle and its accompanying [[Luxon Ranger]]s. |
||
| − | If a hero or hench dies, make sure they get resurrected quickly, specially the necros. If a [[Juggernaut]] dies, make sure to go get another one once they re-appear next to a tree. Let them follow you as you fight and plant them only when your targeting needs get you back to the gate they belong. |
||
| + | Two siege turtles will come to each side, and eventually, another siege turtle will come from the west. Clearing that last siege turtle group will trigger the cut scene. Do not do this until all other Luxons are dead. Also reposition juggernauts such that two are near the north gate and one is near the south gate, for use after the cut scene. |
||
| − | In the [[Luxon]] battle, stand your ground inside the gates till there is an obvious lull in the fight. This is the time to go take out a [[Siege Turtle]]. A good thing to do is to take out a Turtle, leaving any surviving Luxon behind. The ones left alive are of little consequence. It is more important to run back inside the gates when one of the heroes health meters starts moving. Never stay outside the gates for very long. Journey just long enough to kill a Turtle (maybe two Turtles if they are together, and maybe a few Luxons if they are fast kills) and back. It is very easy to loose a [[Tree Singer]] because a stray foe got through the gates. |
||
| + | Any Luxons that are still alive at the cut scene are likely to turn allied, though siege turtles are less likely than other Luxons. This is actually a problem for you, as the Luxons will wander back and forth from the grove to the hill where they were stationed with a siege turtle, and probably be attacked by afflicted far outside of the grove. If this happens, it will delay the first wave of afflicted reaching the grove, but the afflicted will win, and arrive at the same time as the second wave, which can overwhelm your party. Furthermore, NPC allies that spawn inside the grove may chase outside of it to help the Luxons fighting well outside of it, so you end up with fewer NPC allies rather than more once the fighting starts. |
||
| − | In the [[Afflicted]] battle, skip the cinematic. Period. You need the extra time to set up. |
||
| − | Get your heroes back in their places (exactly as before). Quickly start getting the [[Juggernaut]] in place (two on the right gate, and one on the left gate). |
||
| + | After the cut scene, flag the ritualist in the center of the grove, to heal all allies on both sides from there. Flag a minion master at the north gate, near where Mhenlo stands, while the rest of the party defends the south gate. The rest of the party should spread out a bit, to not all get hit by [[Afflicted Soul Explosion]]s at once. |
||
| − | Now sit at the middle tree and let them come. As they approach the gates, make sure you select your targets while standing close to the middle tree. This assures you are attacking foes that are about to enter the gates. |
||
| + | Nearly everyone should stay behind the gates at nearly all times while fighting afflicted. Until a wave is nearly cleared, assume that if you take so much as a single step beyond the gate, you'll die instantly unless you have significantly over 100 armor. That's not quite true, but it is pretty close. Only [[Juggernaut]]s and very heavily armored players or heroes should go out beyond the gates, and even those should beware of outrunning their healing. If any mobs get behind you, kill the ones behind you, rather than moving up to kill casters. Juggernauts will take very heavy damage, and are the best tanks you have, so it can help to heal them. |
||
| − | DO NOT go outside the gates AT ALL during the [[Afflicted]] battle. The Necroes will keep them busy at the gates as you select the targets closest to the middle tree. The last group of [[Afflicted]] brings two bosses with them. Make sure the left gate is clear of foes before you attack the bosses at the right gate. Let the first boss enter the right gate a bit. Remove your hero flags, and take one boss out at a time. Make sure to kill the [[Afflicted Monk]]s first. |
||
| + | The first wave comes and won't be entirely cleared before the second arrives. When the second wave arrives, kill [[The Afflicted Maaka]] as quickly as possible, and keep it [[blind]]ed or [[weakened]] until it is dead. Once the boss is dead, it may sometimes be necessary for one or two characters to help out at the north gate. |
||
| − | With a bit of luck and good healing you will be able to make Masters easily. |
||
| + | After the second wave is clear (7 groups remaining), reposition juggernauts as before. The third wave distributes mobs more evenly than the second, so it can help to move a party member to the north gate for reinforcements. When the third wave is clear (3 groups remaining), reposition juggernauts as before again if any have died. If you can clear the third wave significantly before the fourth wave arrives, you'll almost certainly win. |
||
| − | It may take a few trial runs to get it right, but the strategy works well. It helps to bring a [[Powerstone of Courage]] so you can to remove ALL death penalty from your party half way through the [[Afflicted]] battle. Also any attribute raising goodie ([[Candy Apple]], [[Candy Corn]], [[Golden Egg]], etc) comes in handy. |
||
| + | The last two waves send most mobs to the north gate, and only 2 or 3 to the south gate. A couple party members at the south gate with healing from the ritualist in the center can hold that gate, while the rest of the party defends the north gate. Once the south gate is clear, the characters there can help at the north gate. |
||
| − | Another way to do this, if you only have one Necromancer hero is is with 2 Monk heroes, and one Minion Master hero, with Erys Vasburg, Jamei, Devona, and Cynn. As soon as the mission starts, flag the two healers anywhere in the Grove, and flag everyone else to where the first Siege Turtle will be coming. Flag the first healer to the tree that is going to be attacked first (2 on the map) and the second one to the one that is going to be attacked next (3 on the map). When the Juggernauts spawn, place two at one gate, and one at the other, while you help guard the gate with only one Juggernaut. |
||
| − | |||
| − | By now, the 5 other Henchmen should be fighting the first group of Luxons while your healer at tree 2 makes sure no Tree Singers die. If your henchmen take too long to kill the first group, and the second group comes, your second healer at tree 3 will keep the Tree Singers alive long enough for your henchmen to kill the first group, so they can move onto the second group and you can reposition your first healer to Tree 3 if two healers are needed, or move it to Tree 1, so it can protect the Tree Singers there from the next group. Repeat all of these steps and continue repositioning your healers so that no Tree Singers are injured too much until all of the Luxon waves are over, which will begin the second part. |
||
| − | |||
| − | Call all of your Henchmen back into the Grove, and in one gate, set 2 Juggernauts, yourself, one Healer and the Minion Master. Send everyone else, including the last Juggernaut to the other gate and wait for the Afflicted to come. Try sending the Juggernauts out at the bottom of the steps leading to the Grove, so they will be the first to draw the aggro while everyone else kills the Afflicted. If any Juggernauts die on your side, quickly flag over Devona to your side to help with the fighting while you bring it back. If the Juggernaut at the other gate dies, flag Cynn to your side to help fight while you bring the Juggernaut back. Be sure not to let any Afflicted get inside the Grove, especially the bosses, you will need to pull forces away from the gate to finish them off quickly, which risks letting even more in. If one gate is in more trouble than the other, move some henchmen to the gate that needs it. Keep this up and eventually all of the Afflicted will be gone. |
||
| − | |||
| − | ===Hard Mode Tips=== |
||
| − | |||
| − | Rather than the usual build on each team, bring one solid ranger who can attack the luxon turtle in the centre area from the middle forever tree (this means they dont have to leave the base and risk wiping a side). This way you dont leave the base and the tree singers exposed to attack from other approaching foes (because unless you have a very strong team you won't be able to kill the luxons in the centre fast enough to get back to your door). The luxon rangers who come with the turtle will just sit there until the end of the Luxon part of the mission and will become your allies afterwards (though they get rapidly wiped out by the afflicted after the cut-scene). |
||
| − | |||
| − | During the afflicted phase of the mission each team should have a good prot monk who will precast Protective Spirit on his teamates when the Afflicted elementalists appear (Otherwise they can easily wipe a side out in a matter of seconds). Also having two human monks is suggested as they can heal the juggernauts to ensure continued tanking (if your MM's minions are dead). |
||
| − | |||
| ⚫ | |||
| ⚫ | |||
==Creatures== |
==Creatures== |
||
| Line 109: | Line 102: | ||
*{{x}}20 [[Reef Lurker|Pet - Elder Reef Lurker]] |
*{{x}}20 [[Reef Lurker|Pet - Elder Reef Lurker]] |
||
*{{x}}20 [[Baron Mirek Vasburg]] |
*{{x}}20 [[Baron Mirek Vasburg]] |
||
| − | *{{x}}28 [[Elite Juggernaut Berta]] |
+ | *{{x}}28 [[Kurzick Juggernaut|Elite Juggernaut Berta]] |
| − | *{{x}}28 [[Elite Juggernaut Klaus]] |
+ | *{{x}}28 [[Kurzick Juggernaut|Elite Juggernaut Klaus]] |
| − | *{{x}}28 [[Elite Juggernaut Lieber]] |
+ | *{{x}}28 [[Kurzick Juggernaut|Elite Juggernaut Lieber]] |
*{{r}}20 [[Luxon Ranger]] |
*{{r}}20 [[Luxon Ranger]] |
||
*{{r}}20 [[Luxon Soldier]] |
*{{r}}20 [[Luxon Soldier]] |
||
| Line 123: | Line 116: | ||
===Foes=== |
===Foes=== |
||
Afflicted |
Afflicted |
||
| − | *{{w}}20 [[Afflicted Warrior]] |
+ | *{{w}}20 (26) [[Afflicted Warrior]] |
| − | *{{r}}20 [[Afflicted Ranger]] |
+ | *{{r}}20 (26) [[Afflicted Ranger]] |
| − | *{{mo}}20 [[Afflicted Monk]] |
+ | *{{mo}}20 (26) [[Afflicted Monk]] |
| − | *{{me}}20 [[Afflicted Mesmer]] |
+ | *{{me}}20 (26) [[Afflicted Mesmer]] |
| − | *{{e}}20 [[Afflicted Elementalist]] |
+ | *{{e}}20 (26) [[Afflicted Elementalist]] |
| − | *{{a}}20 [[Afflicted Assassin]] |
+ | *{{a}}20 (26) [[Afflicted Assassin]] |
Luxons |
Luxons |
||
| − | *{{w}}20 [[Luxon Warrior]] |
+ | *{{w}}20 (26) [[Luxon Warrior]] |
| − | *{{r}}20 [[Luxon Ranger]] |
+ | *{{r}}20 (26) [[Luxon Ranger]] |
| − | *{{e}}20 [[Luxon Elementalist]] |
+ | *{{e}}20 (26) [[Luxon Elementalist]] |
Turtles |
Turtles |
||
*{{r}}24 [[Siege Turtle]] |
*{{r}}24 [[Siege Turtle]] |
||
| − | + | ===Bosses - elite skill captures=== |
|
| − | *{{w}}28 [[The Afflicted Maaka]] |
+ | *{{w}}28 (30) [[The Afflicted Maaka]] - [[Enraged Smash]] |
| − | *{{a}}28 [[The Afflicted Senku]] |
+ | *{{a}}28 (30) [[The Afflicted Senku]] - [[Shadow Form]] |
| − | *{{rt}}28 [[The Afflicted Xenxo]] |
+ | *{{rt}}28 (30) [[The Afflicted Xenxo]] - [[Weapon of Quickening]] |
| + | ==Dialogues== |
||
| − | ==Elite Skill Capture== |
||
| + | ===Inside the mission=== |
||
| − | *[[Image:Warrior-icon-small.png]][[The Afflicted Maaka]] - [[Enraged Smash]] |
||
| + | <div class="dialogue"> |
||
| − | *[[Image:Assassin-icon-small.png]][[The Afflicted Senku]] - [[Shadow Form]] |
||
| + | Tree Singer: ''Today, three brave Kurzicks have volunteered to become new, more powerful juggernauts. We honor them for their sacrifice. Let the Awakening begin!'' |
||
| − | *[[Image:Ritualist-icon-small.png]][[The Afflicted Xenxo]] - [[Weapon of Quickening]] |
||
| + | |||
| + | Baron Mirek Vasburg: ''You must remain vigilant. There have been many signs and omens ... it is certain that the Luxons will attempt to kill the Tree Singers and interrupt the ceremony.'' |
||
| + | |||
| + | Danika: ''Until the ceremony is complete, fear not for my life, or the baron's ... concern yourself only with the lives of the Tree Singers. Without them, all is lost.'' |
||
| + | |||
| + | |||
| + | |||
| + | Baron: ''Ha! These Luxon brutes have no chance against us.'' |
||
| + | |||
| + | Danika: ''I've seen my friends here handle enemies far more frightening than these ragtag savages.'' |
||
| + | |||
| + | Tree Singer: ''You have done well so far, but do not grow complacent. We sense there is much danger lurking in the forest.'' |
||
| + | |||
| + | Danika: ''Grow complacent!? There's not much danger of that, is there? Not with all these bloodthirsty Luxons everywhere.'' |
||
| + | |||
| + | Baron: ''Countess! You should show more respect. Our apologies, honored Tree Singers.'' |
||
| + | |||
| + | |||
| + | |||
| + | Danika: ''Why aren't we done yet? Can't you sing any faster? Honestly, if you doubled the tempo, wouldn't the ceremony finish faster?'' |
||
| + | |||
| + | Baron: ''I expect it is not so simple, Countess. Though perhaps they would finish sooner if there were fewer interruptions.'' |
||
| + | |||
| + | Danika: ''Yes, I know. That's why I've been fighting for the last hour ... so the adagio chorus book there doesn't get interrupted.'' |
||
| + | |||
| + | |||
| + | |||
| + | Brother Mhenlo: ''I am pleased to see Luxons and Kurzicks fighting side by side. Together, you can defeat this Affliction. I believe you ...'' |
||
| + | |||
| + | Danika: ''Let's talk peace after the battle is over! After all, if these Luxons aren't better than the ones we fought earlier, they won't be alive much longer.'' |
||
| + | </div> |
||
| + | |||
| + | ===Intermediate cutscene=== |
||
| + | |||
| + | <div class="dialogue"> |
||
| + | Kurzick Soldier: ''Here they come. More Luxons.'' |
||
| + | |||
| + | Kurzick Soldier: ''Haven't they had enough?'' |
||
| + | |||
| + | Baron Mirek Vasburg: ''Hold! They're waving the white flag.'' |
||
| + | |||
| + | Luxon General: ''The Afflicted! They've returned.'' |
||
| + | <br /> ''Nobody gets out of here alive unless we work together.'' |
||
| + | |||
| + | <party leader>: ''Baron Vasburg, he makes a good point."'' |
||
| + | <br /> ''The Luxons are no longer the greatest threat to the Forever Trees.'' |
||
| + | <br /> ''It couldn't hurt to have a few extra blades to help turn back the Afflicted.'' |
||
| + | |||
| + | Baron Mirek Vasburg: ''Until further notice, the Luxons are our allies.'' |
||
| + | <br /> ''You stand with us now.'' |
||
| + | <br /> ''If anyone has a problem with this, speak it now or forever hold your peace.'' |
||
| + | <br /> ''Good. Now comes the hard part.'' |
||
| + | </div> |
||
| + | |||
| + | ===Ending cutscene=== |
||
| + | |||
| + | <div class="dialogue"> |
||
| + | Baron Mirek Vasburg: ''Look at this mess.'' |
||
| + | |||
| + | <party leader>: ''So, are you ready to believe now?'' |
||
| + | |||
| + | Baron Mirek Vasburg: ''Believe what?'' |
||
| + | |||
| + | Brother Mhenlo: ''That Shiro has returned.'' |
||
| + | |||
| + | Baron Mirek Vasburg: ''It's hard to argue with the evidence littered here at our feet.'' |
||
| + | |||
| + | <party leader>: ''Then it's settled?'' |
||
| + | <br /> ''You'll help us gather the Kurzicks together to fight Shiro?'' |
||
| + | |||
| + | Baron Mirek Vasburg: ''Yes. We are with you.'' |
||
| + | |||
| + | <party leader>: ''Even if that means fighting alongside the Luxons?'' |
||
| + | |||
| + | Baron Mirek Vasburg: ''Until Shiro has been destroyed, we will look upon the Luxons as our allies.'' |
||
| + | |||
| + | Brother Mhenlo: ''Well then. I think our work here is done.'' |
||
| + | <br /> ''Let us go find Master Togo.'' |
||
| + | |||
| + | Luxon Guard Captain: ''If you're looking for Master Togo, you'll find him with our champion, Argo, in the Harvest Temple.'' |
||
| + | |||
| + | Brother Mhenlo: ''Then we must go to the Harvest Temple.'' |
||
| + | </div> |
||
==Follow-up== |
==Follow-up== |
||
| − | * |
+ | *Upon completion of the mission players will find themselves in: [[Vasburg Armory]] |
| − | * |
+ | *To continue the storyline, take on the following [[Primary Quest]]: [[Into the Whirlpool]] |
| + | |||
| ⚫ | |||
| ⚫ | |||
{{C2MissionNavBox}} |
{{C2MissionNavBox}} |
||
Latest revision as of 03:54, 3 March 2010
Eternal Grove Mission map

This article has an associated Zaishen Challenge Quest.
This is a mission entry. For information on the location The Eternal Grove, see The Eternal Grove (location). For information on the explorable area The Eternal Grove, see The Eternal Grove (explorable).
Objectives
- Protect the Forever Trees by keeping the Tree Singers alive.
- Defeat the Afflicted forces. You have 12 groups remaining.
Rewards
Reward Tree Singers remaining XP Gold Skill Points Kurzick faction1 points Standard 1..5 1,000 100 1 1,000 Expert's 6..11 1,500 150 1 1,000 Master's 12 2,000 200 1 1,000 Hard mode Standard 1..5 1,000 200 1 1,000 Expert's 6..11 2,000 300 1 1,000 Master's 12 3,000 500 1 1,000
- 1 You can only earn the faction reward the first time you complete the mission at a certain level in either mode, you will not earn faction for completing it in the other mode.
Walkthrough
Primary
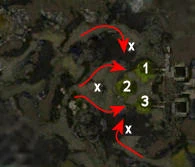
There is an additional health display on the top left corner of your screen, which shows the health status of the three Forever Trees. The trees are located at the points 1, 2, and 3 on the map. There are four Tree Singers grouped around each of these trees, each of which accounts for one quarter of the tree's hit points. When the singers are damaged, the health bar of their tree will degrade, and if a tree singer dies his tree's health bar will not regenerate back up to 100%. When all four singers of one tree are dead, so is the tree. Note that this does not result in a failure of this mission! Success only requires one tree singer (out of 12) to survive. While in the area near the trees, you will get the Aura of the Grove environmental effect, which boosts your running speed.
Each tree has an associated Juggernaut in the mission. Each juggernaut will continuously resurrect near the north tree as long as its forever tree stays alive. In addition to providing the Aura of the Juggernaut, which boosts your energy regeneration, the juggernauts make great tanks and do good damage as well. You can talk to a juggernaut to make it follow you, and talk to it again to make it stop.
Luxon attack
There are two types of Luxon groups. One consists of pairs of Luxon Warriors, Elementalists, and Rangers. These will rush into the grove to attack tree singers. They must go through one of the two gates, so it helps to guard both gates and intercept them there.
The other type of Luxon group consists of a Siege Turtle and two or three rangers. These will go to a hill (marked X on the map) overlooking the grove and stay there. The siege turtle will bombard the corresponding tree, and kill tree singers if ignored. Siege turtles may attack your group instead if you get close. The rangers that accompany the siege turtles will not attack the grove, but will only attack you if you come near.
The siege turtle groups come, in order, from the west, south, north, south, north, and west. The other pairs of Luxons come from all three directions, and sometimes take circuitous routes on their way to the grove.
It helps to go far west of the grove to kill a siege turtle and several Luxons at the very start of the mission. After this, hang back in the grove and kill any Luxon raiders that come, leaving only to kill siege turtles. If you can split your party (e.g., with heroes), it can help to have a couple characters guard one gate while the rest of the party leaves to kill a siege turtle in the other direction. The rest of the party can readily intercept any Luxons heading for the other gate before they get there.
Once all siege turtles that come from the west and their accompanying Luxons are dead, there will be a cut scene. It is not necessary to kill the rangers that accompany the siege turtles that come from the north or south. Indeed, most such rangers that are left alive will become your allies at the cut scene, so it can be beneficial to leave them.
Afflicted attack
After the cut scene, your defenses will be reinforced by two Luxon warriors and two pet crabs at each gate. Mhenlo will go to the north gate to heal. Danika will stay back initially, but often step up to heal. Most Luxon rangers left alive at the cut scene will become allies, and will run back and forth between the hill they were at and the gate on that side. If not all such rangers become allies, those that do will usually kill those that don't.
Twelve groups of afflicted will assault the grove, split into five distinguishable waves. Unlike the Luxons, the afflicted have no means of bombardment, so you can guard the two gates and wait for them to reach you there. The waves are timed, and one wave can come before all mobs in the previous wave are dead. Indeed, the second wave will usually arrive before the first is completely cleared.
The first wave has mobs that attack both gates, but more attack the southern gate. The second wave is similar, and includes the warrior boss The Afflicted Maaka at the south gate. The third wave balances the mobs more evenly between the two gates. In the last two waves, most of the mobs attack the north gate, with only two or three attacking the south gate. The last wave also brings two bosses to attack the north gate, The Afflicted Senku and The Afflicted Xenxo. When all afflicted are dead, the mission is completed.
The second part of the mission is harder than the first. As it is a point defense mission, standard area defense tactics such as traps or a minion master can be useful. Spirit range is long enough that a spirit dropped in the middle of the grove can have its effect throughout the grove, affecting combat at both gates simultaneously. Ritualist spirits such as Recuperation and Life will not merely heal party members at both gates at once, but your Luxon allies, Juggernauts, Mhenlo, and Danika, as well.
Note that if you only care about mission completion and not master's reward, you only have to keep one tree singer alive. If having trouble with the mission, you could camp out in one spot and fight mobs there. The north tree is probably the most easily defensible, as it contains Mhenlo and the juggernaut respawn point.
Master's reward
To get master's reward if grouped with only henchmen here is unusually difficult. You can try flagging henchmen off to one area while you guard another, and using juggernauts to accompany you, providing a more even group split. It is possible to do either portion of the mission without losing any tree singers even with only henchmen, but you'll most likely need either heroes or other players in order to effectively split your group and get master's reward. Getting master's reward with heroes and henchmen is much more doable, so the remainder of this section will assume the presence of heroes or players who can move independently of the rest of the group.
For the group setup, it helps to have a ritualist with Recuperation, Life, and some other healing spells. It also helps to have a minion master who can keep some minions up even with corpses only intermittently available. Spells such as Animate Flesh Golem, Animate Bone Minions, Animate Shambling Horror, and Jagged Bones can effectively provide multiple minions off of one corpse making them more effective than other minion spells. The minions are going to have to take some hits and die, so it is better to bring Death Nova for a minion bomber build than to try to heal them. The other six party members should comprise a reasonably well-balanced group of six.
The entire party should initially head west of the grove to kill the first siege turtle and the various Luxons near it. After that, come back to the grove and leave two party members (one of which is a healer) standing in the north gate to kill any Luxons that attack from that side. The rest of the party can guard the south gate, then head out to kill the south siege turtle when it comes. After that, switch the two party members at the north gate to the south gate while the rest of the party heads to the north gate. Kill the north siege turtle when it comes. Repeat this shuffling to kill the next two siege turtles, and then the six party members at the north gate can head over to kill the siege turtle party coming from the west, triggering the cut scene.
After the cut scene, send all three juggernauts and the minion master to the north gate, the ritualist to the center of the grove, and the rest of the party to the south gate. If a juggernaut dies, then move it back to the north gate between waves. The ritualist should cast recuperation and life as often as possible to heal, and various other healing spells to heal party members or allies on either side as appropriate.
The ritualist should not set up any attacking spirits in the center of the grove. Mobs prefer to attack things that are attacking them, so this can make them run to the center of the grove to kill a spirit. Mobs also prefer nearby targets over distant ones, so after killing an attacking spirit, they sometimes move on to attack tree singers. A hero ritualist should not bring any attacking spirits for this reason. A player ritualist can set up attacking spirits by the gates, but not in the center. A player ritualist can even set up the same attacking spirit by each gate and have two copies of it up and fighting at the same time.
Depending on the course of the fighting, a character from the south gate may need to go help at the north gate once the south gate is reasonably secure. Once the mobs to the south are cleared in the second and third waves, all characters defending the south gate should help clear the north gate. This setup should get you through the first three waves. When you get a message saying that 3 groups remain, it's time to change tactics.
After that, send two or three characters (including a healer) to the south gate while the rest of the party defends the north gate. The characters at the south gate should clear the couple of afflicted that come, and then head over to help at the north gate. Once the fourth wave is clear, the two or three characters can return to the south gate to kill the couple of afflicted that come there in the fifth wave, before again returning to the north gate to fight.
Hard mode
To complete this mission with only henchmen and heroes is unusually difficult. As such, let us assume that your party consists entirely of players and heroes. Two players and six heroes is sufficient.
As usual in hard mode, not only are enemies greatly strengthened, but so are your NPC allies, which is vital, as you have a lot of them. AI prefers to attack weaker targets over stronger targets, so mobs will usually prefer to attack members of your party rather than your NPC allies. In particular, the Afflicted will usually leave Tree Singers alone until all other party members and most allies nearby are dead. This helps greatly in getting master's reward, to the degree that if you can finish the mission at all, you probably won't lose any tree singers after the cut scene.
The party should include a ritualist with Recuperation and Life. The ritualist can be flagged in the middle of the grove when fighting afflicted and these spirits will heal both your party members and all NPC allies on both sides at once.
The party should also include at least one minion master, and possibly two. Use a minion bomber build, as trying to keep minions alive is pretty futile. Instead, raise minions, Death Nova them, and let them die. Skills such as Animate Flesh Golem, Animate Shambling Horror, and Animate Bone Minions that can effectively raise multiple minions from a single corpse work especially well. Avoid Blood of the Master, as the health sacrifice from that is likely to get your minion master killed. Heroes are probably better than players at this, as players have difficulty finding minions to death nova them amid the mayhem.
Assume that virtually all resurrecting will be done in combat--and that you will have to do some resurrecting in combat. Rebirth is useless, and skills that revive a character with little health may not be terribly useful.
The mobs that come do so at set times, and do not wait until the previous mobs are dead. This can be particularly deadly if the third or fourth wave of afflicted comes before the previous is cleared. Afflicted tend to group up a lot, and as such, skills that damage several mobs at once without making mobs scatter out of the way are highly useful. Area hexes, conditions, and wards that dampen mob damage are also quite useful.
At the start, the whole party should head west to kill the 10 or so Luxons that come. Speed matters here, as if they aren't killed fast enough, mobs can slip into the grove while you're away and kill undefended tree singers. In particular, delays in loading the mission may force a restart.
After that, split your party into two reasonably balanced groups of four, and send one to each gate. Each group should kill any Luxons that come to that gate. If the gate is not under attack and a Siege Turtle comes on a group's side, the group can go out and kill the siege turtle and its accompanying Luxon Rangers.
Two siege turtles will come to each side, and eventually, another siege turtle will come from the west. Clearing that last siege turtle group will trigger the cut scene. Do not do this until all other Luxons are dead. Also reposition juggernauts such that two are near the north gate and one is near the south gate, for use after the cut scene.
Any Luxons that are still alive at the cut scene are likely to turn allied, though siege turtles are less likely than other Luxons. This is actually a problem for you, as the Luxons will wander back and forth from the grove to the hill where they were stationed with a siege turtle, and probably be attacked by afflicted far outside of the grove. If this happens, it will delay the first wave of afflicted reaching the grove, but the afflicted will win, and arrive at the same time as the second wave, which can overwhelm your party. Furthermore, NPC allies that spawn inside the grove may chase outside of it to help the Luxons fighting well outside of it, so you end up with fewer NPC allies rather than more once the fighting starts.
After the cut scene, flag the ritualist in the center of the grove, to heal all allies on both sides from there. Flag a minion master at the north gate, near where Mhenlo stands, while the rest of the party defends the south gate. The rest of the party should spread out a bit, to not all get hit by Afflicted Soul Explosions at once.
Nearly everyone should stay behind the gates at nearly all times while fighting afflicted. Until a wave is nearly cleared, assume that if you take so much as a single step beyond the gate, you'll die instantly unless you have significantly over 100 armor. That's not quite true, but it is pretty close. Only Juggernauts and very heavily armored players or heroes should go out beyond the gates, and even those should beware of outrunning their healing. If any mobs get behind you, kill the ones behind you, rather than moving up to kill casters. Juggernauts will take very heavy damage, and are the best tanks you have, so it can help to heal them.
The first wave comes and won't be entirely cleared before the second arrives. When the second wave arrives, kill The Afflicted Maaka as quickly as possible, and keep it blinded or weakened until it is dead. Once the boss is dead, it may sometimes be necessary for one or two characters to help out at the north gate.
After the second wave is clear (7 groups remaining), reposition juggernauts as before. The third wave distributes mobs more evenly than the second, so it can help to move a party member to the north gate for reinforcements. When the third wave is clear (3 groups remaining), reposition juggernauts as before again if any have died. If you can clear the third wave significantly before the fourth wave arrives, you'll almost certainly win.
The last two waves send most mobs to the north gate, and only 2 or 3 to the south gate. A couple party members at the south gate with healing from the ritualist in the center can hold that gate, while the rest of the party defends the north gate. Once the south gate is clear, the characters there can help at the north gate.
Creatures
Allies
 20 Pet - Elder Reef Lurker
- 20 Baron Mirek Vasburg
- 28 Elite Juggernaut Berta
- 28 Elite Juggernaut Klaus
- 28 Elite Juggernaut Lieber
- 20 Luxon Ranger
- 20 Luxon Soldier
- 20 Brother Mhenlo
- 20 Danika
- 20 Ex-Redemptor Berta
- 20 Klaus
- 20 Leiber
- 20 Tree Singer
Foes
Afflicted
- 20 (26) Afflicted Warrior
- 20 (26) Afflicted Ranger
- 20 (26) Afflicted Monk
- 20 (26) Afflicted Mesmer
- 20 (26) Afflicted Elementalist
- 20 (26) Afflicted Assassin
Luxons
- 20 (26) Luxon Warrior
- 20 (26) Luxon Ranger
- 20 (26) Luxon Elementalist
Turtles
- 24 Siege Turtle
Bosses - elite skill captures
- 28 (30) The Afflicted Maaka - Enraged Smash
- 28 (30) The Afflicted Senku - Shadow Form
- 28 (30) The Afflicted Xenxo - Weapon of Quickening
Dialogues
Inside the mission
Tree Singer: Today, three brave Kurzicks have volunteered to become new, more powerful juggernauts. We honor them for their sacrifice. Let the Awakening begin!
Baron Mirek Vasburg: You must remain vigilant. There have been many signs and omens ... it is certain that the Luxons will attempt to kill the Tree Singers and interrupt the ceremony.
Danika: Until the ceremony is complete, fear not for my life, or the baron's ... concern yourself only with the lives of the Tree Singers. Without them, all is lost.
Baron: Ha! These Luxon brutes have no chance against us.
Danika: I've seen my friends here handle enemies far more frightening than these ragtag savages.
Tree Singer: You have done well so far, but do not grow complacent. We sense there is much danger lurking in the forest.
Danika: Grow complacent!? There's not much danger of that, is there? Not with all these bloodthirsty Luxons everywhere.
Baron: Countess! You should show more respect. Our apologies, honored Tree Singers.
Danika: Why aren't we done yet? Can't you sing any faster? Honestly, if you doubled the tempo, wouldn't the ceremony finish faster?
Baron: I expect it is not so simple, Countess. Though perhaps they would finish sooner if there were fewer interruptions.
Danika: Yes, I know. That's why I've been fighting for the last hour ... so the adagio chorus book there doesn't get interrupted.
Brother Mhenlo: I am pleased to see Luxons and Kurzicks fighting side by side. Together, you can defeat this Affliction. I believe you ...
Danika: Let's talk peace after the battle is over! After all, if these Luxons aren't better than the ones we fought earlier, they won't be alive much longer.
Intermediate cutscene
Kurzick Soldier: Here they come. More Luxons.
Kurzick Soldier: Haven't they had enough?
Baron Mirek Vasburg: Hold! They're waving the white flag.
Luxon General: The Afflicted! They've returned.
Nobody gets out of here alive unless we work together.
<party leader>: Baron Vasburg, he makes a good point."
The Luxons are no longer the greatest threat to the Forever Trees.
It couldn't hurt to have a few extra blades to help turn back the Afflicted.
Baron Mirek Vasburg: Until further notice, the Luxons are our allies.
You stand with us now.
If anyone has a problem with this, speak it now or forever hold your peace.
Good. Now comes the hard part.
Ending cutscene
Baron Mirek Vasburg: Look at this mess.
<party leader>: So, are you ready to believe now?
Baron Mirek Vasburg: Believe what?
Brother Mhenlo: That Shiro has returned.
Baron Mirek Vasburg: It's hard to argue with the evidence littered here at our feet.
<party leader>: Then it's settled?
You'll help us gather the Kurzicks together to fight Shiro?
Baron Mirek Vasburg: Yes. We are with you.
<party leader>: Even if that means fighting alongside the Luxons?
Baron Mirek Vasburg: Until Shiro has been destroyed, we will look upon the Luxons as our allies.
Brother Mhenlo: Well then. I think our work here is done.
Let us go find Master Togo.
Luxon Guard Captain: If you're looking for Master Togo, you'll find him with our champion, Argo, in the Harvest Temple.
Brother Mhenlo: Then we must go to the Harvest Temple.
Follow-up
- Upon completion of the mission players will find themselves in: Vasburg Armory
- To continue the storyline, take on the following Primary Quest: Into the Whirlpool
Note
- This mission is the Kurzick equivalent to the Gyala Hatchery mission for the Luxons.
| Factions Campaign Missions |
|---|
 |