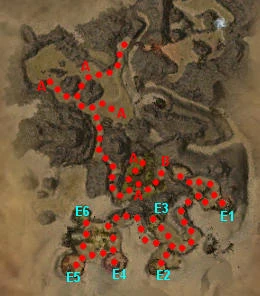
Thirsty River Mission map
This is a mission entry. For information on the location Thirsty River, see Thirsty River (location).
Objectives
Annihilate the opposing enemy teams.
- Defeat Goss Aleessh's team.
- Defeat Issah Sshay's team.
- Defeat Hessper Sasso's team.
- Defeat Josso Essher's team.
- Defeat Lyssha Suss's team. (Note: The boss in this team is Custodian Phebus)
- Defeat Kesskah Shissh's team. (Note: The boss in this team is Custodian Hulgar)
- Bonus Cleanse the area before King Khimaar's spirit is driven away.
Walkthrough
Primary
The idea of this mission is to defeat the aforementioned six teams in three arenas. In the first arena you will meet one team; in the second arena you face two teams; finally you have to fight three teams. Each opposing team is varied in number and formation, but will have one boss (who the team is named after) and one priest who resurrects fallen team members.
For starters, it is recommended that you kill all 5 Sand Giants on your way to the opposing teams, which will give you a 10% morale boost (2% from each giant). (At the very least, kill 4 to get 8% so the first boss will bring you to 10%.) The Sand Giants are at the locations marked with A on the map.
Continue on the obvious path forward, mostly south towards a passage over a wrecked ship. A few Rockshot Devourers should be in your way. Continue along the path over the ship and you'll fight another set of devourers, and soon make your way into an oasis of sorts.
Talk to the Ghostly Hero to begin facing the first boss team, and a timer will appear. The timer is not counting against you: it is actually an excellent tool to time your attacks.
The first team has three groups. Focus on one group at a time and take out the Forgotten Illusionists first. Use the timer in order to plan your attack on the enemy priest. At each multiple of two minutes (2:00, 4:00, etc.), the enemy priest, if still alive, will resurrect all his fallen teammates. You need to make sure you kill the enemy priest before the timer hits a multiple of two minutes. Then the team is defeated (the popup says 'annihilated') once you have killed the last of its members. One of the issues with the priest resurrecting these fallen enemies is that they spawn in his shrine, making it harder to kill him.
Tip: The usual scenario is to take out one or two groups blocking your way, then have at least three to four members—if not the entire team—break through the enemy and kill the priest. Then resume taking on the remainder of the enemy team. A good rule of thumb is to begin the concerted attack on the priest at around 1:30 (and for later teams, 30 seconds before a two-minute interval, i.e., 3:30, 5:30, etc.). Sometimes hero/hench will focus on their current target when you try to bring down the priest. Setting a flag near the priest helps grab their attention.
Tip: If you are worried about being unable to finish off a priest before he revives his fallen comrades (timer nearing a multiple of 2 minutes), then retreat. The revived patrols will move out and you can engage them again. Running in and desperately trying to throw everything at the priest, only to be caught in the respawn, is a sure way to fail. Regrouping and redoing a team is easier than restarting a mission.
The fight in the next arena is against two teams, so you should focus on one team at a time. The Ghostly Hero will open the door to the arena when he nears it. When the door is opened and you enter the arena, enemies will approach you from both sides. Do not fight both teams at the same time; instead, stick to the left wall and engage the team on the left (southeast, labeled E2 on the map). Although it may not look like it, you can avoid aggro-ing the team on the right simply by hugging the left wall. You may want to wait until 2:00 before actually initiating the fight, though if your team is ready and you have a good target caller, this is not usually necessary. As usual, spell casters should be the first priority, in this case Forgotten Arcanists and Forgotten Cursebearers. It is noteworthy that the former cast Kinetic Armor and Ether Renewal, making them highly resilient, while the latter cast Order of the Vampire and Consume Corpse, making them highly annoying.
After finishing the first of the two teams, wait until the timer is near a two-minute interval (4:00, 6:00, etc.) before proceeding to the next team.
Tip: When moving on to a second or third team in a single arena (i.e., while the timer is still going), judge your team's ability to take down an enemy quickly. You may be able to 'cheat' a bit and engage the next team at anywhere from 10 to 20 seconds before an even two-minute interval, as long as you do not drop the first enemy before the two-minute interval is reached. Note that casters will fall quicker than warrior or ranger types.
Continue on to the last arena against three teams, again focusing on and taking out one team at a time. As before, kill the priests before an even two-minute interval. The team on the right starts with a defensive 'gap' that allows your team to rush in and kill its priest at the outset of the engagement. Simply follow the right wall and catch the priest alone with the boss in the alcove (labeled E6 on the map). Be sure to watch your aggro circle so as not to trigger a back attack as the patrols pass near the opening of the alcove. Once the team at E6 is dead, proceed counter-clockwise to E5, and then to E4.
The boss in one of the final three teams (almost always the leftmost one at E4) is a monk. He is an exceptionally good healer. It is best to engage his team while they are outside his healing range, then attack the boss and the priest alone. The priest needs to die first, since trying to kill the monk boss first is likely to fail, as it will probably drag the battle beyond the next multiple of 2:00. While it is possible to kill the priest over the boss's healing by focusing fire on the priest, it is easier to have one or two party members distract the boss while the others focus on the priest. If there is anyone with interruption skills equipped (like Cry of Frustration or Distracting Blow), they should try to disrupt the boss as much as possible.
General Tips: Don't rush. Unless specifically going for the bonus, the total amount of time spent fighting is of little consequence, other than the 2:00 minute interval resurrection. Aggroing too many enemies at once is a very easy way to get defeated - especially as party size is limited to 6. Wait for patrols to spread out and take them on one-by-one. Most importantly, remember that the Ghostly Hero often fails to retreat with the party and has a tendency to stand in AoE spells, and if he is defeated, it causes a mission failure. He is not a terribly strong fighter, so the team shouldn't lose much by ordering him to stay back. Once an arena is cleared, he will automatically unlock the door to the next one, regardless of his position.
Bonus
Note: The King now gets attacked 10-20 seconds after you go in and will be killed in less than 1 minute if you do not rush to save him. The bonus objective is to clear all the enemy teams before King Khimaar leaves, which happens after fighting for ten minutes in the third arena. You will know that the bonus is still achievable if King Khimaar is standing in the central area of the third arena. If he leaves before you finish, then you've failed the bonus. The bonus is also failed if King Khimaar dies at any time. If you have any human Monks on the team, make sure they heal the king if he happens to fall under attack. The best way to kill off the teams to protect the king is from right to left (Warrior Boss, then Ranger, then Monk). When the door opens run in between the Warrior Boss' team and the king to protect him.
After you defeat all the teams (in any order), you will receive the bonus 1000 XP, right before the mission ending cut scene.
Creatures
NPCs
- Ghost
 /
/ 20 Ghostly Hero
- 24 King Khimaar
Monsters
Bosses (elite skill captures)
Dialogues
Briefing from the Ghostly Hero.
Cutscene 1
| Ghostly Hero: | "Before you can Ascend and enter the Rift, you must first be cleansed. Lead me safely to the Rune Circle at the end of this test, and I will cast the ritual to burn away your earthly imperfections. Your first challenge will be to defeat a single legion of Forgotten. Your opponents will be resurrected every two minutes unless you destroy the priest who tends their shrine. Once you have defeated your foes, lead me to the door, and I will usher you into the next challenge. The challenges will grow harder as you progress. If you defeat all of the foes along your path, we will claim the Rune Circle, and you will be cleansed. Prove yourselves worthy, and you will be one step closer to gaining entrance to the Rift." |
| Continue mission | |
|---|---|
| Ghostly Hero: | "Defeat the enemy priests to stop the other team from resurrecting. Once the enemy team is defeated, we will move on. Quickly! Through this door. We face much harder challenges ahead. This last battle will test us all. May Balthazar grant us strength and courage." |
| Bonus objective: | |
| King Khimaar: | "The Forgotten defile the resting place of my people. Have we not suffered enough...? I will never fully rest until the memory of my people is no longer taunted by these filthy creatures...My spirits have been weakened by such blasphemy. I must see the Forgotten removed from this place before I slip away...In a matter of moments, I shall leave this world for good, never to see my people's resting place cleansed..." |
Cutscene 2
| Ghostly Hero: | "Under the scrutiny of the gods, your souls will be pure, your bodies cleansed. You are ready for the next phase." |
Follow-up
- Upon completion of the mission players will find themselves in: Augury Rock.
- If you completed Dunes of Despair and Elona Reach you now must defeat the Doppelganger.
Notes
- Unlike most Enchanted, the Forgotten Avengers, Forgotten Champions, Custodian Hulgar and Custodian Phebus are fleshy creatures that leave corpses.
