| 這篇文章仍有需要翻譯的地方。您可以幫忙編輯。 如果是"模板:紅色的英文名稱",請直接點入新的一頁,把中文名稱打進去,並用兩層的方框[[ ]]給它框起來。 |
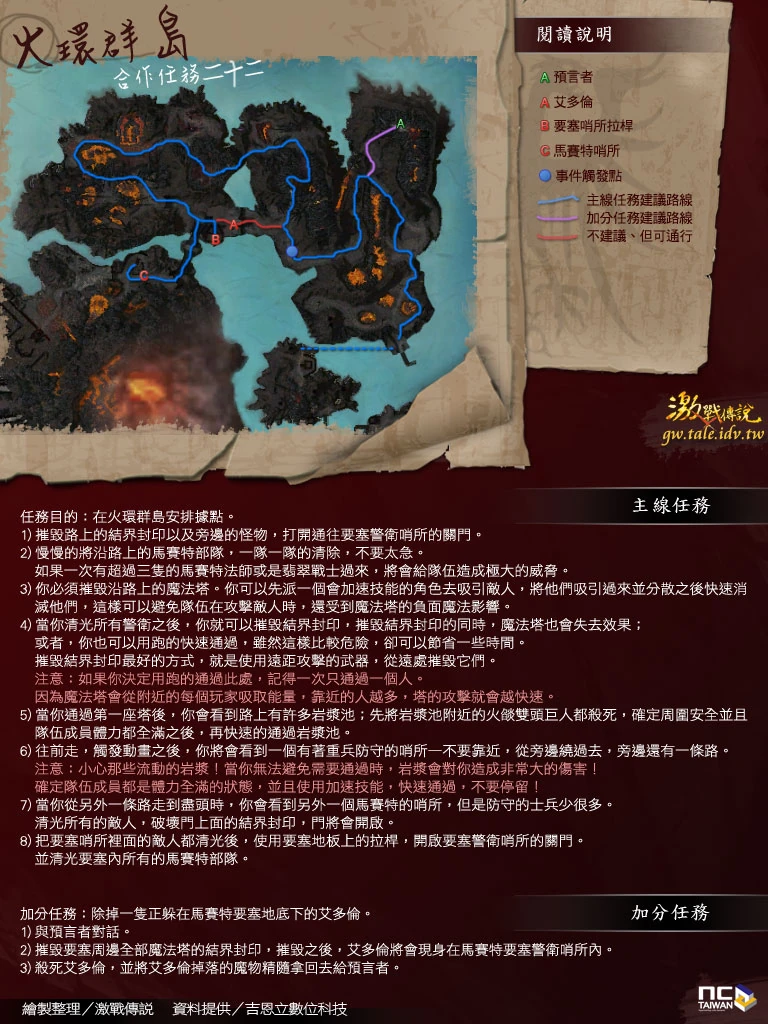
火環群島任務攻略
Description[]
The large volcano at the center of this ring is where the gods reportedly dropped the legendery 血石s before leaving ![]() for good. Of the volcanic island that surround this one, many are still active. Ships that pass by the Ring report hearing the tell-tale hiss of scalding hot lava hitting the ocean, instantly vaporizing the saltwater into steam.
for good. Of the volcanic island that surround this one, many are still active. Ships that pass by the Ring report hearing the tell-tale hiss of scalding hot lava hitting the ocean, instantly vaporizing the saltwater into steam.
NPCs[]
- 模板:Fogard Axemighty
- 模板:Gnik'ekaj (雜貨商人)
- 桑萊專員
- Henchmen in 火環群島 are Level 20
Mission Objectives[]
Get into 地獄隘口, the entrance to the volcano where the 模板:Door of Komalie is located. Unlocking the Door of Komalie will supposedly yield the best tool for defeating the 馬賽特.
Walkthrough[]
模板:Brechnar Ironhammer will throw himself at a large group of Mursaat spellcasters as you enter this mission (point A). Do not try to save him: he is supposed to die drawing away the Mursaat; trying to save him may wipe out your party. Let him go, and veer right. Once you've gone as far right as possible, you should see two groups of three Mursaat spellcasters. A group of 翡翠戰士s and a group of 翡翠弓手s will slowly circle around the lava pit to attack you from behind; you can either wait to take them out, or go after the Mursaat spellcasters first. Either way, when you are done, follow the purple path on the map until you come to point B.
This may be your first time facing a 模板:Mursaat Tower powered by an 結界封印, and they are bad news for your party. While the seal remains, the tower is activated by your proximity, and will initiate 模板:Mursaat Tower (Skill) that quickly drains away your energy. Additionally, the seal will cast 風系魔法 spells. So, not only will you not have the energy to hit the seal with spells and skills, but you will not have the energy to heal your teammates as they get clobbered with 連鎖閃電 and 心靈震暴. When attacking a seal, you should first try to lure away its defenders to a distance where your healers and spellcasters can operate outside the tower's light radius. The seal itself is much easier to destroy once its defenders are dead.
Tip: It may be a good idea for your 戰士s to bring a few 怒氣-based attacks, and not just 能量-based ones.
Tip: 擊倒s do work on the seals. The round seal will collapse when it is successfully knocked down.
Keep going on the purple path. You will engage various groups of 火焰雙頭巨人s and pass another seal. At point C, 基卜倫元老 will appear and note (quite shrewdly) that the main entrance is too tough to tackle head-on. He advises you to take the back route into the Mursaat fortress to try and get into Abaddon's mouth. It is arguably as difficult, if not more so, to take the back route, but either an assault on the front gate or fighting your way to the back will satisfy your mission objectives. If you're taking the back route, just follow the purple path.
Note: It is worth noting that the back route in general is far more difficult than the front route. It includes fighting the deadly and very resilient 模板:Lava Spitters, as well as a ridiculous {{Wikipedia:Mario|Super-Mario}}-like game, where the party has to narrowly traverse flaming pits of fire, only to face 模板:Nuke 模板:Lava Imps!
You will engage various groups of wildlife on the Islands (this part of the mission may not be plotted accurately on the map.) Eventually, you will approach the Mursaat encampment from the west. Take out the groups of Jade Armors, Jade Bows and Mursaat carefully. You will be able to get to a bridge, but its end will be locked. The lever to open it is in the adjacent room (point D), guarded by a Mursaat boss. Luckily, you should be able to sneak into the room without triggering the host of nearby enemies guarding the front gate.
Pull the lever, and cross the bridge, which has a lone boss halfway across. You will finally face a group of Mursaat spellcasters and then a Mursaat boss alone in the central chamber. Defeat him to win the mission.
Bonus[]
To get the bonus, you must go to point 1 after destroying the first Ether Seal. There you will find some Ettins (with a boss) and a 預言者. Speak to the Seer and she will mention an 艾多倫 (the squid-like monster that you killed to 灌注魔力 your armor in the 莫拉登礦山 mission) and ask you to bring her (or him or it) the essence of that monster.
The Eidolon is located at point 3. You will have to destroy two Ether Seals in the courtyard, which will cause the Eidolon to spawn and engage you.
Note: Parties that have completed this bonus have entered the fortress by breaking through the main gate before taking down the two seals in the courtyard. When you do that, the Eidolon appears. If you come from the back road (purple path), and breaking the two seals does not work for you, try engaging the main gate.
Tip: Assaulting the main gate is easy with careful luring and timing of patrols. One trick is to have a party member with a 長弓 shoot at a seal: this will cause the patrol guarding it to rush out and meet you. This helps you avoid any surprises from patrols. Also, it is possible to destroy only one of the seals so that the gate does not open, then place an elementist to "nuke" the enemies before entering.
After killing the beast, take its 模板:Spectral Essence back to the Seer. It is risky to simply send a runner as a Tower appears when one returns. You will get the bonus, as well as a chance to infuse any part of your armor that is not already infused.
Elite Skill Capture[]
Known elite skills in this area:
- 驕傲的凱恩 : 毀滅之鎚
- 巨鎚坡克 : 背擊
- 憂慮的凱恩 : 誓言之箭
- 火網卡許斯 : 燃燒之箭
- 大力士弗格 : 尖刺陷阱
- 模板:Coventina the Matron : 信仰靈氣
- 疾風各侖 : 迴避之盾
- 爆浪基什 : 非凡魔力
- 劣火邁達 : 雷鳴
- 艾多倫 : 迷霧
- 善良的摩列客 : 能量震盪
- 惡吐皮特 : 頭痛
- 不快的奧德林 : 生命轉移
- 判官沙立克 : 生命轉移
Additional Notes[]
The players will be in 地獄隘口 at the completion of this mission.